How To Draw 3d
Here is the introduction paragraph: Learning to draw in 3D can be a challenging but rewarding experience, allowing artists to create immersive and engaging visuals that seem to jump off the page. To master the art of 3D drawing, it's essential to understand the basics of perspective, proportion, and shading. By grasping these fundamental concepts, artists can create convincing and realistic 3D drawings that capture the viewer's attention. In this article, we'll explore the key techniques for creating stunning 3D artwork, from understanding the basics of 3D drawing to creating depth and dimension, and finally, advanced techniques for realistic 3D drawings. By the end of this article, you'll be equipped with the skills and knowledge to take your 3D drawing skills to the next level. So, let's start by understanding the basics of 3D drawing.
Understanding the Basics of 3D Drawing
Understanding the basics of 3D drawing is a fundamental skill for artists, designers, and architects. To create realistic and engaging 3D models, it's essential to grasp the underlying principles of perspective, proportions, and basic shapes. In this article, we'll delve into the world of 3D drawing and explore the key concepts that will help you get started. We'll begin by learning the fundamentals of perspective, which is the foundation of creating realistic 3D models. We'll also discuss the importance of understanding proportions and measurements, as well as mastering basic shapes and forms. By the end of this article, you'll have a solid understanding of the basics of 3D drawing and be ready to take your skills to the next level. So, let's start by learning the fundamentals of perspective, which is the first step in creating stunning 3D models.
Learning the Fundamentals of Perspective
Learning the fundamentals of perspective is a crucial step in mastering the art of 3D drawing. Perspective is the technique used to create the illusion of depth and distance on a flat surface, making objects appear more realistic and three-dimensional. To start, it's essential to understand the basic principles of perspective, including the concept of vanishing points, horizon lines, and orthogonal lines. Vanishing points are the points on the horizon line where parallel lines appear to converge, creating a sense of depth and distance. The horizon line is an imaginary line that represents the viewer's eye level, and orthogonal lines are lines that are perpendicular to the picture plane. By understanding how to use these elements, artists can create a convincing sense of perspective, drawing the viewer's eye into the scene. One-point perspective, two-point perspective, and three-point perspective are the three main types of perspective, each with its unique characteristics and applications. One-point perspective is used to create symmetrical compositions, while two-point perspective is used to create more dynamic and asymmetrical compositions. Three-point perspective is used to create highly detailed and realistic scenes. By mastering the fundamentals of perspective, artists can create stunning 3D drawings that appear to leap off the page, engaging the viewer and drawing them into the world of the artwork.
Understanding Proportions and Measurements
Understanding proportions and measurements is a crucial aspect of 3D drawing, as it enables artists to create realistic and balanced compositions. Proportions refer to the relationships between the sizes and shapes of different elements within a drawing, while measurements involve the use of units to quantify these relationships. To accurately depict proportions and measurements, artists must develop their observation skills, paying close attention to the way objects relate to one another in terms of size, shape, and placement. This can be achieved by studying the work of other artists, observing the world around them, and practicing drawing from life. By mastering proportions and measurements, artists can create drawings that are not only visually appealing but also convincing and immersive, drawing the viewer into the 3D world they have created. In 3D drawing, proportions and measurements are used to create a sense of depth and distance, with objects in the background appearing smaller and less detailed than those in the foreground. By carefully balancing proportions and measurements, artists can guide the viewer's eye through the composition, creating a sense of movement and energy. Ultimately, understanding proportions and measurements is essential for creating 3D drawings that are engaging, realistic, and visually stunning.
Mastering Basic Shapes and Forms
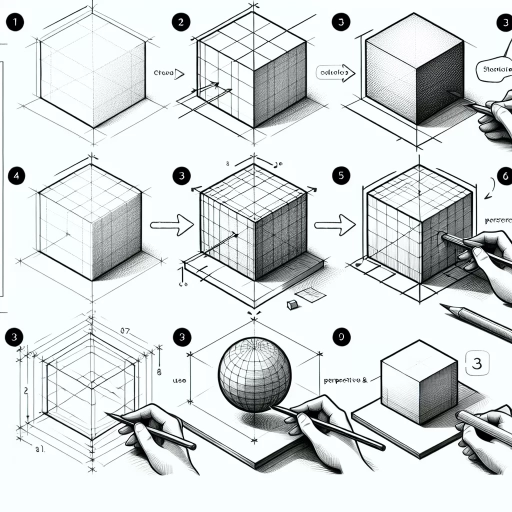
Mastering basic shapes and forms is a fundamental step in learning 3D drawing. It involves understanding and creating the building blocks of three-dimensional objects, which are essential for creating realistic and believable drawings. Basic shapes, such as spheres, cylinders, and cubes, are the foundation of all 3D objects, and being able to accurately draw and manipulate them is crucial for creating complex forms and structures. By mastering basic shapes and forms, artists can develop their spatial reasoning and visual perception skills, allowing them to better understand the relationships between different parts of an object and how they fit together in 3D space. This, in turn, enables them to create more accurate and detailed drawings, and to effectively communicate their ideas and visions to others. Furthermore, mastering basic shapes and forms also allows artists to break down complex objects into simpler components, making it easier to draw and render them. By doing so, artists can focus on the overall form and structure of the object, rather than getting bogged down in details, and can create more confident and proficient drawings. Ultimately, mastering basic shapes and forms is a key skill for any artist looking to improve their 3D drawing skills and take their artwork to the next level.
Creating Depth and Dimension in 3D Drawings
Creating depth and dimension in 3D drawings is an essential skill for artists, designers, and architects to master. To achieve a convincing and immersive visual experience, several techniques can be employed. One of the most effective methods is to use shading and lighting techniques to create areas of light and shadow, which can greatly enhance the sense of volume and depth in a drawing. Additionally, applying atmospheric perspective and texture can also contribute to the illusion of depth, by creating a sense of distance and tactility. Furthermore, creating overlapping and layering effects can add complexity and visual interest to a drawing, drawing the viewer's eye through the composition. By incorporating these techniques, artists can create rich, detailed, and engaging 3D drawings that invite the viewer to explore and interact with the visual space. One of the most fundamental techniques to start with is using shading and lighting techniques to create a sense of volume and depth.
Using Shading and Lighting Techniques
Using shading and lighting techniques is a crucial step in creating depth and dimension in 3D drawings. Shading refers to the process of adding different values of light and dark to a drawing to create the illusion of three-dimensional form. By carefully manipulating shading, artists can create a range of effects, from subtle, nuanced transitions to dramatic, high-contrast shifts. Lighting, on the other hand, involves the strategic placement of light sources to create areas of highlight and shadow, further enhancing the sense of depth and dimensionality. When combined, shading and lighting techniques can be used to create a range of visual effects, from the soft, gentle glow of ambient light to the sharp, defined edges of direct light. By mastering these techniques, artists can add depth, volume, and texture to their 3D drawings, drawing the viewer's eye into the composition and creating a more immersive and engaging visual experience. Effective use of shading and lighting can also be used to create mood and atmosphere, with warm, golden light evoking feelings of comfort and relaxation, while cool, blue light can create a sense of tension and drama. Whether used to create subtle, realistic effects or bold, stylized statements, shading and lighting techniques are essential tools in the creation of compelling and engaging 3D drawings.
Applying Atmospheric Perspective and Texture
Applying atmospheric perspective and texture are two essential techniques for creating depth and dimension in 3D drawings. Atmospheric perspective refers to the way objects appear to fade into the background as they recede into the distance, due to the scattering of light by the atmosphere. To apply atmospheric perspective, artists can use a range of techniques, including fading colors, softening edges, and reducing contrast. For example, a mountain range in the distance might be depicted with softer, cooler colors and less defined edges than a tree in the foreground. Texture, on the other hand, refers to the surface quality or "feel" of an object. Artists can use texture to create a sense of depth and dimension by suggesting the tactile qualities of different materials, such as rough stone, smooth metal, or soft fabric. By combining atmospheric perspective and texture, artists can create highly realistic and engaging 3D drawings that draw the viewer's eye into the scene. For instance, a drawing of a misty forest might use soft, muted colors and gentle texture to create a sense of depth and atmosphere, while a drawing of a rocky landscape might use bold, contrasting colors and rough texture to create a sense of ruggedness and dimension. By mastering these techniques, artists can add depth, dimension, and visual interest to their 3D drawings, and create highly effective and engaging artworks.
Creating Overlapping and Layering Effects
Creating overlapping and layering effects is a crucial technique in creating depth and dimension in 3D drawings. This technique involves placing objects in front of or behind each other to create a sense of depth and distance. To achieve this effect, artists can use a variety of methods, including overlapping shapes, layering lines, and creating atmospheric perspective. Overlapping shapes involves placing one shape in front of another, creating a sense of depth and dimension. For example, if drawing a cityscape, an artist might draw a building in the foreground, overlapping it with a tree or another building in the background. This creates a sense of depth and distance, drawing the viewer's eye into the scene. Layering lines involves creating a series of lines that overlap each other, creating a sense of depth and dimension. For example, if drawing a landscape, an artist might draw a series of lines to suggest the contours of hills and mountains, with each line overlapping the one in front of it. This creates a sense of depth and distance, drawing the viewer's eye into the scene. Atmospheric perspective involves creating a sense of depth and distance by using color and contrast to suggest the atmosphere. For example, if drawing a landscape, an artist might use cool colors in the background to suggest distance, and warm colors in the foreground to suggest closeness. This creates a sense of depth and dimension, drawing the viewer's eye into the scene. By using these techniques, artists can create a sense of depth and dimension in their 3D drawings, drawing the viewer's eye into the scene and creating a sense of realism and immersion.
Advanced Techniques for Realistic 3D Drawings
Creating realistic 3D drawings requires a combination of technical skills and artistic vision. To achieve a high level of realism, artists must employ advanced techniques that go beyond basic drawing skills. Three key techniques that can help artists create highly realistic 3D drawings are using grids and projections for accuracy, mastering curves and contours for realism, and adding details and patterns for texture and interest. By using grids and projections, artists can ensure that their drawings are proportionate and accurately represent the subject's dimensions. Mastering curves and contours allows artists to capture the subtleties of shape and form, while adding details and patterns can add depth and visual interest to the drawing. By combining these techniques, artists can create highly realistic 3D drawings that engage and persuade the viewer. One of the most important techniques for achieving accuracy in 3D drawing is using grids and projections.
Using Grids and Projections for Accuracy
Using grids and projections is a fundamental technique for achieving accuracy in 3D drawings. A grid is a network of lines that intersect to form a matrix of squares or rectangles, providing a framework for measuring and placing objects in a drawing. By overlaying a grid onto a 2D representation of a 3D object, artists can ensure that the proportions and dimensions of the object are accurate. Projections, on the other hand, involve creating multiple views of an object from different angles, allowing artists to visualize and draw the object's shape and structure more accurately. There are several types of projections, including orthographic, perspective, and isometric projections, each with its own strengths and weaknesses. Orthographic projections, for example, provide a 2D representation of an object from multiple angles, while perspective projections create a more realistic representation of an object's depth and distance. Isometric projections, meanwhile, provide a 2D representation of an object from a 120-degree angle, allowing artists to create detailed and accurate drawings of complex objects. By combining grids and projections, artists can create highly accurate and detailed 3D drawings that showcase their subject's shape, structure, and proportions. This technique is particularly useful for artists who want to create realistic and detailed drawings of complex objects, such as machines, buildings, or vehicles. By using grids and projections, artists can ensure that their drawings are accurate, detailed, and visually stunning, making them ideal for a wide range of applications, from technical illustration to fine art.
Mastering Curves and Contours for Realism
Mastering curves and contours is a crucial aspect of creating realistic 3D drawings. To achieve a high level of realism, it's essential to understand how to accurately depict the subtle nuances of curved and contoured surfaces. One technique for mastering curves and contours is to break down complex shapes into simpler, more manageable components. This involves identifying the underlying geometric forms that make up the object, such as spheres, cylinders, and cones, and then using these forms to construct the overall shape. By doing so, you can create a more accurate and detailed representation of the object's curves and contours. Another technique is to use reference images to study the way light interacts with curved and contoured surfaces. By observing how light behaves in different situations, you can gain a deeper understanding of how to accurately depict the subtle play of light and shadow on curved and contoured surfaces. Additionally, practicing different line weights and hatching techniques can help to create a sense of depth and dimensionality in your drawings, making them appear more realistic. By combining these techniques and practicing regularly, you can develop the skills necessary to master curves and contours and take your 3D drawings to the next level.
Adding Details and Patterns for Texture and Interest
Adding details and patterns is a crucial step in creating realistic 3D drawings. This technique helps to add texture and interest to your artwork, making it more engaging and visually appealing. To add details and patterns, start by identifying the areas of your drawing that need more texture and interest. This could be the rough bark of a tree, the intricate patterns on a leaf, or the detailed architecture of a building. Once you've identified these areas, use a range of techniques to add details and patterns. For example, you can use hatching and cross-hatching to create texture and shading, or use stippling to create detailed patterns. You can also use a range of tools, such as pens, pencils, and markers, to add different textures and effects. Additionally, consider using reference images to get a better understanding of the details and patterns you want to add. By adding details and patterns to your 3D drawing, you can create a more realistic and engaging artwork that draws the viewer in. This technique can also help to create a sense of depth and dimensionality, making your drawing feel more lifelike. Overall, adding details and patterns is an essential technique for creating realistic 3D drawings, and with practice and patience, you can master this skill and take your artwork to the next level.