How To Draw Yoshi
Yoshi, the lovable dinosaur from the Super Mario Bros. series, has captured the hearts of gamers and artists alike with his adorable appearance and charming personality. For those looking to bring this beloved character to life on paper, drawing Yoshi can be a fun and rewarding experience. To get started, it's essential to understand the basics of Yoshi's form and structure, including his body shape, proportions, and key features. Mastering his facial expressions and details, such as his big eyes and toothy grin, will also help to capture his playful and endearing personality. Finally, adding color and movement to your drawing will bring Yoshi to life and make him look like he's ready to jump off the page. In this article, we'll explore these key elements of drawing Yoshi, starting with the foundation of his basic form and structure.
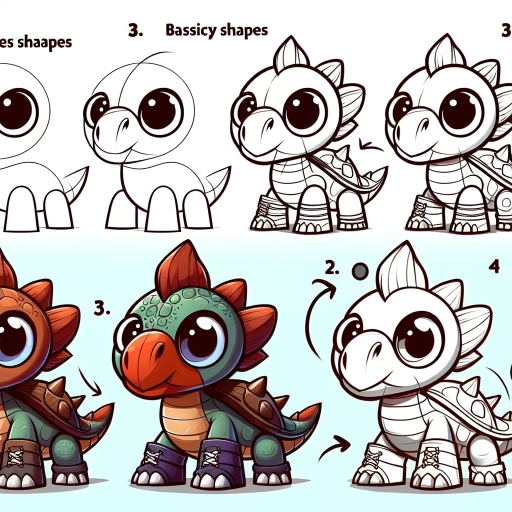
Understanding Yoshi's Basic Form and Structure
Understanding Yoshi's basic form and structure is crucial for creating an accurate and visually appealing representation of this beloved character. To achieve this, it's essential to break down Yoshi's body into simple shapes, identify key features and proportions, and recognize the importance of symmetry. By doing so, artists and designers can gain a deeper understanding of Yoshi's overall design and create more authentic and engaging artwork. In this article, we'll explore these fundamental concepts, starting with the basics of Yoshi's body structure. By simplifying his form into basic shapes, we can better comprehend his overall design and proportions, making it easier to create accurate and detailed artwork. Let's begin by breaking down Yoshi's body into simple shapes, a crucial step in understanding his basic form and structure.
Breaking Down Yoshi's Body into Simple Shapes
When breaking down Yoshi's body into simple shapes, it's essential to start with the basics. Yoshi's body can be divided into three main sections: the head, body, and tail. The head is roughly a rounded triangle with a slight curve, while the body is a larger oval shape. The tail is a long, curved rectangle that tapers to a point. By simplifying Yoshi's body into these basic shapes, you can begin to see the underlying structure that makes up his iconic form. The rounded triangle of the head is key to capturing Yoshi's adorable and expressive face, while the oval body provides a sturdy base for his limbs and tail. The curved rectangle of the tail adds a dynamic element to Yoshi's design, allowing him to balance and move with ease. By breaking down Yoshi's body into these simple shapes, you can gain a deeper understanding of his basic form and structure, making it easier to draw and render him accurately.
Identifying Key Features and Proportions
When drawing Yoshi, it's essential to identify the key features and proportions that make up his basic form and structure. Start by observing the overall shape of Yoshi's body, which is roughly a combination of a dinosaur and a turtle. Note the proportions of his head, body, and limbs, with the head being relatively small compared to the body. Yoshi's body is also slightly rounded, with a distinctive hump on his back. His limbs are short and stumpy, with his arms being slightly longer than his legs. Pay attention to the placement and shape of his eyes, nostrils, and mouth, which are all crucial in capturing his adorable and expressive face. Additionally, take note of the texture and pattern of his skin, which is typically depicted as scaly and rough. By accurately capturing these key features and proportions, you'll be able to create a recognizable and endearing Yoshi that fans of the character will love.
Recognizing the Importance of Symmetry
Recognizing the importance of symmetry is crucial when drawing Yoshi, as it plays a significant role in creating a balanced and visually appealing character. Symmetry refers to the arrangement of identical or similar elements on either side of a central axis, creating a sense of order and harmony. In Yoshi's case, his body is roughly symmetrical, with his head, body, and tail forming a central axis. His eyes, nostrils, and mouth are also symmetrical, with each feature mirrored on the opposite side of his face. When drawing Yoshi, it's essential to pay attention to these symmetrical elements to ensure that your drawing looks balanced and accurate. By recognizing the importance of symmetry, you can create a more polished and professional-looking drawing of Yoshi. Additionally, understanding symmetry can also help you to create more dynamic and interesting poses, as you can use the principles of symmetry to create a sense of movement and energy in your drawing. By applying the principles of symmetry to your drawing, you can bring Yoshi to life and create a drawing that is both visually appealing and true to the character's original design.
Mastering Yoshi's Facial Expressions and Details
Mastering Yoshi's facial expressions and details is a crucial aspect of bringing this beloved character to life. To achieve this, it's essential to focus on three key areas: capturing Yoshi's iconic smile and eyes, adding texture and dimension to his skin, and creating expressive eyebrows and nostrils. By perfecting these elements, artists and designers can create a Yoshi that is both authentic and engaging. In this article, we'll delve into the techniques and strategies for mastering Yoshi's facial expressions and details, starting with the foundation of his iconic look: capturing his smile and eyes. By understanding the subtleties of Yoshi's facial structure and expression, artists can create a character that is instantly recognizable and endearing to audiences of all ages. Let's begin by exploring the secrets behind Yoshi's iconic smile and eyes.
Capturing Yoshi's Iconic Smile and Eyes
Capturing Yoshi's iconic smile and eyes is a crucial aspect of drawing the beloved character. To start, focus on the smile, which is a defining feature of Yoshi's cheerful personality. The smile should be wide and curved, stretching from ear to ear, and should be slightly upturned at the edges to convey a sense of joy. The mouth should be a simple, curved line, with a slight dip in the middle to create a sense of depth. When drawing the eyes, remember that they are large and expressive, with a distinctive shape that is both rounded and angular at the same time. The eyes should be positioned on either side of the head, with the top of the eye aligned with the top of the head, and the bottom of the eye aligned with the bottom of the nose. The pupils should be small and circular, with a slight shine to them to convey a sense of friendliness. To capture the sparkle in Yoshi's eyes, add a small white highlight to the top of each pupil, and a slight curve to the eyelid to create a sense of warmth. By paying close attention to these details, you can create a Yoshi drawing that is both authentic and endearing.
Adding Texture and Dimension to Yoshi's Skin
Adding texture and dimension to Yoshi's skin can elevate your drawing to the next level. To achieve this, start by adding gentle, rounded scales that cover Yoshi's body, making sure to vary their size and spacing to create a natural, organic look. Use short, curved lines to suggest the texture of the scales, and pay attention to how they overlap and intersect to create a sense of depth. You can also add some subtle wrinkles and creases to Yoshi's skin, particularly around the eyes, mouth, and joints, to give him a more aged and weathered appearance. To add dimension, use a range of values and shading techniques to create a sense of volume and structure. For example, you can use hatching and cross-hatching to create areas of shadow and highlight, and use stippling or pointillism to create a sense of texture and pattern. By combining these techniques, you can create a rich, detailed, and engaging texture that brings Yoshi to life. Additionally, you can also experiment with different materials and mediums, such as colored pencils, markers, or paint, to add an extra layer of texture and dimension to your drawing.
Creating Expressive Eyebrows and Nostrils
When it comes to creating expressive eyebrows and nostrils for Yoshi, it's all about capturing the subtleties of his emotions. For the eyebrows, start by drawing two curved lines that follow the natural shape of Yoshi's head. The top line should be thicker and more rounded, while the bottom line is thinner and more angular. To convey different emotions, adjust the shape and angle of the eyebrows. For example, a relaxed Yoshi might have slightly raised eyebrows, while an excited Yoshi might have eyebrows that are more angular and pointed. For nostrils, draw two small oval shapes on either side of Yoshi's nose, making sure to leave a small gap between them. To add expression, adjust the size and shape of the nostrils. For instance, a happy Yoshi might have slightly larger nostrils, while a sad Yoshi might have smaller, more pinched nostrils. By paying attention to these small details, you can bring Yoshi's face to life and create a wide range of emotions.
Bringing Yoshi to Life with Color and Movement
Yoshi, the lovable dinosaur from the Super Mario Bros. series, has been a beloved character for decades. To bring Yoshi to life, artists and designers must carefully consider the use of color and movement in their depictions. A well-chosen color palette can evoke Yoshi's playful and curious personality, while dynamic movement and energy can convey his sense of adventure and excitement. In this article, we will explore the key elements of bringing Yoshi to life, including selecting a color palette that matches his personality, adding movement and energy to his pose, and using shading and lighting to create depth and dimension. By examining these essential components, artists and designers can create a vibrant and engaging representation of Yoshi that captures his spirit and charm. To start, let's dive into the importance of selecting a color palette that matches Yoshi's personality.
Selecting a Color Palette that Matches Yoshi's Personality
When it comes to selecting a color palette that matches Yoshi's personality, it's essential to consider his playful, friendly, and curious nature. A palette that reflects his bright and cheerful demeanor would be perfect for bringing him to life. A combination of pastel colors such as light blue, pale yellow, and mint green would be an excellent choice, as they evoke a sense of innocence and joy. These soft colors would also complement Yoshi's rounded and endearing features, making him appear even more lovable and approachable. Additionally, incorporating earthy tones such as brown and beige would add a sense of warmth and depth to the palette, reflecting Yoshi's connection to the natural world. By selecting a color palette that captures Yoshi's personality, you'll be able to create a visually appealing and engaging character that will delight audiences of all ages.
Adding Movement and Energy to Yoshi's Pose
Adding movement and energy to Yoshi's pose can be achieved by incorporating dynamic lines, angles, and gestures. To start, consider the direction and flow of Yoshi's body, using gentle curves and swooping lines to convey a sense of fluidity and motion. For example, you can draw Yoshi's arms and legs in a relaxed, curved position, as if he's about to spring into action. Adding a slight tilt to his head and a raised eyebrow can also give the impression that he's alert and ready to move. To add more energy to the pose, you can experiment with different angles and perspectives, such as drawing Yoshi from a low or high angle to create a sense of dynamism. Additionally, you can use visual storytelling techniques like motion lines or speed lines to convey a sense of movement and energy. For instance, you can draw a few curved lines around Yoshi's feet to suggest that he's about to jump or run. By incorporating these elements, you can bring Yoshi to life and create a sense of movement and energy in your drawing.
Using Shading and Lighting to Create Depth and Dimension
Using shading and lighting is a crucial step in creating depth and dimension in your Yoshi drawing. To achieve this, start by identifying the light source in your scene, which will help you determine where the shadows will fall. For Yoshi, you can use a soft, warm light source to create a friendly and inviting atmosphere. Next, use a range of shading techniques, such as hatching and cross-hatching, to create depth and texture on Yoshi's body. Pay attention to the areas where the light would naturally hit, such as the tops of his ears and the curve of his back, and use lighter shading to create a sense of volume. Conversely, use darker shading to create shadows in areas such as the underside of his ears and the crevices of his body. By carefully balancing light and dark, you can create a sense of depth and dimension that will bring Yoshi to life. Additionally, you can use lighting to create a sense of movement and energy, such as by using a highlight on Yoshi's nose or a shadow on his tail to suggest that he is in motion. By mastering the use of shading and lighting, you can add a new level of sophistication and realism to your Yoshi drawing.