How To Draw A Beaver
Understanding the Basics of Drawing
Recognizing the Fundamentals of Art
The first step in learning to draw a beaver is understanding the basic principles of drawing. Drawing is a skill that takes time and practice to master. It involves understanding the key elements of art, namely line, shape, form, value, space, and texture. These elements are the building blocks of any artwork and should be thoroughly understood before you start sketching. For example, the line is used for outlining the beaver’s shape, while the value will help in creating depth and three-dimensionality in the picture.
- Confidence in your strokes: This comes with lots of practice. The more you draw, the more confident your strokes will become.
- Visualizing your subject: Before drawing, it helps to visualize your subject. This helps you familiarize yourself with what you are about to draw.
- Patience is key: Drawing is not something you rush. It requires a vast amount of patience and concentration. Therefore, patience is something you need in your arsenal.
Understanding the Anatomy of a Beaver
Like every other animal, a beaver has unique characteristics and features that make it distinct. Therefore, understanding the anatomy of a beaver is essential in drawing one accurately. Some of the notable features to consider are the beaver's round body, short legs, broad tail, and large front teeth.
- Short and stout: The beaver's body is round and stout. It is quite low to the ground due to its short legs.
- Broad and flat tail: Another noticeable feature is the beaver's tail. It is broad, flat and scale-like in texture.
- Large teeth: Beavers are also known for their large incisors. When drawing, the beaver's teeth should be visibly prominent.
Getting the Right Drawing Tools
In drawing, the kind of tools you use can significantly impact the outcome of your work. It is necessary to choose quality drawing materials as they can make the drawing process more manageable and the result more impressive. For drawing a beaver, you would need a set of drawing pencils with different hardness levels, quality sketching paper, erasers, and smudging tools.
- The right paper: While you can technically draw on any surface, some types of paper are better suited for drawing. The best paper for sketching and drawing generally has a smooth, heavy surface. This kind of paper can handle erasing and heavy shading.
- Pencil variations: Different hardness levels of pencil are suitable for different areas of drawing. For instance, softer pencils (like 4B or 6B) are perfect for shading, while harder pencils (like HB or 2H) are suitable for outlining and details.
- Good eraser: We all make mistakes, and it's not any different when drawing. A good eraser is essential for getting rid of any errors or for lightening areas of your drawing for effect.
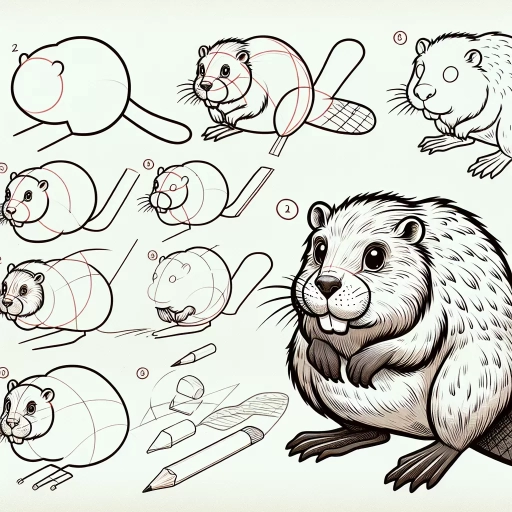
Step-by-Step Guide to Drawing a Beaver
Producing a Rough Sketch
The initial stage of drawing a beaver involves making a rough sketch. This is where you make an outline of your beaver using simple shapes and lines to capture its form. The sketch does not need to be perfect at this stage, as it is just a placeholder for the more detailed drawing
- Use simple shapes: Start by outlining your beaver with simple shapes like circles, ovals, and rectangles to capture its form and proportions.
- Use light strokes: These lines are not final, so to make it easier for you to erase and adjust them, make the strokes as light as possible.
- Take your time: Spend time observing the beaver and attempting to capture its form and proportions. This stage lays the groundwork for the final sketch, so it's crucial to take your time.
Adding the Details
Once you have the basic sketch, you can start adding the beaver's details. Here, you focus on the beaver's features such as its fur, tail, paws, and facial features. This is also where you will fine-tune the shapes and outlines you created in the previous step to make the drawing look more like a beaver.
- The beaver's fur: Beavers have a thick coat of fur. To depict this, use short strokes to mimic the texture of the fur.
- Facial features: Draw out the beaver's eyes, nose, and mouth. Remember to make the teeth prominent as this is one of the beaver's key features.
- Tail and paws: Accentuate the tail using crosshatching to mimic its texture. Also, detail the paws to show claws.
Shading and Finishing Touches
The final step in drawing a beaver involves adding shades and highlights. This brings your beaver to life, giving it a three-dimensional look. Also, erase any unnecessary lines and correct any errors.
- Shading: Use a softer pencil to shade the parts of the beaver that are supposed to be dark, such as under the body, around the nose, and inside the mouth.
- Highlights: For parts of the beaver catching light, leave them unshaded or use an eraser to lighten the shade there.
- Finishing touches: Finally, go over your drawing to fine-tune any details and correct any errors. Erase any guide lines that are still visible and add any last-minute details that you think are necessary.
Practical Tips for Enhancing Your Drawing Skills
Practicing Regularly
Like any other skill, the best way to improve your drawing skills is by practicing regularly. Make it a point to sketch something every day, even if it's just for a few minutes. You can draw something from life, from a photo, or from your imagination. It doesn't matter what, just as long as you're drawing.
- Create a sketchbook: A sketchbook is a great tool to keep track of your progress. It allows you to reflect on your past works and see how much you've improved over time.
- Join a local art group: An art group will keep you motivated and give you the chance to learn from others. You can exchange ideas and get feedback, which is invaluable for improving your skills.
- Take drawing classes: If you're serious about improving your drawing skills, consider taking drawing classes. You'll get expert guidance and structured lessons that will help you progress at a faster pace.
Studying from Professional Artists
Professional artists have a wealth of knowledge that you can learn from. Studying their works can provide inspiration, show you new techniques and broaden your understanding of drawing.
- Visit museums and art galleries: Make the time to visit museums and art galleries. By looking at the works of great artists, you'll be able to appreciate the aesthetics and techniques used in their drawings.
- Study artwork online: With the internet, you have access to countless works of art. Visit online art platforms or follow professional artists on social media to learn and find inspiration.
- Read books and watch video tutorials: Books and video tutorials can provide step-by-step guidance. You can follow along at your own pace.
Being Open to Constructive Criticism
While it's not always easy to take criticism, it can be beneficial when used to improve your drawing skills. Constructive criticism can highlight areas that need work, offering insights that you might not have considered.
- Ask for feedback: Don't be afraid to ask for feedback from others. This could be family, friends or fellow artists. Their insights could help you improve your work, even if they aren't professional artists.
- Stay open-minded: Try not to get defensive when receiving feedback. Instead, use it as an opportunity to learn and grow.
- Take time to reflect: Accepting criticism doesn't mean you must agree with everything said. Take some time to reflect on the feedback and then decide which advice you want to take on board.