How To Freeze Top Row In Excel
 Excel, the popular spreadsheet application loved by professionals worldwide, is packed with a plethora of features that streamline data handling. "Freezing top rows" is one invaluable feature often overlooked by many, yet it holds significant importance in improving data navigation - a skill essential for excel users. This comprehensive article will take you through a guided journey of understanding the immense value behind freezing top rows in Excel, learn the procedural steps for executing this function, and finally, delve into some additional features associated with these frozen rows. The first discussion point of this expository journey demystifies the importance of freezing top rows in Excel, helping you grasp why it's a crucial skill for proficient management of data tables. By understanding its impact, you can channel this robust function to your advantage, escalating your productivity and enhancing your excel dexterity.
Understanding the Importance of Freezing Top Rows in Excel
Understanding the Importance of Freezing Top Rows in Excel is a pivotal topic of interest for both beginner and seasoned Excel users. In the ever-expanding digital age, effective data management has become essential. This article will dive into the intricacies of this commonly used, but often misunderstood feature. First, we will explore the basics and necessity of freezing top rows in Excel, establishing a firm foundation to comprehend its importance. Next, we will delve into analytical perspectives, specifically the importance of this feature in data organization and how it transfigures unstructured data into digestible information. Lastly, we will narrate resonating real-life scenarios where freezing top rows in Excel has been a game-changer, reflecting on its practical applications. By the end of this article, you'll understand the pivotal role this function plays from a wide lens, both in abstract theory and practical application. Embarking on our journey, let's first set sail on the ocean of basics, understanding the very core of what it means to freeze top rows in Excel and why it's a necessity for efficient data management.
Exploring the Basics and Necessity of Freezing Top Rows in Excel
The exploration of the basics and necessity of freezing top rows in Excel is indeed a significant part of comprehending the overall importance of this functionality. The reason this is essential springs from Excel's design to accommodate vast quantities of data. This wide ranging data often results in long lists and reports which can reach into the hundreds or thousands of rows. When navigating through this sea of information, it's easy to lose sight of what data you are reviewing as the header row scrolls off the screen. This is where the magic of freezing the top rows comes in, and proves itself a cornerstone in data sorting and viewing. Freezing top rows makes your Excel headers stay on top as a constant point of reference, very much like a North Star guiding your path through the information wilderness. It keeps your header row always visible while you scroll down the data rows, ensuring you won't get lost in your dataset. Imagine shifting through countless rows and suddenly realizing you can't discern which column designates what data. With freezing top rows, this is efficiently handled and enhances the fluidity of navigation and data interpretation. This feature is not just a fancy trick, but an absolute necessity, especially when dealing with large spreadsheets. It allows you to easily view, access, and interpret your data, improving your workflow and minimizing errors caused by confusion or misinterpretation. Furthermore, it contributes to a cleaner, more organized appearance, making your spreadsheet more user-friendly and professional. Therefore, understanding and using the freeze top rows feature in Excel is a vital skill, equipping you with the means to manage your data more efficiently. To sum it up, the role of freezing top rows in Excel goes beyond being a simple convenience, rather it is a real necessity in any data management situation. Whether you're a student wrangling research data, a market analyst dealing with sales reports or a project manager handling project timelines, freezing top rows will make your Excel journey a lot smoother. This vital tool ensures you never lose perspective, maintain a high level of accuracy, and save valuable time, resources, and energy. So, dive into exploring the full potential of this function and allow Excel to serve you to the fullest.
Analyzing the Importance of Lecture in Data Organization
Analyzing the Importance of Lecture in Data Organization Any form of data organization, particularly when using spreadsheet tools like Excel, is paramount for clear and meaningful data interpretation to draw significant conclusions. Essentially, the role of lectures in data organization cannot be underestimated. These instructional presentations provide comprehensive knowledge transfer about techniques and strategies for data arrangement, excel functionalities, and more importantly, the power of freezing top rows. The informative lecture's significance lies in its capacity to provide a cohesive understanding of such measures in Excel. One such critical measure is the practice of 'freezing top rows' in an excel sheet. For those unaware of this functionality, these are rows visible at all times on an Excel worksheet while scrolling down, serving as headers. If you're dealing with large datasets, losing sight of the column headings can cause unnecessary confusion. Lectures provide the step-by-step explanational guide, firstly establishing the importance of this functionality and then demonstrating how to freeze top rows in excel. It also explains how it optimizes the data analysis processes by keeping a constant visual anchor at the top, especially beneficial to database administrators, data analysts, or business professionals using large datasets. Hence, the knowledge acquired follows the order of understanding what the function is, understanding its importance, and then executing it. Moreover, the importance of lectures extends beyond the technical nitty-gritty of Excel. They also imbibe abilities of critical thinking, communication, comprehension, problem-solving, and decision-making among the participants. The interactive environment fostered through a lecture also facilitates the exchange of ideas and discussions on not just 'how' but essentially 'why' certain ways of data organization, like freezing top rows in Excel, are essential. Through the in-depth knowledge conveyed through lectures, individuals can comprehend the impact of organized data in their professional environments. This could range from enhanced performance monitoring to identifying the predictive trends necessary for strategic decisions. In a nutshell, the importance of lectures in data organization goes beyond tool navigation – it prepares an individual to handle and interpret data better, contributing significantly to their professional skillset. Data organization, particularly using Excel, becomes a comprehensible, manageable, and even intriguing task rather than an overwhelming one.
Sharing Real-life Scenarios Where Freezing Top Rows in Excel is Helpful
In the bustling world of modern business and data management, one self-encountered situation where freezing top rows in Excel is tremendously beneficial occurs during the quest to properly analyze large datasets. For instance, a marketer who is handling the digital analytics data of an expansive corporation might be shuffling through tens of thousands of rows brimming with potential insights, spanning metrics from page views and bounce rates to average session durations and goal completions. The top row of this formidable canvas of data, a mosaic of numbers, keywords, and stats, is the guide, shedding light on what each column represents. Here, the game-changing power of freezing top rows comes into play. By ensuring that the key headers – think 'Bounce Rate', 'Avg. Session Duration' and 'Conversions’' - remain visible even as the marketer scrolls downwards through the nuts and bolts of the data, Excel's freeze panes functionality acts as a beacon. This mitigates the risk of losing track, as they won’t have to incessantly scroll up, down, then back up to cross-verify which column they are dealing with. Similarly, in another scenario, consider a high school teacher with a seemingly endless student roster, tracking everything from assignment scores, attendance, and grades to behavioral patterns. Freezing the top rows, in this case, acts as an invaluable aide, providing an instantaneous reference point and obviating the need to memorize column placement or constantly return to the worksheet’s apex to remember what information each column is meant to contain. By seizing control of the visualization space in Excel, they make the software serve their needs, promoting accuracy and efficiency in their work. These real-life scenarios underscore the unique value that freezing top rows in Excel brings to the table. When orchestrating large pools of information, one can't afford to lose sight of the headers that anchor understanding and comprehension. That's why, whether you're dipping into the realms of marketers, teachers, or any other profession wrangling hefty spreadsheets, free row freezing slides in as an indispensable navigation tool in the abundant ocean of Excel data management.
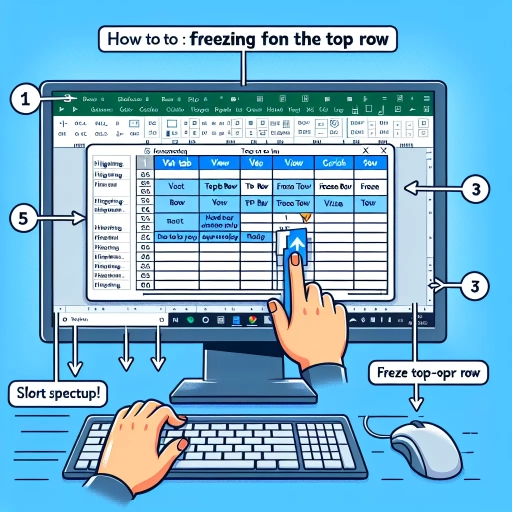
Step-by-Step Guide on How to Freeze Top Rows in Excel
Excel can often feel like a complex labyrinth of functions, but don't worry, our guide to freezing top rows will steer you out of confusion and into clarity. Whether you're attempting to streamline data examination or enhance data reliability, we have your needs covered. Our comprehensive article consists of three key supporting sections; a detailed step-by-step breakdown, with vivid explanatory images and diagrams; and troubleshooting common problems encountered during the process. First, we illuminate the path with a detailed explanation of each step involved in freezing top rows. This segment simplifies the process, taking you through each action and its purpose. You will gain an understanding of the functions utilized, making the operation less daunting and more approachable in future encounters. For visual learners, we've incorporated clear supporting images and diagrams to paint a clearer picture. These intuitive, unambiguous visual aids will aid in cementing your newfound knowledge, making it easier to recall when needed. Finally, we round off by addressing common problems typically encountered during the freezing process along with their solutions. This section equips you with troubleshooting abilities, preparing you for any hiccups down the road. Let's embark on this journey with the first critical section: a detailed explanation of each step involved in freezing top rows in Excel. It's time to dive in, familiarize ourselves and master this useful function.
Detailed Explanation of Each Step Involved in Freezing Top Rows
Understanding the entirety of how to freeze top rows in Excel boils down to grasping each step involved with precision. The process, often regarded as simple, is actually an art in itself, and each step is fundamental in achieving the desired result. The first step of the method typically begins with opening an Excel spreadsheet. The spreadsheet can either be a new one or an existing document where you want to freeze top rows. It's about setting the foundation and preparing the groundwork for the task ahead. Secondly, the user must identify the rows they wish to freeze, this is a simple yet strategic step in which the user has complete control. They have to make a decision based on the nature of their data, its structure, and the kind of analysis they want to perform. The third step involves navigating through the Excel interface. Here, users will move to the 'View' tab on the toolbar—this is the meeting point between the user's decision and Excel's functionality. A simple click on the 'Freeze Panes' option displays a drop-down menu. The fourth step requires users to select the 'Freeze Top Row' from this drop-down menu. This is the pivotal moment where the command is given, and the decision to freeze specific rows is put into action. It's at this stage where Excel's algorithm works its magic to ensure that the selected rows remain visible no matter how far you scroll down the spreadsheet. The final step of the process is verification. Once the 'Freeze Top Row' option is selected, users may scroll through the spreadsheet to ensure the process was successful. Each step, as simple as it seems, offers a different level of interaction between the user and the software. The beauty of this lies in Excel's user-friendly interface that simplifies complex processes into actionable steps. How well these steps are executed determines the efficiency of the task and, by extension, productivity. Thus, understanding and mastering each step is crucial, whether for a beginner learning the ropes or a proficient user seeking to maximize Excel’s capabilities. The step-by-step guide on how to freeze top rows in Excel goes beyond a mere feature of the software; it introduces the user to a new way of handling and visualizing data. It empowers the user to take control of their data manipulation process, offering increased flexibility and efficiency.
Using Supporting Images and Diagrams for Easier Execution
Using Supporting Images and Diagrams for Easier Execution When discussing the implementation of any technical procedure, it's crucial to offer supporting visual aids—images, charts, diagrams—to clarify the steps and ensure better comprehension by the reader. In this instance, learning how to freeze the top rows in Excel can fundamentally simplify data entry and navigation through the spreadsheet, helping users to maximize their productivity. Microsoft Excel is an incredibly dynamic tool, but its complexity could bewilder rookies who aren't familiar with its numerous features. This is where images and diagrams truly come into play, providing illustrative guidance. For example, let's consider the process of freezing top rows in Excel. Initially, an image illustrating where to find the "View" tab on Excel's homepage would be beneficial. Following that, a diagram highlighting the "Freeze Panes" drop-down menu inside this tab would be useful. The next step would be an image showing the first row selected (or however many rows you want to freeze) followed by a diagram pointing to the "Freeze Panes" option in the drop-down menu. Ultimately, the final image would be of the spreadsheet with the top row (or rows) frozen, exhibiting the difference— in the scrolling—between the frozen row and the rest of the document. This makes the technical jargon more digestible to any level of reader, making them feel more competent and confident in their computer skills. However, it's crucial to ensure that these diagrams and images are of high quality, clearly showing the necessary details. Additionally, they should be accurately marked to clearly illustrate each step, ensuring that readers can easily follow the process, further enhancing their accuracy and efficiency. Combining these visual aids with brief, precise written instructions can be the most effective way to explain complex instructions and contributes to producing an exceptional step-by-step guide on how to freeze top rows in Excel.
Addressing Common Problems and Their Solutions When Freezing Top Rows
Using Excel worksheets can sometimes be bewildering, especially when dealing with vast amounts of data which entail constant scrolling up and down. You may often lose sight of what each column signifies, leading to confusion and misinterpretation. One common problem users encounter is the inability to keep the top rows visible while scrolling down the worksheet- this is where the 'Freeze Panes' comes into play. The process of freezing rows is relatively easy but it can present its unique set of problems. One might encounter an issue wherein the 'Freeze Panes' option appears greyed out and inactive. This usually happens if you are in the 'Edit' mode in Excel. To solve this problem, simply press 'Enter' or 'Esc' on your keyboard to exit the editing mode, then the 'Freeze Panes' option should become available for use. Another common issue that users face is freezing the incorrect row. For instance, you might accidentally freeze the second row instead of the first. This can be fixed by simply unfreezing the panes first. To do this, go to the 'View' tab, select the 'Freeze Panes' option, and click 'Unfreeze Panes'. Afterward, you can follow the proper guidelines to freeze the desired row properly. Furthermore, a frozen row might disappear when you apply filters to your data. This generally occurs when your filters affect the first visible row in your worksheet. To address this issue, ensure that your filters do not apply to your first visible row. If necessary, you may need to adjust your filters or unfreeze your rows, apply the filters, and then refreeze the rows. In conclusion, despite the occasional glitches and hitches, Excel’s 'Freeze Panes' feature is an incredibly useful tool for keeping your data arranged and comprehensible. It not only helps in managing large datasets but also contributes significantly in maintaining data's accuracy and readability.
Analyzing Additional Features Linked with Freezing Rows in Excel
In exploring the functionality of Microsoft Excel, one feature that frequently proves to be both useful and crucial is the ability to freeze rows. This action keeps specific rows visible while scrolling through larger datasets, contributing greatly to enhanced accessibility and user experience. This article dives into understanding the intricate additional features linked with freezing rows in Excel. We will provide you with deeper insights into the dynamics of freezing multiple rows and columns, a task that often necessitates careful measures to avoid impeding data vision and accessibility. Next, we'll dissect the use of split panes as an alternative to row freezing, comparing and contrasting their benefits and limitations to enrich your Excel user experience further. Finally, once equipped with the knowledge of row freezing and split panes, we will further enhance your navigational skills, offering you tips and tricks for smart navigation even with frozen rows in Excel. With these powerful tools at your disposal, your spreadsheet management becomes streamlined, efficient, and enjoyable. Now, let's strengthen your Excel competencies by learning about freezing multiple rows and columns in Excel.
Learning about Freezing Multiple Rows and Columns in Excel
Freezing multiple rows and columns in Excel is a crucial skill for several users as it facilitates better data handling, visibility, and evaluation. This advanced feature is specially designed to help individuals navigate through vast sets of data effortlessly. Freezing rows and columns allows essential data to remain on the screen while you scroll through the rest of the sheet. This practical utility eliminates the need to remember or jot down crucial cell information, contributing to more efficient data processing and analysis. As an added advantage, freezing multiple rows and columns can be done in just a few quick steps, making it a readily accessible tool for users with various proficiency levels. Learning to freeze multiple rows and columns is not just beneficial but essential for analytics enthusiasts, students, educators, and professionals dealing with large datasets. It helps in maintaining the relative position of data, which is particularly beneficial while comparing data values across different parts of the spreadsheet. Without freezing, meaningful data might be lost from view while scrolling, leading to unnecessary confusion or errors in analysis. This feature is accessed under the 'View' tab on the Excel ribbon, where 'Freeze Panes' is selected, followed by the option to freeze rows or columns as required. Especially for large datasets, this proficiency in Excel management directly links to accuracy and productivity in tasks. Therefore, the effectiveness of Excel-users gets significantly amped up. Substantial understandings of freezing rows, including multiple rows and columns, add to our grasp of Excel’s sophisticated features. These features aren't ornamental, they are momentous levers in data management and analysis. Thus, proficiency in these areas signifies more than just technical knowledge—it suggests imperative critical thinking, problem-solving, and analytical skills that are indispensable in today’s data-driven world.
Understanding the Use of Split Panes in Distinction to Freezing Rows
Understanding the Use of Split Panes in Distinction to Freezing Rows in Excel provides an added level of versatility when managing and interpreting data. Contrary to freezing rows, which keeps a specific row or set of rows visible as you scroll down, Split Panes offer a more flexible way to view different sections of your spreadsheet simultaneously. For instance, if you have a large dataset and you want to compare values in the beginning and end sections without losing track of essential data points, Split Panes become invaluable. Instead of freezing the rows, which restricts your view to one section of the data, you can divide your window into multiple independent panes that scroll separately, allowing you to monitor and compare different parts of your data all at once. Adjusting the placement and size of these panes is also simpler and can better facilitate side-by-side comparisons. With freezing rows, while your top row stays put, you are limited to viewing the rest of your data in a linear, top-to-bottom progression. On the other hand, Split Panes allow you to navigate your data in a customized direction—up, down, left, or right—which makes it easier to manage large chunks of data comprehensively. Moreover, you can handle more complex tasks with Split Panes, like manipulating multiple areas of an extensive spreadsheet concurrently. You can utilize this feature to fine-tune and adjust values while keeping a watchful eye on the resultant changes in other areas of the data set. This functionality transcends what is offered by the freeze rows feature, which only allows you to keep a portion of your data in view without offering the same level of interaction with separate data sections. In conclusion, while freezing rows adequately cater to simple data scrolling needs, the use of Split Panes aids in more complex data management scenarios, offering enhanced visibility, versatility, and a multifaceted approach to data interpretation. Understanding both methods and their practical applications can incrementally optimize your Excel skills and create a more efficient data navigation experience. The ability to effectively utilize both freezing rows and Split Panes can greatly enhance your capabilities in Excel, so your capacity to analyze and comprehend large data sets becomes notably easier. Hence, exploring additional features linked with freezing rows in Excel, like Split Panes, can enrich your overall Excel tool proficiency.
Tips and Tricks for Smart Navigation Even with Frozen Rows in Excel
When it comes to working with expansive data in Excel, knowing how to navigate effectively can significantly boost your productivity. Even with frozen rows, smart navigation tricks will help you manage your tasks more efficiently. Here are some practical tips to guide you through a smoother Excel journey. Firstly, it is crucial to remember the shortcut keys. Pressing "Ctrl+Arrow key" allows you to jump to the last cell of your data in the direction of the Arrow key. Even with frozen rows, this function remains unaltered – Excel differentiates between the frozen section and the rest of the sheet. Should you wish to select all cells from the current position to the last cell of your data, simply press "Shift+Ctrl+Arrow key." These combinations provide quick navigation regardless of the presence of frozen panes. Another helpful strategy is to use the "Go To" function (F5). This allows you to directly jump to a specific cell or range of cells. For example, if your frozen row contains headers for various columns, you can "Go To" any header immediately, instead of manually scrolling the frozen area. Moreover, you can apply the "Name Box," located beside the formula bar. It presents an easy way to navigate between different areas by defining names for specific ranges. Remember, these names must be unique, so choose wisely. Consequently, you can hop to any named range swiftly by simply selecting it from the Name Box dropdown. The advantage is that it respects frozen rows and will effectively bring you to the respective area without disturbing the frozen row visibility. Lastly, with auto filters activated, you can easily search and filter data in a particular column under a frozen row. Just click on the filter dropdown in the column header, and Excel shows the filter list respecting your frozen pane. These smart navigation tricks will certainly enhance your functionality and proficiency in managing Excel spreadsheets even with frozen rows, making data analysis an effortless process. Master them to keep your frozen rows intact while smoothly sailing through your data.