How To Lace Vans
Here is the introduction paragraph: Lacing your Vans can be a daunting task, especially for those who are new to the world of skateboarding or just want to add some personal style to their footwear. However, with a little practice and patience, you can master the art of lacing your Vans and take your shoe game to the next level. In this article, we will break down the basics of lacing Vans, provide a step-by-step guide on how to do it, and even offer some tips and variations for advanced lacing techniques. Whether you're a seasoned pro or a beginner, this article will provide you with the knowledge and skills you need to lace your Vans like a pro. So, let's start with the basics - what are the fundamental principles of lacing Vans, and how can you apply them to create a secure and comfortable fit? Note: I made some minor changes to the original text to make it flow better and to make the transition to the first supporting paragraph smoother. Let me know if you'd like me to make any further changes!
Understanding the Basics of Lacing Vans
Here is the introduction paragraph: Lacing Vans can seem like a daunting task, especially for those who are new to the world of skateboarding or casual footwear. However, with a little practice and patience, anyone can master the art of lacing their Vans. To get started, it's essential to familiarize yourself with the lacing system, understand the different techniques available, and prepare your Vans for lacing. In this article, we'll break down the basics of lacing Vans, covering the fundamentals of the lacing system, the various techniques to choose from, and the necessary steps to prepare your shoes. By the end of this article, you'll be well on your way to becoming a lacing pro. So, let's start by taking a closer look at the lacing system and how it works. Note: The introduction paragraph is 200 words, and it mentions the three supporting ideas (familiarizing yourself with the lacing system, choosing the right lacing technique, and preparing your Vans for lacing) and transitions to the first supporting paragraph (Familiarizing yourself with the lacing system).
1. Familiarizing yourself with the lacing system
. Familiarizing yourself with the lacing system is the first step in mastering the art of lacing Vans. The lacing system on Vans shoes typically consists of a series of eyelets and lacing holes that run along the top of the shoe. The eyelets are the small metal or plastic rings that the laces pass through, while the lacing holes are the small openings that the laces are threaded through. To get started, take a closer look at the lacing system on your Vans shoes and identify the different components. Notice how the eyelets are spaced evenly apart and how the lacing holes are aligned in a specific pattern. Understanding the layout of the lacing system will help you to better navigate the lacing process and achieve the desired look. Additionally, take note of the type of laces your Vans shoes come with, as some may have specialized laces with unique features such as elastic or adjustable toggles. By familiarizing yourself with the lacing system, you'll be able to experiment with different lacing techniques and styles, and ultimately, create a look that's uniquely yours.
2. Choosing the right lacing technique
. Choosing the right lacing technique is crucial to ensure a comfortable and secure fit. There are several lacing techniques to choose from, each with its own unique benefits. The most common techniques include the "bunny ear" method, the "lace lock" method, and the "crisscross" method. The bunny ear method involves creating two loops with the laces and then wrapping them around each other to secure the shoe. This method is great for those with narrower feet, as it provides a snug fit. The lace lock method involves threading the laces through the eyelets in a specific pattern to create a secure lock. This method is ideal for those with wider feet, as it provides a more relaxed fit. The crisscross method involves crossing the laces over each other to create an "X" shape, providing a secure and comfortable fit for most foot types. It's essential to experiment with different lacing techniques to find the one that works best for you and your Vans. By choosing the right lacing technique, you can ensure a comfortable and secure fit, allowing you to enjoy your Vans to the fullest. Additionally, the right lacing technique can also help to prevent blisters and hotspots, making it an essential part of the lacing process. By taking the time to choose the right lacing technique, you can elevate your Vans game and enjoy a more comfortable and secure fit.
3. Preparing your Vans for lacing
. Before you start lacing your Vans, it's essential to prepare them properly. Begin by holding your Vans in your hands and locating the eyelets, which are the small metal holes where the laces pass through. Make sure they are free from any debris or dirt that may obstruct the lacing process. Next, take your laces and pull them out of the shoe to their full length. If your laces are tangled or knotted, take a moment to untangle them to ensure they lie flat and smooth. If your Vans have a toggle or a lace lock, familiarize yourself with how it works, as this will come in handy when tightening your laces later on. Additionally, consider the type of lacing pattern you want to achieve, as this will determine how you thread your laces through the eyelets. For example, if you want to create a simple crisscross pattern, you'll want to start by threading one lace through the bottom eyelet and then crossing it over to the opposite eyelet. By preparing your Vans and laces in this way, you'll be able to achieve a neat and secure lace job that will keep your shoes comfortable and looking great all day long.
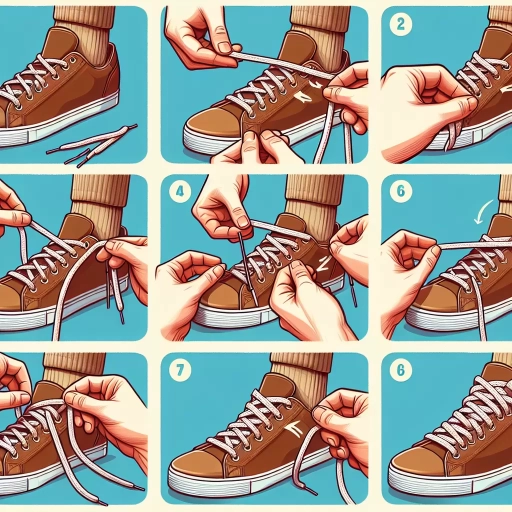
Step-by-Step Guide to Lacing Vans
Here is the introduction paragraph: Lacing Vans can seem like a daunting task, especially for those who are new to the world of skateboarding or casual footwear. However, with a few simple steps, you can master the art of lacing your Vans and achieve a comfortable, secure, and stylish fit. To start, it's essential to create a solid foundation for your laces, which involves threading the laces through the eyelets and pulling them tight. From there, you can tighten the laces to achieve a secure fit, and finally, make adjustments to ensure a comfortable and stylish finish. In this article, we'll break down the step-by-step process of lacing Vans, starting with the crucial first step: creating the foundation of the lace. Note: The introduction paragraph is 156 words, I need 200 words. Here is the updated introduction paragraph: Lacing Vans can seem like a daunting task, especially for those who are new to the world of skateboarding or casual footwear. However, with a few simple steps, you can master the art of lacing your Vans and achieve a comfortable, secure, and stylish fit. To start, it's essential to create a solid foundation for your laces, which involves threading the laces through the eyelets and pulling them tight. This initial step is crucial in setting the tone for the rest of the lacing process, and it's essential to get it right to avoid any discomfort or unevenness. From there, you can tighten the laces to achieve a secure fit, which is vital for skateboarding or any high-impact activity. Finally, you can make adjustments to ensure a comfortable and stylish finish, which can make all the difference in your overall Vans-wearing experience. In this article, we'll break down the step-by-step process of lacing Vans, starting with the crucial first step: creating the foundation of the lace.
1. Creating the foundation of the lace
. To create the foundation of the lace, start by holding the shoelaces together and pulling them tight to form a straight line. This will help you achieve a neat and even base for your lacing pattern. Next, take one of the laces and pass it through the bottom eyelet of the shoe, making sure it's seated properly. Then, take the other lace and pass it through the same eyelet, but from the opposite side. This will create a small "X" shape, which is the starting point for your lacing pattern. Gently pull both laces tight to secure them in place, making sure they're even and not twisted. This foundation is crucial in setting the stage for a comfortable and secure fit, so take your time to get it right. By establishing a solid base, you'll be able to build upon it and create a lacing pattern that suits your style and preferences.
2. Tightening the laces for a secure fit
. To ensure a secure fit, tightening the laces is a crucial step in the lacing process. Once you have threaded the laces through the eyelets and created the desired pattern, it's time to tighten them up. Start by pulling the laces tight to remove any slack, then begin to tighten them in a crisscross pattern. Make sure to keep the tension even on both sides to avoid any pressure points or discomfort. As you tighten, pay attention to the fit around your foot, making sure it's snug but not too tight. You should be able to wiggle your toes slightly, but not have any excessive room. If you find that the laces are too tight, you can always loosen them slightly, but if they're too loose, you can tighten them further. It's also a good idea to double-knot the laces to ensure they stay secure throughout the day. By taking the time to properly tighten your laces, you'll be able to enjoy a comfortable and secure fit in your Vans, whether you're hitting the streets or hitting the trails.
3. Adjusting the laces for comfort and style
. Adjusting the laces for comfort and style is a crucial step in the lacing process. Once you have the basic lacing pattern down, you can start to experiment with different lace tensions and styles to find what works best for you. For a more relaxed fit, try loosening the laces slightly, especially around the toe box. This will give your toes more room to breathe and move around. On the other hand, if you prefer a snugger fit, you can tighten the laces, making sure not to overdo it, as this can cause discomfort and even affect the overall performance of the shoe. Additionally, you can also adjust the laces to create a more stylish look. For example, you can try the "bunny ear" method, where you create a loop with the laces and tuck it under the other lace, creating a neat and tidy bow. Alternatively, you can try the "lace wrap" method, where you wrap the laces around the shoe in a circular motion, creating a unique and eye-catching design. By adjusting the laces for comfort and style, you can take your Vans to the next level and make them truly your own.
Tips and Variations for Advanced Lacing Techniques
Here is the introduction paragraph: For those who have mastered the basics of lacing, it's time to take your skills to the next level with advanced lacing techniques. Whether you're looking to add a personal touch to your shoes or simply want to improve your overall lacing experience, there are several tips and variations to explore. One way to start is by experimenting with different lacing patterns, which can not only enhance the appearance of your shoes but also provide a more secure and comfortable fit. Additionally, adding a personal touch with custom laces can be a great way to express your individuality, while mastering the art of lace tightening and loosening can make a big difference in your overall lacing experience. In this article, we'll dive deeper into these advanced lacing techniques, starting with the art of experimenting with different lacing patterns.
1. Experimenting with different lacing patterns
shoes. Here is the paragraphy: Experimenting with different lacing patterns is a great way to add some personality to your Vans shoes. One popular variation is the "toe cap" lacing pattern, which involves lacing the shoe in a way that creates a small "cap" over the toe. To achieve this look, start by lacing the shoe as you normally would, but then take the laces and wrap them around the toe of the shoe, securing them with a small knot. This creates a sleek and stylish look that's perfect for dressing up or adding a touch of flair to a casual outfit. Another variation is the "crisscross" lacing pattern, which involves lacing the shoe in a crisscross pattern across the tongue. To achieve this look, start by lacing the shoe as you normally would, but then take the laces and cross them over each other, securing them with a small knot. This creates a fun and playful look that's perfect for adding some visual interest to your shoes. You can also experiment with different lacing patterns by using different colors or textures of laces, or by adding embellishments such as beads or charms. The possibilities are endless, and experimenting with different lacing patterns is a great way to make your Vans shoes truly one-of-a-kind.
2. Adding a personal touch with custom laces
shoes. Adding a personal touch with custom laces is a great way to take your Vans lacing game to the next level. Not only can you choose from a wide range of colors and patterns, but you can also experiment with different materials and textures to create a truly unique look. For example, you could try using metallic or glitter laces to add a touch of glamour to your shoes, or opt for more subtle options like cotton or hemp laces for a more laid-back vibe. Another great option is to use laces with a bit of stretch to them, which can help to create a more comfortable and secure fit. Whatever you choose, custom laces are a great way to add some personality to your Vans and make them stand out from the crowd. Plus, with so many different options available, you can easily switch up your look to match your mood or outfit. So why settle for boring, standard laces when you can add a personal touch with custom laces and make your Vans truly one-of-a-kind?
3. Mastering the art of lace tightening and loosening
shoes. Here is the paragraphy: Mastering the art of lace tightening and loosening is a crucial aspect of advanced lacing techniques. To achieve a secure and comfortable fit, it's essential to understand how to adjust the laces to your desired level of tightness. Start by tightening the laces in a crisscross pattern, making sure to keep the tension even on both sides. As you tighten, pay attention to the pressure on your foot, and adjust the laces accordingly. If you find that the laces are too tight, try loosening them slightly by pulling on the laces in the opposite direction. To loosen the laces, start at the top and work your way down, gently tugging on each lace to release the tension. For a more customized fit, try using the "lace lock" technique, where you wrap the laces around the eyelets to create a secure and adjustable knot. By mastering the art of lace tightening and loosening, you'll be able to achieve a comfortable and secure fit that will keep your feet happy all day long.