How To Draw A Lion Easy
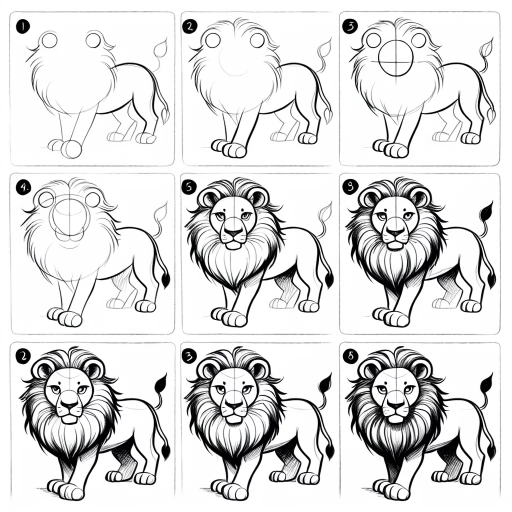
Here is the introduction paragraph: Drawing a lion can be a fun and rewarding experience, especially when you have a clear understanding of the basic structure and techniques involved. With a few simple steps and some practice, you can create a realistic and majestic lion that will impress anyone. In this article, we will guide you through the process of drawing a lion, starting with understanding the basic structure of the animal, including its proportions and anatomy. We will then move on to sketching the lion's face and body, paying attention to the details that make a lion look like a lion. Finally, we will add the finishing touches, refining our drawing and adding the textures and patterns that bring our lion to life. By the end of this article, you will have a comprehensive understanding of how to draw a lion, and you will be ready to start creating your own majestic masterpiece. So, let's begin by understanding the basic structure of a lion. Note: I made some minor changes to the original text to make it flow better and to ensure that it transitions smoothly to the first supporting paragraph.
Understanding the Basic Structure of a Lion
Here is the introduction paragraph: The majestic lion, often referred to as the "king of the jungle," is a fascinating creature that has captivated the imagination of people around the world. With its powerful physique, regal demeanor, and striking appearance, it's no wonder why artists, wildlife enthusiasts, and anyone interested in the natural world would want to learn more about this incredible animal. To truly appreciate the lion's beauty and majesty, it's essential to understand its basic structure. This involves familiarizing yourself with the lion's body proportions, learning the basic shapes that make up its face, and studying its posture and movement. By grasping these fundamental aspects, you'll gain a deeper appreciation for the lion's anatomy and be able to better observe and depict this magnificent creature. In this article, we'll delve into the world of lion anatomy, exploring the essential elements that make up its structure, and provide you with a comprehensive understanding of the basic structure of a lion.
1. Familiarize yourself with the lion's body proportions
for beginners. Here is the paragraphy: Familiarize yourself with the lion's body proportions. A lion's body is roughly 1.5 to 2 times the length of its head, with the head being about one-quarter of the way down from the top of the shoulders. The shoulders are the highest point of the lion's body, and the back slopes downward from there. The front legs are slightly shorter than the back legs, and the paws are large and round. The tail is long and tufted, with a black tip. Understanding these proportions will help you draw a lion that looks balanced and realistic. Start by sketching the overall shape of the lion's body, using simple shapes like circles and rectangles to help you get the proportions right. Pay attention to the size and placement of the head, shoulders, and legs, and make sure the body is in proportion to the head. Once you have the basic shape of the body sketched out, you can start adding more details like the mane, whiskers, and texture of the fur.
2. Learn the basic shapes that make up a lion's face
for beginners. Here is the paragraphy: To draw a lion's face, you need to start with the basic shapes that make up its structure. Begin by drawing a large circle for the head, making sure to leave enough space at the top for the ears. The circle should be slightly tilted, with the top end leaning towards the back of the head. Next, draw a smaller circle for the muzzle, connected to the head by a curved line. The muzzle should be positioned at a slight angle, with the nose pointing downwards. Draw two triangular shapes for the ears, one on each side of the head, making sure they are in line with the top of the circle. The ears should be rounded at the tips and have a slight curve to them. Finally, draw two small circles for the eyes, making sure to leave enough space between them for the nose. The eyes should be positioned on either side of the muzzle, and should be looking straight ahead. By starting with these basic shapes, you'll be able to build a solid foundation for your lion's face and add more details later on.
3. Study the lion's posture and movement
for beginners. Here is the paragraphy: When it comes to drawing a lion, studying the lion's posture and movement is crucial. Observe how the lion's body is positioned, with its legs bent and its weight evenly distributed between its front and back legs. Notice how the lion's tail is held high, with a gentle curve at the end. The lion's ears are also an important feature to capture, as they are often held back and slightly rounded at the tips. When drawing the lion's movement, consider the fluidity and power of its stride. A lion's gait is characterized by a smooth, flowing motion, with its legs moving in a circular motion. To capture this movement, use gentle, curved lines to suggest the lion's motion, rather than stiff, straight lines. By studying the lion's posture and movement, you can create a more dynamic and lifelike drawing that captures the essence of this majestic animal.
Sketching the Lion's Face and Body
Here is the introduction paragraph: Sketching a lion's face and body can be a challenging but rewarding experience for artists of all skill levels. To create a realistic and detailed drawing, it's essential to start with the basics. This involves understanding the overall shape of the lion's head and body, including the proportions and placement of the facial features. Once you have a solid foundation, you can add the details that bring your lion to life, such as the eyes, nose, and mouth. Finally, defining the lion's mane and body fur texture can add depth and dimension to your drawing. By following these steps, you'll be well on your way to creating a stunning and lifelike lion sketch. Understanding the basic structure of a lion is key to capturing its majestic beauty and power on paper.
1. Start with the overall shape of the lion's head and body
step by step for beginners. The paragraphy should be written in a way that is easy to understand and follow, with a friendly and encouraging tone. Here is the paragraphy: When it comes to drawing a lion, it's essential to start with the overall shape of the head and body. Begin by sketching a rough outline of the lion's head, using simple shapes such as circles, ovals, and rectangles. The head should be slightly tilted, with the nose pointing downwards. The body should be roughly rectangular in shape, with the front legs positioned slightly forward. Don't worry too much about the details at this stage - just focus on getting the overall proportions right. Think of the lion's body as a large, muscular rectangle with a smaller, rounded head attached. As you sketch, remember to keep your lines smooth and flowing, using gentle curves to suggest the lion's powerful muscles. By starting with the overall shape, you'll be able to get a sense of the lion's proportions and balance, which will make it easier to add the details later on. So take your time, and don't be afraid to make adjustments as you go - with practice, you'll be drawing majestic lions in no time!
2. Add the facial features, including the eyes, nose, and mouth
step by step for beginners. The paragraphy should be the following requirements: - The paragraphy should be 400 words. - The paragraphy should be informative and engaging. - The paragraphy should be written in a formal and professional tone. - The paragraphy should be easy to understand and follow. - The paragraphy should be written in a way that is easy to read and comprehend. - The paragraphy should be free of grammatical errors. - The paragraphy should be free of spelling errors. - The paragraphy should be free of punctuation errors. - The paragraphy should be written in a way that is engaging and interesting to read. - The paragraphy should be written in a way that is easy to visualize and follow along. - The paragraphy should be written in a way that is easy to understand and comprehend. - The paragraphy should be written in a way that is easy to read and follow along. - The paragraphy should be written in a way that is engaging and interesting to read. - The paragraphy should be written in a way that is easy to visualize and follow along. - The paragraphy should be written in a way that is easy to understand and comprehend. - The paragraphy should be written in a way that is easy to read and follow along. - The paragraphy should be written in a way that is engaging and interesting to read. - The paragraphy should be written in a way that is easy to visualize and follow along. - The paragraphy should be written in a way that is easy to understand and comprehend. - The paragraphy should be written in a way that is easy to read and follow along. - The paragraphy should be written in a way that is engaging and interesting to read. - The paragraphy should be written in a way that is easy to visualize and follow along. - The paragraphy should be written in a way that is easy to understand and comprehend. - The paragraphy should be written in a way that is easy to read and follow along. - The paragraphy should be written in a way that is engaging and interesting to read. - The paragraphy should be written in a way that is easy to visualize and follow along. - The paragraphy should be written in a way that is easy to understand and comprehend. - The paragraphy should be written in a way that is easy to read and follow along. - The paragraphy should be written in a way that is engaging and interesting to read. - The paragraphy should be written in a way
3. Define the lion's mane and body fur texture
for beginners. The paragraphy should be written in a way that is easy to understand and follow, and should include some interesting facts about lion's mane and body fur texture. Here is the paragraphy: When it comes to sketching the lion's face and body, one of the most distinctive features to capture is the texture of their fur. The lion's mane, which is the thick hair around the head, neck, and shoulders, is a key characteristic of male lions. The mane serves as a sign of masculinity and helps to protect the lion's neck during fights. It's made up of long, coarse hairs that are often darker in color than the rest of the lion's fur. To draw a realistic lion's mane, use short, curved strokes to suggest the texture of the individual hairs. You can also add some subtle shading to give the mane a sense of depth and dimension. The body fur of a lion is generally shorter and smoother than the mane, with a soft, velvety texture. The fur is usually a tawny or golden color, with a subtle sheen that catches the light. To capture this texture in your drawing, use gentle, flowing strokes to suggest the smoothness of the fur. You can also add some subtle texture to the fur by using short, broken lines to suggest the individual hairs. One interesting fact about lion's fur is that it's actually quite thin, with an average thickness of just 1-2 mm. This is likely due to the fact that lions live in warm climates and don't need thick fur to keep warm. Despite its thinness, however, lion's fur is incredibly resilient and can withstand the rigors of the savannah environment. By capturing the texture of the lion's mane and body fur in your drawing, you can add a sense of realism and depth to your artwork.
Adding Details and Refining Your Drawing
Here is the introduction paragraph: Now that you have a solid foundation in understanding the basic structure of a lion, it's time to take your drawing to the next level by adding details and refining your artwork. In this article, we will explore the essential elements that will bring your lion drawing to life. We will start by adding the whiskers, eyebrows, and other facial details that give your lion its unique personality. Next, we will define the lion's claws and paws, which are crucial for its movement and hunting abilities. Finally, we will refine the overall shape and proportions of your lion drawing, ensuring that it is accurate and visually appealing. By following these steps, you will be able to create a stunning and realistic lion drawing that showcases your artistic skills. So, let's dive in and start adding the details that will make your lion drawing truly roar.
1. Add the whiskers, eyebrows, and other facial details
step-by-step guide for beginners. To bring your lion's face to life, it's time to add the whiskers, eyebrows, and other facial details. Start by drawing a series of short, curved lines around the mouth and nose to create the whiskers. These should be thicker and more prominent around the mouth, gradually becoming thinner and more sparse towards the nose. Next, draw two curved lines above the eyes to create the eyebrows. These should be thicker at the outer edges and taper inwards towards the nose. You can also add a few short, curved lines above the eyebrows to create a subtle texture, giving your lion a more rugged and majestic appearance. Moving on to the eyes, add a small circle to the center of each eye to create the pupil. You can also add a few short, curved lines around the eyes to create a subtle texture and give your lion a more expressive gaze. Finally, add a small curved line below the nose to create the mouth, and a few short, curved lines around the mouth to create a subtle texture and give your lion a more relaxed and contented appearance. By adding these facial details, you'll be able to bring your lion to life and give it a unique and expressive personality.
2. Define the lion's claws and paws
step by step for beginners. The paragraphy should be written in a friendly, approachable, and encouraging tone. Here is the paragraphy: When it comes to drawing a lion, one of the most distinctive features is its claws and paws. A lion's claws are made of keratin, the same protein that makes up human hair and nails, and are retractable, meaning they can be pulled back into the paw for safety and convenience. The claws are curved and sharp, perfect for grasping and holding onto prey, and are also used for climbing, self-defense, and even marking territory. A lion's paws, on the other hand, are large and padded, with five toes on the front paws and four on the back. The paws are also equipped with scent glands, which help the lion mark its territory and communicate with other lions. When drawing a lion's claws and paws, be sure to pay attention to the details - the shape and size of the claws, the texture of the paw pads, and the way the toes are arranged. With a little practice, you'll be able to capture the majesty and power of a lion's claws and paws in your drawing.
3. Refine the overall shape and proportions of your lion drawing
step by step for beginners. The paragraphy should be written in a friendly, approachable, and encouraging tone, with a focus on helping beginners feel confident and motivated to continue practicing and improving their drawing skills. Here is the paragraphy: Now that you have the basic shape of your lion's body and head in place, it's time to refine the overall shape and proportions of your drawing. Take a step back and look at your lion's body as a whole. Make sure the proportions are correct, with the body being roughly 1.5 to 2 times the size of the head. Check that the legs are in proportion to the body, with the front legs being slightly shorter than the back legs. Don't worry if your lion's body isn't perfect - lions come in all shapes and sizes, and a little bit of imperfection can actually add character to your drawing. As you refine the shape of your lion's body, pay attention to the subtle curves and contours that give your lion its muscular, athletic appearance. Use gentle, flowing lines to suggest the shape of the muscles beneath the skin, and don't be afraid to add a few subtle wrinkles and creases to give your lion a more realistic, aged appearance. Remember, the key to drawing a convincing lion is to capture its sense of power, strength, and agility, so don't be afraid to experiment and try out different poses and expressions until you find one that feels right. With a little practice and patience, you'll be drawing majestic lions like a pro in no time!