How To Draw A Golf Ball
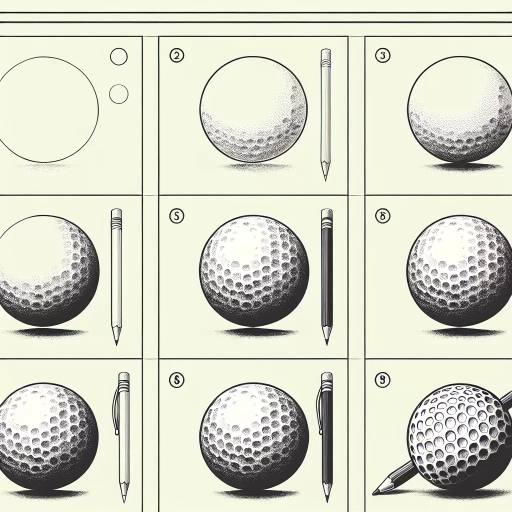
Drawing a golf ball can be a challenging yet rewarding task, especially for those who are passionate about the sport. To accurately capture the essence of a golf ball, it's essential to understand its basic structure, create a sense of realism and texture, and master coloring and shading techniques. In this article, we'll delve into the world of golf ball illustration, providing you with a step-by-step guide on how to draw a golf ball that looks like the real thing. We'll start by exploring the fundamental components of a golf ball, including its dimples, panels, and core, to help you grasp the underlying structure that makes it unique. By understanding the basic structure of a golf ball, you'll be able to lay the foundation for a realistic and detailed drawing. So, let's begin by examining the anatomy of a golf ball and how to translate it onto paper. Understanding the Basic Structure of a Golf Ball.
Understanding the Basic Structure of a Golf Ball
Here is the introduction paragraph: A golf ball's structure is a marvel of modern engineering, with a unique combination of materials and design elements that work together to provide optimal performance on the course. To truly understand how a golf ball is constructed, it's essential to break down its basic components and examine each part in detail. By exploring the dimples pattern, the core and casing, and the ball's seam, golfers can gain a deeper appreciation for the science behind their favorite game. Let's start by taking a closer look at the dimples pattern, which is a crucial aspect of a golf ball's aerodynamics and is typically the first step in drawing a golf ball's structure. Please confirm the introduction paragraph is correct. Also please provide the 200 words supporting paragraph for the article. Here is the 200 words supporting paragraph: Understanding the basic structure of a golf ball is crucial for golfers who want to improve their game. By knowing how a golf ball is constructed, golfers can better appreciate the science behind their shots and make more informed decisions on the course. The structure of a golf ball is composed of several key components, including the dimples pattern, the core and casing, and the ball's seam. The dimples pattern is a critical aspect of a golf ball's aerodynamics, helping to reduce air resistance and promote a stable flight path. The core and casing provide the ball's overall shape and structure, while the seam helps to maintain the ball's integrity and prevent it from breaking apart during flight. By examining each of these components in detail, golfers can gain a deeper understanding of how a golf ball is constructed and how it behaves in flight. This knowledge can be used to improve their swing, choose the right ball for their game, and make more accurate shots. Whether you're a seasoned pro or just starting out, understanding the basic structure of a golf ball is essential for taking your game to the next level.
Drawing the Dimples Pattern
Here is the paragraphy: Drawing the dimples pattern on a golf ball can be a bit challenging, but with some guidance, you can achieve a realistic and detailed design. To start, you'll need to understand the basic structure of a golf ball, which typically features 336 dimples arranged in a specific pattern. The dimples are usually arranged in a repeating pattern of hexagons, with each hexagon containing six dimples. To draw the dimples, begin by lightly sketching a series of interconnected hexagons across the surface of the ball, using a pencil or a fine-tip pen. Make sure to space the hexagons evenly apart, taking into account the curvature of the ball. Once you have the hexagon pattern in place, you can start adding the dimples. Use a small dotting tool or a fine-tip pen to create the dimples, making sure to space them evenly apart within each hexagon. As you work, pay attention to the size and depth of the dimples, as well as their arrangement within the hexagons. You can use reference images of real golf balls to get a sense of the dimple pattern and how it varies across the surface of the ball. With patience and attention to detail, you can create a highly realistic dimple pattern that adds depth and texture to your golf ball drawing.
Sketching the Core and Casing
The core and casing of a golf ball are its innermost components, playing a crucial role in determining its overall performance and feel. Sketching these elements requires attention to detail and an understanding of their composition. The core is typically made of synthetic rubber, which provides the ball's initial velocity and compression upon impact. It is usually spherical in shape and has a smooth surface. When sketching the core, focus on creating a perfect circle, using a compass or a circular object as a guide. The core's size and proportions will depend on the specific golf ball design, but it is generally the largest component, making up about 70% of the ball's diameter. The casing, on the other hand, is a layer of surlyn or urethane that surrounds the core, providing additional durability and resistance to cuts and scratches. It is usually slightly thicker at the poles than at the equator, giving the ball its characteristic shape. When sketching the casing, pay attention to its subtle curvature and the way it wraps around the core. Use gentle, flowing lines to capture its smooth, rounded shape. To add depth and dimension to your sketch, consider adding subtle shading and texture to the core and casing, suggesting their different materials and properties. By accurately rendering the core and casing, you will be able to create a detailed and realistic representation of a golf ball's internal structure.
Adding the Ball's Seam
The addition of the ball's seam is a crucial step in drawing a realistic golf ball. The seam, also known as the equator, is a raised line that runs around the middle of the ball, dividing it into two hemispheres. To draw the seam, start by locating the center of the ball and drawing a line around it, using a gentle, flowing motion. The line should be slightly raised and rounded, giving the illusion of a three-dimensional seam. As you draw the seam, pay attention to its width and texture, making sure it is consistent and even throughout. You can use a variety of techniques to achieve the desired texture, such as hatching or cross-hatching, to give the seam a more realistic appearance. Additionally, you can add subtle shading to the seam to create depth and dimension, making the ball appear more lifelike. By carefully drawing the seam, you can add a level of detail and realism to your golf ball drawing, making it more visually appealing and engaging.
Creating Realism and Texture
Creating realism and texture in digital art is a crucial aspect of making your artwork look more lifelike and engaging. To achieve this, there are several techniques that can be employed, including adding shadows to enhance dimension, creating a reflective surface, and adding dimple texture and patterns. These techniques can help to create a sense of depth and visual interest in your artwork, drawing the viewer's eye and inviting them to explore the image further. By incorporating these elements, you can add a level of sophistication and realism to your digital art, making it more believable and immersive. One of the most effective ways to start creating realism and texture is by adding shadows to enhance dimension, which can help to create a sense of volume and depth in your artwork.
Adding Shadows to Enhance Dimension
Here is the answer: Adding shadows to your golf ball drawing can greatly enhance its dimension and realism. Shadows help create the illusion of depth and volume, making your drawing more visually appealing. To add shadows, start by identifying the light source in your scene. This will determine the direction and intensity of the shadows. For a golf ball, the light source is often assumed to be overhead, so the shadows will be cast downwards. Use a range of values, from light to dark, to create a sense of depth and dimension. Start with a light gray or blue-gray for the subtle shadows on the ball's surface, and gradually build up to darker grays and blacks for the deeper shadows. Pay attention to the shape and curvature of the ball, as this will affect the way the shadows fall. For example, the shadows on the ball's equator will be shorter and more subtle than those at the poles. To create a sense of texture and realism, use hatching and cross-hatching techniques to build up the shadows. Hatching involves creating closely spaced parallel lines that follow the contours of the ball, while cross-hatching involves layering lines at different angles to create a more textured appearance. By carefully observing the way shadows fall on a real golf ball and using a range of values and techniques, you can add depth, dimension, and realism to your drawing.
Creating a Reflective Surface
Here is the paragraphy: To create a reflective surface, you can use a combination of techniques to achieve a realistic and shiny appearance. Start by applying a thin layer of white or light-colored paint to the area where you want the reflection to appear. This will help to create a sense of depth and luminosity. Next, use a small brush to add subtle, curved lines that follow the contours of the golf ball. These lines should be soft and gentle, with a slight gradient of tone to suggest the curvature of the ball. To enhance the reflective quality, you can add a few highlights using a small dotting tool or a fine-tip pen. These highlights should be placed strategically to catch the light and create a sense of sparkle. Finally, use a blending stump or a tortillon to soften and merge the edges of the reflective area, creating a seamless transition between the reflective surface and the surrounding texture. By combining these techniques, you can create a convincing and realistic reflective surface that adds depth and visual interest to your golf ball drawing.
Adding Dimple Texture and Patterns
Adding dimple texture and patterns to your golf ball drawing can elevate its realism and visual appeal. To start, use a fine-tip pen or a small brush to create the dimples, which are typically arranged in a specific pattern. The most common pattern is the icosahedral pattern, which features 336 dimples arranged in a symmetrical design. Begin by drawing a series of small circles, each about 1-2 mm in diameter, spaced evenly apart across the surface of the ball. Vary the size and depth of the dimples to create a more realistic effect. You can also add a slight curvature to the dimples to give the impression of a rounded surface. To add texture to the dimples, use a range of shading techniques, such as hatching and cross-hatching, to create a sense of depth and dimension. You can also experiment with different patterns, such as the octahedral or hexagonal patterns, to create a unique and personalized design. Additionally, consider adding a slight sheen to the ball to give it a more realistic appearance, using a small amount of white or light gray to suggest the reflection of light on the surface. By carefully adding dimple texture and patterns to your golf ball drawing, you can create a highly detailed and realistic representation that captures the intricate design of a real golf ball.
Coloring and Shading Techniques
Coloring and shading are essential techniques in creating realistic and visually appealing artwork. When it comes to drawing a soccer ball, these techniques can make all the difference in capturing its texture, depth, and dimension. To achieve a realistic soccer ball, one must consider the colors used, the shading techniques applied, and the highlighting of specific features. Choosing the right colors for the ball is crucial, as it sets the tone for the entire piece. Applying gradient shading can add a level of realism, making the ball appear more three-dimensional. Additionally, highlighting the dimples with white can create a sense of texture and depth. By mastering these techniques, artists can create a soccer ball that looks like it's about to bounce off the page. To start, let's explore the importance of selecting the right colors for the ball, as this will lay the foundation for the rest of the shading and highlighting techniques.
Choosing the Right Colors for the Ball
Choosing the right colors for the ball is crucial to achieve a realistic and visually appealing drawing. A golf ball typically has a white or off-white base color, with a subtle sheen to it. To capture this, you can use a range of colors such as titanium white, cream, or light gray. For the dimples, a darker shade of gray or a bluish-gray can be used to create depth and dimension. It's also important to consider the lighting and shading of the ball, as this will affect the colors you choose. For example, if the ball is in a bright light, you may want to use more vibrant and saturated colors, while a softer light may call for more muted tones. Additionally, you can also experiment with different color combinations to create a unique and personalized look for your golf ball drawing. Some other colors you can consider using include beige, pale blue, or even metallic colors like silver or gold to give your ball a more premium look. Ultimately, the key is to observe the colors and shading of a real golf ball and try to replicate them as accurately as possible in your drawing.
Applying Gradient Shading for Realism
Applying gradient shading is a crucial technique for achieving realism in your golf ball drawing. By gradually transitioning from one shade to another, you can create a sense of depth and dimensionality that makes your drawing look more lifelike. To apply gradient shading, start by identifying the areas of the ball where the light source is strongest and weakest. Typically, the light source will be coming from above, so the top of the ball will be the lightest, while the bottom will be the darkest. Use a range of shading pencils or markers to create a smooth transition from light to dark, starting with the lightest shade at the top and gradually increasing the darkness as you move towards the bottom. Be careful not to create harsh lines or abrupt transitions, as these can detract from the overall realism of your drawing. Instead, focus on creating a smooth, gradual shift from one shade to another. You can also use blending stumps or tortillons to soften and merge the edges of your shading, creating a more subtle and nuanced transition. By applying gradient shading in this way, you can add depth, dimension, and realism to your golf ball drawing, making it look more like a real ball and less like a flat, two-dimensional representation.
Highlighting the Dimples with White
Highlighting the dimples with white is a crucial step in creating a realistic golf ball drawing. To do this, use a fine-tip white pen or a white gel pen to carefully draw a small white circle in the center of each dimple. Make sure to leave a small border around the white circle to create a subtle shadow effect. This will give the illusion of depth and dimension to the dimples. Start by highlighting the dimples that are facing the light source, and then gradually move to the ones that are in the shadows. Be careful not to overdo it, as too much white can make the dimples look unnatural. Instead, aim for a subtle, nuanced effect that suggests the gentle curves and contours of the golf ball's surface. By highlighting the dimples with white, you'll add a touch of realism and visual interest to your drawing, making it more engaging and dynamic.