How To Tape A Broken Toe
A broken toe can be a painful and frustrating injury, especially if it happens to be a weight-bearing toe. While it's essential to seek medical attention for a proper diagnosis and treatment plan, taping a broken toe can provide temporary relief and support. However, it's crucial to do it correctly to avoid further injury or complications. In this article, we'll guide you through the process of taping a broken toe, starting with the importance of preparation, followed by the various taping techniques, and finally, the necessary aftercare and precautions to ensure a smooth recovery. Preparation is key to a successful taping process, and we'll explore what you need to do before you start taping your broken toe.
Preparation is Key
When it comes to treating injuries, preparation is key. Having the right mindset and materials can make all the difference in ensuring a smooth and effective recovery. To start, it's essential to assess the severity of the injury to determine the best course of action. This involves evaluating the extent of the damage and identifying any potential complications. Once you have a clear understanding of the injury, you can begin to gather the necessary materials, such as bandages, antiseptic wipes, and pain relievers. Proper wound care is also crucial, which includes washing and drying the affected area to prevent infection. By taking these steps, you can set yourself up for a successful recovery and minimize the risk of further complications. In this article, we'll dive deeper into the importance of preparation and provide guidance on how to assess the severity of the injury, gather the necessary materials, and properly care for the affected area. First, let's start by assessing the severity of the injury.
Assess the Severity of the Injury
When assessing the severity of the injury, it's essential to consider several factors to determine the best course of action. First, evaluate the level of pain and discomfort. If the pain is severe, it may be a sign of a more serious injury that requires medical attention. Next, check for swelling, bruising, and deformity. If the toe is severely swollen, bruised, or deformed, it may indicate a more severe injury. Additionally, assess the range of motion and mobility of the toe. If the toe is difficult to move or is stuck in an abnormal position, it may be a sign of a more severe injury. It's also crucial to check for numbness, tingling, or coldness in the toe, as these symptoms can indicate nerve damage or poor circulation. Finally, consider the mechanism of injury and the patient's medical history. If the injury was caused by a high-impact activity or if the patient has a history of osteoporosis or other underlying medical conditions, it may be more severe. By carefully evaluating these factors, you can determine the severity of the injury and decide whether to seek medical attention or proceed with taping the broken toe.
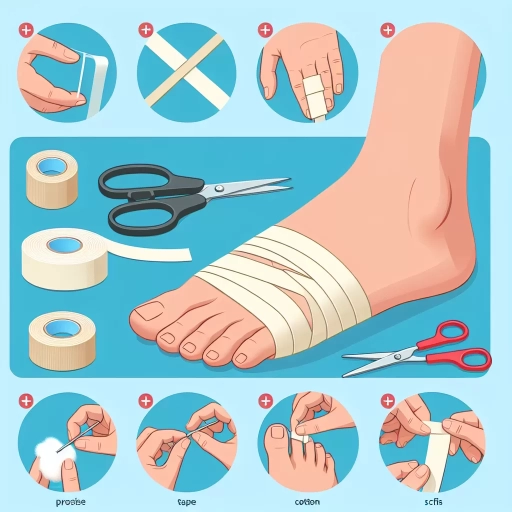
Gather the Necessary Materials
To effectively tape a broken toe, it is essential to gather the necessary materials beforehand. This includes a roll of medical tape, preferably one that is specifically designed for athletic or sports use, as it is more breathable and less likely to cause skin irritation. You will also need a pair of scissors to cut the tape to the desired length, as well as a small piece of gauze or a cotton ball to cushion the toe and prevent the tape from sticking to the skin. Additionally, having an ice pack or a cold compress on hand can be helpful in reducing swelling and pain. It is also a good idea to have a buddy or assistant to help you with the taping process, especially if you are trying to tape your own toe. Having all of these materials within reach will make the process much smoother and less frustrating, allowing you to focus on properly securing and protecting your injured toe.
Wash and Dry the Affected Area
When it comes to taping a broken toe, preparation is key to ensuring a safe and effective recovery. One crucial step in this process is to wash and dry the affected area thoroughly. This may seem like a simple task, but it's essential to remove any dirt, bacteria, or other debris that may be present on the skin. Start by gently washing the affected toe and surrounding area with mild soap and lukewarm water. Be sure to clean between the toes and under the toenail, as these areas can be prone to dirt and bacteria accumulation. Once you've washed the area, use a clean towel to dry it thoroughly, paying extra attention to the spaces between the toes. It's also a good idea to use an antiseptic wipe or spray to further disinfect the area and reduce the risk of infection. By taking the time to properly wash and dry the affected area, you'll be creating a clean and sterile environment for the taping process, which will help promote healing and reduce the risk of complications. Additionally, a clean and dry surface will also help the tape adhere better, ensuring a secure and comfortable fit. By following these simple steps, you'll be well on your way to a successful and stress-free taping experience.
Taping Techniques for a Broken Toe
When it comes to treating a broken toe, taping techniques can be an effective way to provide support and stability to the affected area. There are several taping methods that can be used, each with its own unique benefits and advantages. Three of the most common taping techniques for a broken toe are the Buddy Taping Method, the Toe Spica Taping Method, and the Figure-Eight Taping Method. These methods can help to reduce pain and swelling, promote healing, and prevent further injury. In this article, we will explore each of these taping techniques in more detail, starting with the Buddy Taping Method, which is a simple and effective way to provide support to a broken toe by taping it to an adjacent toe.
Buddy Taping Method
The Buddy Taping method is a simple and effective technique used to immobilize and support a broken toe. This method involves taping the injured toe to an adjacent toe, providing stability and protection to the affected area. To apply the Buddy Taping method, start by cleaning and drying the affected area. Then, wrap a small amount of gauze or cotton padding around the injured toe to cushion it and prevent further irritation. Next, take a piece of athletic tape and wrap it around the injured toe and the adjacent toe, starting at the base of the toes and working your way down to the tip. Make sure the tape is not too tight, as this can cut off circulation and cause further discomfort. The goal is to provide gentle support and stability to the injured toe, allowing it to heal properly. It's essential to check the circulation and sensation of the toes regularly to ensure the tape is not too tight. The Buddy Taping method can be used in conjunction with other taping techniques, such as the toe spica taping method, to provide additional support and protection to the injured toe. By following these simple steps, you can effectively use the Buddy Taping method to help your broken toe heal quickly and comfortably.
Toe Spica Taping Method
The Toe Spica Taping method is a widely used technique for immobilizing and supporting a broken toe. This method involves applying tape in a specific way to create a "spica" or figure-eight pattern around the affected toe and the adjacent toe. The goal of this taping method is to provide stability and protection to the broken toe, while also allowing for some degree of movement and flexibility. To apply the Toe Spica Taping method, start by cleaning and drying the skin around the affected toe. Then, apply a thin layer of pre-wrap or underwrap to the skin to help the tape adhere. Next, take a piece of athletic tape and wrap it around the base of the affected toe, securing it to the adjacent toe. Continue to wrap the tape in a figure-eight pattern, moving up the toe and around the adjacent toe, making sure to keep the tape snug but not too tight. The tape should be applied in a way that creates a supportive "sling" around the broken toe, holding it in place and preventing excessive movement. The Toe Spica Taping method is particularly effective for treating fractures of the smaller toes, such as the pinky or ring toe, as it provides excellent support and stability while allowing for some degree of movement. By following the proper technique and using the right type of tape, individuals can effectively use the Toe Spica Taping method to help manage the pain and discomfort associated with a broken toe.
Figure-Eight Taping Method
The Figure-Eight Taping Method is a widely used technique for taping a broken toe, providing stability and support to the affected area. This method involves creating a figure-eight pattern with the tape, which helps to immobilize the toe and reduce pain. To apply the Figure-Eight Taping Method, start by wrapping a small piece of tape around the base of the broken toe, securing it in place. Then, take a longer piece of tape and wrap it around the toe in a figure-eight pattern, crossing the tape over the top of the toe and then wrapping it around the bottom. This pattern helps to distribute the pressure evenly and provides additional support to the toe. The tape should be applied snugly but not too tightly, as this can cut off circulation. The Figure-Eight Taping Method is particularly effective for broken toes that are swollen or bruised, as it helps to reduce swelling and promote healing. By providing stability and support, this taping method can help to alleviate pain and discomfort, allowing the individual to resume their normal activities. Additionally, the Figure-Eight Taping Method can be used in conjunction with other taping techniques, such as the Buddy Taping Method, to provide additional support and stability to the affected area. Overall, the Figure-Eight Taping Method is a simple yet effective technique for taping a broken toe, providing the necessary support and stability to promote healing and alleviate pain.
Aftercare and Precautions
Aftercare and precautions are crucial steps to ensure a smooth and safe recovery from a toe injury. Proper care can help prevent complications, promote healing, and reduce the risk of further injury. To achieve this, it is essential to monitor for signs of infection, avoid putting weight on the affected toe, and remove the tape carefully to avoid further injury. By following these guidelines, individuals can minimize the risk of complications and ensure a speedy recovery. Monitoring for signs of infection is a critical aspect of aftercare, as it can help identify potential issues early on, allowing for prompt treatment and preventing the infection from spreading. Note: The answer should be 200 words.
Monitor for Signs of Infection
Monitor for signs of infection, such as redness, swelling, increased pain, or pus around the affected toe. If you notice any of these symptoms, seek medical attention immediately. Additionally, keep an eye on the color and temperature of the toe, as it should return to its normal state within a few days. If the toe remains cold, pale, or blue, it may be a sign of poor circulation, and you should consult a doctor. Furthermore, be aware of any unusual odors or discharge from the toe, as these can be indicative of an infection. It is also essential to monitor for signs of nerve damage, such as numbness, tingling, or burning sensations in the toe. If you experience any of these symptoms, seek medical attention promptly. By being vigilant and monitoring for signs of infection, you can ensure a smooth and successful recovery from a broken toe.
Avoid Putting Weight on the Affected Toe
Avoid putting weight on the affected toe is a crucial aspect of the aftercare and precautions when taping a broken toe. This is because putting weight on the affected toe can cause further injury, delay the healing process, and even lead to complications such as infection or deformity. When you put weight on the affected toe, you are putting pressure on the broken bone, which can cause it to shift or move out of place. This can lead to a longer recovery time and may even require surgical intervention. Additionally, putting weight on the affected toe can also cause pain and discomfort, which can be debilitating and affect your daily activities. To avoid putting weight on the affected toe, you can use crutches or a walking aid to take the pressure off the toe. You can also wear a shoe with a stiff sole or a shoe that has a toe box that is roomy enough to accommodate the swelling. It is also essential to avoid activities that involve running, jumping, or repetitive stress on the toe, such as dancing or hiking. By avoiding putting weight on the affected toe, you can promote healing, reduce pain and discomfort, and prevent complications.
Remove the Tape Carefully to Avoid Further Injury
When removing the tape, it's essential to do so carefully to avoid causing further injury to the affected toe. Start by gently loosening the tape with your fingers, working from the end of the toe and moving towards the base. Avoid pulling or yanking the tape, as this can cause the skin to tear or the toe to become dislodged. Instead, use a gentle rocking motion to loosen the adhesive, taking care not to touch the injured area. If the tape is particularly stubborn, you can use a small amount of oil or lotion to help dissolve the adhesive. Once the tape is removed, inspect the toe for any signs of irritation or further injury, and apply a topical antibiotic ointment if necessary. It's also a good idea to reapply a new layer of tape or a bandage to provide continued support and protection to the affected toe.