How To Roll A Cone
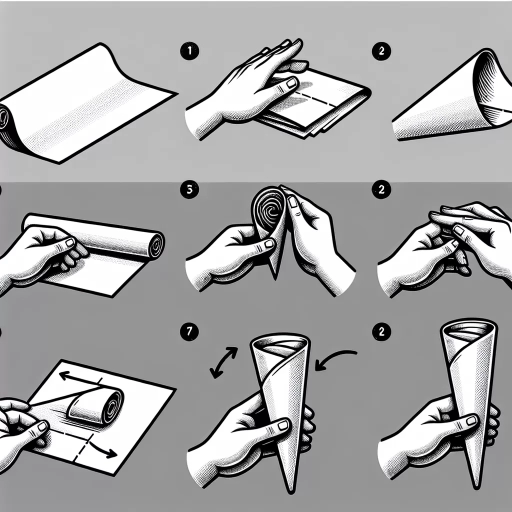
Rolling a cone is a delicate art that requires patience, skill, and attention to detail. Whether you're a seasoned cannabis enthusiast or a newcomer to the world of cannabis, learning how to roll a cone is an essential skill that can elevate your smoking experience. In this article, we'll take you through the step-by-step process of rolling a cone, from understanding the basics to mastering the techniques and adding the finishing touches. To start, it's essential to understand the fundamentals of rolling a cone, including the type of paper to use, the right amount of cannabis to add, and the basic rolling technique. By grasping these basics, you'll be well on your way to creating a perfectly rolled cone that will impress even the most seasoned smokers. So, let's begin by Understanding the Basics of Rolling a Cone.
Understanding the Basics of Rolling a Cone
Rolling a cone is a fundamental skill that can be applied in various contexts, from crafting and art to engineering and design. To master the art of rolling a cone, it's essential to understand the basics, which involve selecting the right paper and material, measuring and cutting the paper to the right size, and understanding the basic cone shape and structure. By grasping these fundamental concepts, individuals can create cones with precision and accuracy, whether for functional or decorative purposes. In this article, we will delve into the world of cone rolling, starting with the crucial step of choosing the right paper and material, which sets the foundation for a successful cone-rolling experience.
Choosing the Right Paper and Material
When it comes to rolling a cone, the type of paper and material used can make all the difference in the final product's quality and durability. Choosing the right paper and material is crucial to ensure that your cone is sturdy, visually appealing, and suitable for its intended use. For instance, if you're planning to use your cone for smoking, you'll want to opt for a paper that is thin, even, and has a smooth texture to prevent any harsh flavors or uneven burns. On the other hand, if you're creating a cone for decorative purposes, you may want to choose a paper with a more textured or patterned design to add visual interest. In terms of material, you can choose from a variety of options, including wood pulp, hemp, or flax, each with its own unique characteristics and benefits. Wood pulp paper, for example, is a popular choice for cones due to its affordability and ease of use, while hemp paper is a more sustainable option that is also resistant to mold and mildew. Ultimately, the right paper and material for your cone will depend on your specific needs and preferences, so be sure to do your research and choose a high-quality option that meets your standards.
Measuring and Cutting the Paper to the Right Size
When it comes to rolling a cone, one of the most crucial steps is measuring and cutting the paper to the right size. To achieve a perfect cone, you need to ensure that your paper is cut accurately, taking into account the desired height and base size of your cone. Start by determining the height of your cone, and then use a ruler or a straightedge to draw a line on the paper to mark the height. Next, decide on the base size of your cone and use a compass or a circular object to draw a circle on the paper. The diameter of the circle should be equal to the base size of your cone. Once you have drawn the circle, use a ruler or a straightedge to draw a line from the center of the circle to the edge, creating a radius. This line will serve as a guide for cutting out the cone shape. To cut out the cone shape, place the paper on a flat surface and use scissors or a craft knife to carefully cut along the line, starting from the edge of the paper and working your way around the circle. Make sure to cut slowly and carefully, as a straight cut is essential for creating a symmetrical cone. As you cut, use a ruler or a straightedge to guide your scissors or craft knife, ensuring that the cut is straight and even. Once you have cut out the cone shape, use a bone folder or a similar tool to create a crease along the edge of the paper, where the cone will be folded. This crease will help you create a sharp, defined edge when you roll the cone. By measuring and cutting the paper to the right size, you will be able to create a cone that is symmetrical, even, and visually appealing.
Understanding the Basic Cone Shape and Structure
Understanding the basic cone shape and structure is crucial before attempting to roll one. A cone is a three-dimensional geometric shape that tapers smoothly from a circular base to a point, called the apex. The cone's structure consists of a circular base, a curved lateral surface, and the apex. The lateral surface is the curved part of the cone that connects the base to the apex. The slant height is the distance from the apex to the edge of the base, while the height is the perpendicular distance from the apex to the center of the base. The radius is the distance from the center of the base to the edge of the base. Understanding these basic components and their relationships is essential to successfully rolling a cone. By visualizing the cone's shape and structure, you can better comprehend how to manipulate the paper to create a smooth, even curve, and how to adjust the size and shape of the cone to achieve the desired result.
Mastering the Techniques of Rolling a Cone
Rolling a cone is a delicate art that requires precision, patience, and practice. Whether you're a seasoned craftsperson or a beginner, mastering the techniques of rolling a cone can elevate your projects to new heights. To achieve a perfectly formed cone, it's essential to focus on three key aspects: creating a crisp fold and starting the roll, shaping and molding the cone to the desired form, and securing the cone with a tab or glue. By mastering these techniques, you'll be able to create cones that are not only visually appealing but also durable and long-lasting. In this article, we'll delve into the world of cone rolling and explore the intricacies of each step, starting with the foundation of it all: creating a crisp fold and starting the roll.
Creating a Crisp Fold and Starting the Roll
When it comes to rolling a cone, creating a crisp fold and starting the roll is a crucial step that requires attention to detail and a bit of finesse. To achieve a crisp fold, begin by holding the cone paper with the shiny side facing down and the seam facing up. Locate the center crease of the paper and gently pinch it to create a sharp fold. This will help you establish a clear starting point for your roll. Next, take the top edge of the paper and fold it down towards the center crease, creating a 45-degree angle. This fold should be crisp and sharp, with no wrinkles or creases. To ensure a smooth roll, make sure the edge of the paper is aligned with the center crease and the fold is even on both sides. With the crisp fold in place, you can now start the roll by gently curling the paper into a cone shape, applying gentle pressure to the seam as you go. As you roll, make sure to maintain even pressure and keep the edge of the paper aligned with the center crease to prevent wrinkles and creases from forming. By following these steps, you'll be able to create a crisp fold and start the roll with confidence, setting yourself up for a successful cone-rolling experience.
Shaping and Molding the Cone to the Desired Form
Rolling a cone requires a combination of shaping and molding the cone to the desired form. To achieve this, start by holding the cone between your thumb and index finger, with the seam facing upwards. Gently squeeze the cone to create a small indentation at the top, which will help guide the rolling process. Next, use your thumb to apply gentle pressure to the cone, starting from the top and working your way down. As you apply pressure, use your index finger to shape the cone into the desired form, whether it's a perfect cylinder or a more tapered shape. Be careful not to apply too much pressure, as this can cause the cone to become misshapen or develop wrinkles. Instead, focus on using gentle, consistent pressure to coax the cone into the desired shape. As you continue to roll the cone, use your fingers to mold and shape it, making adjustments as needed to achieve the perfect form. With practice and patience, you'll be able to shape and mold the cone to the desired form, creating a perfectly rolled cone every time.
Securing the Cone with a Tab or Glue
Securing the cone with a tab or glue is a crucial step in the cone-rolling process. Once you have rolled the cone to the desired shape and size, you need to ensure that it holds its form and doesn't come apart. This is where the tab or glue comes in. A tab is a small flap of paper that is attached to the cone and folded over to secure it in place. To create a tab, simply cut a small triangle of paper from the top of the cone and fold it over, tucking the edge under the cone. You can then use a small dot of glue to hold the tab in place. Alternatively, you can use a small amount of glue to secure the cone without a tab. Apply a tiny amount of glue to the edge of the cone and hold it in place for a few seconds until it sets. Either method will ensure that your cone holds its shape and is secure. It's worth noting that the type of glue you use is important. A glue stick or a small amount of white glue is best, as they dry clear and won't leave any visible residue on the cone. Avoid using hot glue or super glue, as they can be too strong and may damage the paper. By securing the cone with a tab or glue, you can ensure that your finished cone is sturdy and long-lasting.
Adding the Finishing Touches to Your Rolled Cone
The final stage of creating a rolled cone is where the magic happens, and your project transforms into a stunning piece of art. Adding the finishing touches to your rolled cone is a crucial step that requires attention to detail and creativity. In this stage, you'll have the opportunity to add decorations and embellishments to the cone, seal it with a clear coat or varnish to protect it from damage, and finally, shape and smooth out any imperfections. By adding these finishing touches, you'll be able to enhance the overall appearance of your cone and make it truly unique. Let's start by exploring the various ways you can add decorations and embellishments to the cone, which can range from simple to intricate designs, and can completely transform the look and feel of your rolled cone.
Adding Decorations and Embellishments to the Cone
Adding decorations and embellishments to the cone is a great way to give it a personalized touch and make it stand out. You can use a variety of materials such as glitter, stickers, and ribbons to add a pop of color and texture to the cone. For a more elegant look, you can use metallic paint or markers to add intricate designs and patterns. If you're feeling crafty, you can also try adding some handmade embellishments such as paper flowers or beads. Another option is to use themed decorations such as holiday-themed stickers or sports team logos to match the occasion. When adding decorations, make sure to balance them out and not overdo it, as too many embellishments can make the cone look cluttered and overwhelming. Start with a few simple decorations and add more as needed, and don't be afraid to experiment and try out different combinations to find the look that works best for you.
Sealing the Cone with a Clear Coat or Varnish
Sealing the cone with a clear coat or varnish is a crucial step in adding the finishing touches to your rolled cone. This process helps to protect the cone from moisture, dust, and other environmental factors that can cause it to deteriorate or become brittle. By applying a clear coat or varnish, you can ensure that your cone remains durable and long-lasting, while also enhancing its appearance. There are several types of clear coats and varnishes available, including water-based, solvent-based, and UV-resistant options. When choosing a clear coat or varnish, consider the type of material your cone is made of, as well as the desired level of protection and finish. For example, a water-based clear coat may be suitable for paper or cardboard cones, while a solvent-based varnish may be better suited for cones made of wood or other natural materials. Regardless of the type of clear coat or varnish you choose, be sure to follow the manufacturer's instructions for application and drying times to ensure a smooth, even finish. By sealing your cone with a clear coat or varnish, you can add a professional touch to your rolled cone and ensure that it remains a beautiful and functional piece for years to come.
Final Shaping and Smoothing of the Cone
The final shaping and smoothing of the cone is a crucial step in achieving a perfectly rolled cone. To begin, gently pinch the tip of the cone to create a defined point, making sure not to apply too much pressure, which can cause the paper to tear. Next, run your fingers along the edges of the cone to smooth out any wrinkles or creases, ensuring a seamless and even surface. To add a touch of finesse, use a blunt object, such as a chopstick or pencil, to gently press the edges of the cone, creating a crisp and defined shape. Finally, inspect the cone for any imperfections and make any necessary adjustments to achieve a smooth, symmetrical, and perfectly formed cone. By taking the time to carefully shape and smooth the cone, you'll be rewarded with a beautifully crafted rolled cone that's sure to impress.