How To Turn Imessage On
Here is the introduction paragraph: iMessage is a popular messaging service developed by Apple, allowing users to send messages, photos, videos, and other files over the internet. To get started with iMessage, it's essential to understand its requirements and how to enable it on your Apple device. In this article, we'll guide you through the process of turning iMessage on, from understanding its basics to customizing and managing its settings. First, we'll delve into the world of iMessage, exploring its features and requirements, including the necessary hardware and software specifications. By the end of this article, you'll be able to seamlessly send and receive iMessages with your friends and family. So, let's start by understanding iMessage and its requirements.
Understanding iMessage and Its Requirements
iMessage is a popular messaging service developed by Apple, allowing users to send messages, photos, videos, and other files over the internet. To use iMessage, it's essential to understand its requirements and how it differs from traditional SMS. In this article, we'll delve into the world of iMessage, exploring what it is, how it differs from SMS, the system requirements for using it, and the internet connection requirements necessary for seamless messaging. By the end of this article, you'll have a comprehensive understanding of iMessage and be able to use it effectively. So, let's start by understanding the basics of iMessage and how it differs from SMS.
What is iMessage and How Does it Differ from SMS
iMessage is a messaging service developed by Apple, allowing users to send messages, photos, videos, and other files between Apple devices over the internet. Unlike SMS (Short Message Service), which relies on cellular networks to send text messages, iMessage uses end-to-end encryption and internet connectivity to facilitate communication. This means that iMessage messages are sent through Apple's servers, rather than through traditional cellular networks. As a result, iMessage offers several key differences from SMS, including the ability to send messages over Wi-Fi, support for group chats, and the use of read receipts and typing indicators. Additionally, iMessage allows users to send high-quality photos and videos, as well as make voice and video calls, all within the Messages app. To use iMessage, users must have an Apple device, such as an iPhone or iPad, and be connected to the internet. They must also have a valid Apple ID and be running iOS 5 or later, or macOS Mountain Lion or later. Overall, iMessage provides a more feature-rich and secure messaging experience compared to traditional SMS.
System Requirements for Using iMessage
To use iMessage, you need to meet specific system requirements. iMessage is exclusive to Apple devices, so you'll need an iPhone, iPad, iPod touch, or Mac computer. For mobile devices, you'll need to be running at least iOS 5 or later, while Mac computers require macOS Mountain Lion or later. Additionally, you'll need to have a stable internet connection, either through Wi-Fi or a cellular data plan. If you're using a cellular data plan, ensure that your carrier supports iMessage. You'll also need to have an Apple ID, which is used to activate and authenticate iMessage on your device. If you're using a Mac, you'll need to sign in with your Apple ID in the Messages app to start using iMessage. Furthermore, if you want to use iMessage on multiple devices, you'll need to sign in with the same Apple ID on all devices to sync your conversations and messages. It's also important to note that iMessage may not work properly if you're using a beta version of iOS or macOS, so it's recommended to use the latest stable version of the operating system. By meeting these system requirements, you can enjoy the features and benefits of iMessage, including end-to-end encryption, group chats, and file sharing.
Internet Connection Requirements for iMessage
To use iMessage, you need a stable internet connection. The type of internet connection required for iMessage can vary depending on the device you're using. For iPhone users, a cellular data or Wi-Fi connection is necessary to send and receive iMessages. If you're using an iPhone with a cellular plan, you can use your cellular data to send iMessages. However, if you're in an area with poor cellular coverage, you may need to switch to Wi-Fi to ensure a stable connection. For iPad and iPod touch users, a Wi-Fi connection is required to use iMessage. If you're using a Mac, you'll need a Wi-Fi or Ethernet connection to use iMessage. In terms of internet speed, a minimum upload and download speed of 1 Mbps is recommended for iMessage to work smoothly. However, for optimal performance, a speed of at least 5 Mbps is recommended. It's also important to note that iMessage may not work properly if your internet connection is slow or unstable. If you're experiencing issues with iMessage, try checking your internet connection speed and switching to a different network if necessary. Additionally, ensure that your device is connected to the correct Wi-Fi network and that your internet service provider is not blocking iMessage traffic. By meeting these internet connection requirements, you can enjoy seamless and reliable iMessage conversations with your friends and family.
Enabling iMessage on Your Apple Device
iMessage is a popular messaging service developed by Apple, allowing users to send messages, photos, videos, and other files over the internet. To use iMessage, you need to enable it on your Apple device. In this article, we will guide you through the process of enabling iMessage on your Apple device, including activating it on iPhone and iPad, setting it up on Mac and iPod Touch, and troubleshooting common issues that may arise during the activation process. By following these steps, you can start using iMessage to communicate with friends and family who also use Apple devices. First, let's start with the basics of activating iMessage on iPhone and iPad.
Activating iMessage on iPhone and iPad
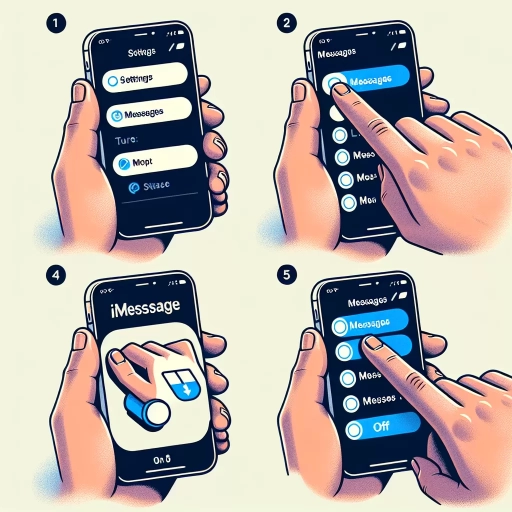
Here is the paragraphy: Activating iMessage on your iPhone or iPad is a straightforward process that can be completed in a few simple steps. To start, ensure that your device is connected to a stable internet connection, either via Wi-Fi or cellular data. Next, navigate to the Settings app on your device, which is represented by a gray icon with gears. Once in the Settings app, scroll down and select "Messages." Within the Messages settings, locate the "iMessage" option and toggle the switch next to it to the right, turning it green. This will activate iMessage on your device. You may be prompted to sign in with your Apple ID, so have your credentials ready. If you're using a new device or have recently restored your device, you may need to wait a few minutes for iMessage to activate. Additionally, ensure that your phone number and email address are correctly configured in the "Send & Receive" section of the Messages settings. This will allow you to send and receive iMessages using your phone number and email address. Once iMessage is activated, you can start sending and receiving messages with other iMessage users.
Setting Up iMessage on Mac and iPod Touch
To set up iMessage on your Mac and iPod Touch, follow these straightforward steps. On your Mac, start by opening the Messages app, which can be found in the Applications folder or by using Spotlight search. Once the app is open, click on "Messages" in the top menu bar and select "Preferences." In the Preferences window, click on the "Accounts" tab and select your Apple ID from the list. If you don't see your Apple ID, click on the "+" button to add it. Next, select the phone number and email address you want to use with iMessage. On your iPod Touch, go to the Settings app, tap on "Messages," and toggle the switch next to "iMessage" to the "On" position. Then, tap on "Send & Receive" and select the phone number and email address you want to use with iMessage. Make sure you're signed in with the same Apple ID on both devices. Once you've completed these steps, you should be able to send and receive iMessages on both your Mac and iPod Touch. If you encounter any issues, try restarting both devices or checking your internet connection. With iMessage set up on your Mac and iPod Touch, you can enjoy seamless messaging across all your Apple devices.
Troubleshooting Common Issues with iMessage Activation
Troubleshooting Common Issues with iMessage Activation If you're having trouble activating iMessage on your Apple device, there are several common issues you can troubleshoot to resolve the problem. First, ensure that your device is connected to a stable internet connection, either Wi-Fi or cellular data, as iMessage requires an internet connection to activate. Next, check that your device is running the latest version of iOS or iPadOS, as outdated software can prevent iMessage activation. Additionally, verify that your phone number or email address is correctly registered with Apple, as this information is used to activate iMessage. If you're using a new device or have recently restored your device, try restarting it and then attempting to activate iMessage again. You can also try disabling and re-enabling iMessage in the Settings app to reset the activation process. If none of these troubleshooting steps resolve the issue, try signing out of your Apple ID and then signing back in to restart the activation process. In some cases, iMessage activation may be delayed due to high traffic or server issues, so try waiting for a few hours and then attempting to activate iMessage again. If you're still experiencing issues, you may want to contact Apple support for further assistance. By following these troubleshooting steps, you should be able to resolve common issues with iMessage activation and start using the service on your Apple device.
Customizing and Managing iMessage Settings
Customizing and managing iMessage settings can significantly enhance your messaging experience on your iPhone or iPad. With the numerous features and options available, you can tailor your iMessage experience to suit your preferences and needs. This article will explore three key aspects of customizing and managing iMessage settings: configuring iMessage notification settings, managing iMessage storage and data usage, and using iMessage apps and stickers. By understanding how to configure your notification settings, you can ensure that you stay informed and connected without being overwhelmed by constant alerts. Additionally, learning how to manage your iMessage storage and data usage can help you avoid running out of space or incurring unexpected data charges. Finally, discovering how to use iMessage apps and stickers can add a fun and creative touch to your conversations. In this article, we will start by examining how to configure your iMessage notification settings, allowing you to take control of your messaging experience.
Configuring iMessage Notification Settings
To configure iMessage notification settings, start by opening the Settings app on your iPhone or iPad. Tap on "Notifications" and then select "Messages" from the list of available apps. Here, you can customize various notification settings to suit your preferences. First, toggle the switch next to "Allow Notifications" to enable or disable notifications for iMessage. If you want to receive notifications, you can choose the types of notifications you want to receive, such as "Show Previews" or "Show Notification Center." You can also select the notification sound and choose whether to display notifications on the lock screen or in the notification center. Additionally, you can set up notification filters to only receive notifications from specific contacts or groups. To do this, tap on "Notification Filters" and select the contacts or groups you want to receive notifications from. You can also set up a "Do Not Disturb" schedule to silence notifications during certain times of the day or night. To access this feature, tap on "Do Not Disturb" and set your preferred schedule. Furthermore, you can customize the notification settings for individual conversations by opening the Messages app, selecting a conversation, and tapping on the "i" icon in the top right corner. From here, you can toggle the switch next to "Hide Alerts" to enable or disable notifications for that specific conversation. By configuring these notification settings, you can take control of your iMessage notifications and ensure that you only receive the notifications that are important to you.
Managing iMessage Storage and Data Usage
Here is the paragraphy: Managing iMessage storage and data usage is crucial to ensure seamless messaging experience. iMessage stores all your conversations, including texts, images, videos, and other media, which can quickly consume your iPhone's storage space. To manage iMessage storage, go to Settings > [Your Name] > iCloud > iCloud Storage > Manage Storage > Messages. Here, you can see the total storage space used by iMessage and delete conversations that are no longer needed. You can also set up your iPhone to automatically delete old messages by going to Settings > Messages > Keep Messages and selecting the desired time frame. Additionally, you can enable the "Low Quality Image Mode" to reduce the file size of images sent via iMessage. To do this, go to Settings > Messages > Low Quality Image Mode. This feature compresses images to reduce data usage, making it ideal for users with limited data plans. Furthermore, you can also manage iMessage data usage by enabling the "Use Less Data" feature. To do this, go to Settings > Messages > Use Less Data. This feature reduces the quality of videos and images sent via iMessage, resulting in lower data usage. By managing iMessage storage and data usage, you can free up storage space, reduce data consumption, and enjoy a smoother messaging experience.
Using iMessage Apps and Stickers
Using iMessage apps and stickers can elevate your messaging experience and add a touch of personality to your conversations. To access iMessage apps, open a conversation in the Messages app, tap the App Store icon, and then tap the "Get" button to download and install apps. You can browse through various categories, such as Games, Entertainment, and Productivity, to find apps that suit your interests. Once installed, you can use these apps to send stickers, play games, or even make payments. Stickers, in particular, are a fun way to express yourself, and you can find a wide range of them in the App Store, from cute and playful to funny and sarcastic. To use a sticker, simply tap on it, and it will be sent to the recipient. You can also use the "Sticker" tab to browse through your downloaded stickers and add them to your messages. Additionally, many iMessage apps allow you to create and send custom stickers, making it easy to personalize your messages. By using iMessage apps and stickers, you can add a creative and playful touch to your conversations, making them more engaging and enjoyable.