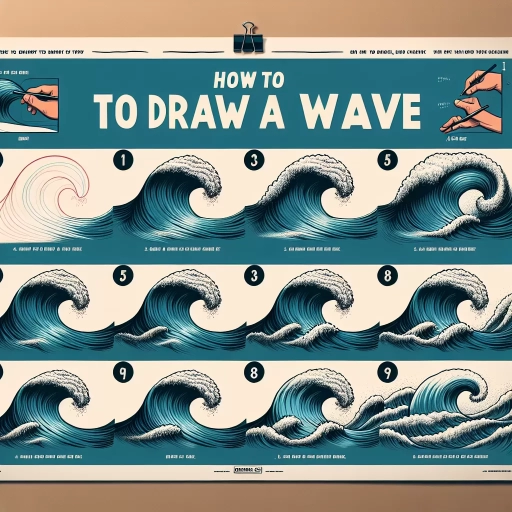
How To Draw A Wave
Drawing a wave can be a challenging yet rewarding experience, especially when done correctly. To create a realistic and captivating wave drawing, it's essential to understand the basics of drawing a wave, employ techniques for drawing a realistic wave, and add details and finishing touches to bring your artwork to life. By incorporating sea foam and bubbles, adding depth and perspective, and enhancing your drawing with final shading and highlights, you can take your wave drawing to the next level. In this article, we will explore these key elements and provide you with a comprehensive guide on how to draw a wave. To get started, let's begin with the fundamentals of drawing a wave, including understanding the shape, movement, and texture of a wave, which will be discussed in the next section, Understanding the Basics of Drawing a Wave.
Understanding the Basics of Drawing a Wave
Drawing a wave can be a challenging task, especially for beginners. However, with a solid understanding of the basics, anyone can learn to draw a realistic and captivating wave. To start, it's essential to recognize the shape and form of a wave, which involves understanding its overall structure and proportions. Additionally, identifying the key elements of a wave, such as the crest, trough, and face, is crucial in creating a detailed and accurate representation. Furthermore, understanding the movement and flow of a wave is vital in capturing its dynamic and fluid motion. By grasping these fundamental concepts, artists can effectively convey the power and beauty of a wave. In this article, we will delve into the basics of drawing a wave, starting with the foundation of recognizing the shape and form of a wave.
Recognizing the Shape and Form of a Wave
Recognizing the shape and form of a wave is crucial in drawing a realistic and captivating wave. A wave typically consists of a crest, trough, and face. The crest is the highest point of the wave, while the trough is the lowest point. The face of the wave is the area between the crest and the trough, and it's where the wave's shape and form are most defined. When drawing a wave, it's essential to capture the subtle curves and contours of the face, as this is where the wave's energy and movement are most apparent. The shape of the wave can vary depending on the type of wave, such as a rolling wave, a breaking wave, or a crashing wave. A rolling wave has a smooth, rounded shape, while a breaking wave has a more angular and fragmented shape. A crashing wave has a dramatic, explosive shape, with a lot of foam and spray. By recognizing the shape and form of a wave, you can create a more accurate and engaging drawing that captures the dynamic movement and energy of the ocean.
Identifying the Key Elements of a Wave
When drawing a wave, it's essential to identify the key elements that make up its structure. A wave typically consists of a crest, trough, face, and base. The crest is the highest point of the wave, where the water is at its most elevated position. The trough, on the other hand, is the lowest point of the wave, where the water is at its most depressed position. The face of the wave refers to the front or forward side of the wave, which is the part that is visible as the wave approaches the shore. The base of the wave is the bottom or back side of the wave, which is the part that is in contact with the ocean floor or the shore. Understanding these key elements is crucial in drawing a realistic and accurate representation of a wave. Additionally, the shape and size of the wave can also be influenced by the wind, tides, and the shape of the coastline, which can affect the wave's height, length, and direction. By identifying and incorporating these key elements, artists can create a more detailed and realistic drawing of a wave.
Understanding the Movement and Flow of a Wave
Understanding the movement and flow of a wave is crucial in capturing its essence on paper. A wave's movement can be broken down into three main parts: the crest, the trough, and the face. The crest is the highest point of the wave, where the water is at its most turbulent and foamy. The trough is the lowest point, where the water is calm and peaceful. The face of the wave is the area between the crest and the trough, where the water is in motion, flowing from the crest down to the trough. To draw a wave, it's essential to understand how these three parts interact and flow into each other. The movement of a wave can be depicted by using gentle, flowing lines to suggest the flow of water from the crest to the trough. The lines should be more turbulent and chaotic at the crest, gradually becoming smoother and more peaceful as they approach the trough. The face of the wave should be drawn with a sense of movement and energy, using lines that curve and flow like the water itself. By capturing the movement and flow of a wave, you can create a drawing that is dynamic, engaging, and full of life.
Techniques for Drawing a Realistic Wave
Drawing a realistic wave can be a challenging task, but with the right techniques, you can achieve a stunning and lifelike representation of the ocean's movement. To create a realistic wave, it's essential to focus on capturing its movement, texture, and color. One way to achieve this is by using soft and gentle lines to convey the wave's fluid motion. Additionally, creating texture and dimension with shading and highlights can add depth and visual interest to your drawing. Finally, blending colors to achieve a realistic ocean effect can help to create a sense of atmosphere and mood. By mastering these techniques, you can create a wave that looks like it's about to crash onto the shore. In this article, we'll explore these techniques in more detail, starting with the importance of using soft and gentle lines to capture the wave's movement.
Using Soft and Gentle Lines to Capture the Wave's Movement
When drawing a realistic wave, using soft and gentle lines is essential to capture the movement and fluidity of the water. To achieve this, start by sketching the overall shape of the wave with a soft pencil, using gentle, flowing motions to suggest the wave's curvature and direction. As you add more detail, switch to a softer pencil, such as a 4B or 6B, to create subtle, nuanced lines that evoke the wave's texture and movement. To capture the wave's crest, use short, gentle strokes to suggest the foamy, white water, while longer, more flowing lines can be used to indicate the wave's face and the water's movement. By varying the pressure and direction of your lines, you can create a sense of energy and movement, drawing the viewer's eye along the wave's path. Additionally, pay attention to the negative space around the wave, using soft, gentle lines to suggest the surrounding water and create a sense of depth and dimensionality. By combining these techniques, you can create a realistic and captivating wave that seems to move and flow across the page.
Creating Texture and Dimension with Shading and Highlights
When it comes to creating a realistic wave, shading and highlights play a crucial role in adding texture and dimension to the drawing. To achieve this, artists use various techniques to create a range of values, from deep shadows to bright highlights. One technique is to use hatching and cross-hatching to create a series of closely spaced lines that follow the contours of the wave. By varying the density and direction of the lines, artists can create a sense of texture and movement. Another technique is to use stippling, which involves creating a pattern of small dots to build up a range of values. This technique can be particularly effective for creating the soft, foamy texture of the wave's crest. To add highlights, artists can use a range of techniques, including glazing, which involves applying multiple layers of transparent paint or ink to achieve a deep, luminous color. By carefully balancing shading and highlights, artists can create a sense of depth and dimensionality in their wave drawing, drawing the viewer's eye into the heart of the wave. Additionally, artists can also use the white of the paper to their advantage, leaving some areas of the wave unshaded to create a sense of sparkle and shine. By combining these techniques, artists can create a wave drawing that is not only visually striking but also highly realistic.
Blending Colors to Achieve a Realistic Ocean Effect
When it comes to drawing a realistic ocean wave, one of the most crucial aspects to master is blending colors to achieve a convincing and lifelike effect. To start, it's essential to understand the color palette of the ocean, which typically ranges from deep blues and greens in the depths to lighter blues and whites towards the surface. To capture this gradient, begin by layering different shades of blue, starting with the darkest tones at the bottom of the wave and gradually lightening them as you move towards the top. Next, add touches of green to the lower sections of the wave, blending them seamlessly into the blue to create a sense of depth and dimension. As you approach the surface, introduce white and lighter blue hues to convey the foamy texture and movement of the water. To achieve a smooth, blended look, use soft brushes or blending stumps to merge the colors together, feathering them out towards the edges of the wave. Additionally, consider adding subtle warm tones, such as beige or golden brown, to the wave's crest and foam to capture the sun's reflection and create a sense of luminosity. By carefully blending these colors and paying attention to the subtle nuances of the ocean's palette, you can create a realistic and captivating wave that draws the viewer in.
Adding Details and Finishing Touches to Your Wave Drawing
Incorporating Sea Foam and Bubbles for Added Realism
Adding Depth and Perspective to Your Wave Drawing
Enhancing Your Wave Drawing with Final Shading and Highlights
Here is the introduction paragraph. Adding the final details to your wave drawing can elevate it from a simple sketch to a stunning work of art. To take your wave drawing to the next level, consider incorporating sea foam and bubbles for added realism, adding depth and perspective to create a sense of movement, and enhancing your drawing with final shading and highlights to bring out the textures and tones of the wave. By incorporating these details, you can create a wave drawing that is not only visually striking but also engaging and immersive. In this article, we will explore how to incorporate sea foam and bubbles for added realism, add depth and perspective to your wave drawing, and enhance your drawing with final shading and highlights. Here is the 200 words supporting paragraph for the article. Incorporating sea foam and bubbles into your wave drawing can add a level of realism and detail that draws the viewer in. To create realistic sea foam, start by adding small, white, rounded shapes to the crest of the wave. You can use a small brush or a fine-tip pen to create these shapes, and vary their size and shape to create a sense of movement and energy. For added realism, you can also add a few strands of seaweed or other ocean debris to the foam. To create bubbles, use a small dotting tool or a fine-tip pen to add small, rounded dots to the surface of the water. Vary the size and spacing of the bubbles to create a sense of depth and movement. By incorporating sea foam and bubbles into your wave drawing, you can create a sense of energy and movement that draws the viewer in and adds depth and interest to your drawing.
Incorporating Sea Foam and Bubbles for Added Realism
Adding Depth and Perspective to Your Wave Drawing
Enhancing Your Wave Drawing with Final Shading and Highlights
Incorporating Sea Foam and Bubbles for Added Realism
Adding Depth and Perspective to Your Wave Drawing
Adding depth and perspective to your wave drawing can elevate it from a simple illustration to a captivating piece of art. To achieve this, start by creating a horizon line, which will serve as a reference point for your wave's movement and depth. Next, use gentle, curved lines to suggest the wave's shape and movement, taking care to vary the line weights and textures to convey a sense of energy and turbulence. To add perspective, use the horizon line as a guide to create a sense of distance and depth, with the wave's crest and troughs receding into the distance. You can also use atmospheric perspective to create a sense of depth, with the wave's details and textures becoming softer and less defined as they recede into the distance. Finally, pay attention to the wave's interaction with the surrounding environment, such as the shore or other waves, to create a sense of context and realism. By incorporating these techniques, you can add depth and perspective to your wave drawing, creating a more engaging and immersive piece of art.