How To Draw A Christmas Tree Easy
The festive season is just around the corner, and what better way to get into the holiday spirit than by creating your own Christmas tree drawing? Drawing a Christmas tree can be a fun and creative activity for people of all ages and skill levels. Whether you're a seasoned artist or a beginner, with a few simple steps and some basic techniques, you can create a beautiful and festive Christmas tree drawing. To get started, it's essential to understand the basics of drawing a Christmas tree, including the shape and proportions of the tree, as well as the placement of the branches and trunk. Once you have a solid foundation, you can add details and decorations to your tree, such as ornaments, lights, and garlands. Finally, you can enhance your drawing with texture and shading to give it a more realistic and dimensional look. In this article, we'll take a closer look at the basics of drawing a Christmas tree, so let's get started by understanding the fundamentals of creating a beautiful and festive holiday tree.
Understanding the Basics of Drawing a Christmas Tree
Drawing a Christmas tree can be a fun and creative activity, especially during the holiday season. To get started, it's essential to understand the basics of drawing a Christmas tree. This involves several key steps, including starting with a large triangle as the base of the tree, using reference images to get the shape and proportions right, and choosing the right drawing tools and materials. By following these steps, you can create a beautiful and festive Christmas tree that captures the spirit of the season. In this article, we'll explore each of these steps in more detail, starting with the foundation of the tree: the large triangle that serves as its base.
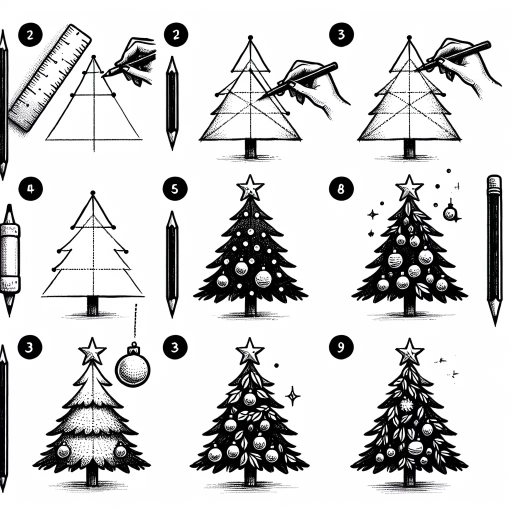
Start with a Large Triangle as the Base of the Tree
Start with a large triangle as the base of the tree, making sure it's tall and wide enough to provide a sturdy foundation for the rest of the tree. The triangle should be symmetrical, with the base being the widest part and the top being the narrowest. You can use a ruler or a straightedge to help you draw a straight line for the base of the triangle, and then use a pencil to sketch in the sides. Make sure the triangle is large enough to accommodate the rest of the tree's details, such as the branches and ornaments. A good rule of thumb is to make the triangle about one-third to one-half the size of the entire tree. By starting with a large triangle, you'll be able to create a balanced and proportional tree that will be the perfect base for your Christmas tree drawing.
Use Reference Images to Get the Shape and Proportions Right
When drawing a Christmas tree, it's essential to get the shape and proportions right to achieve a realistic and visually appealing representation. One effective way to do this is by using reference images. Reference images can be found online or in books, and they can provide a wealth of information about the shape, proportions, and details of a Christmas tree. By studying reference images, you can get a better understanding of the overall shape of the tree, including the shape of the trunk, the branches, and the foliage. You can also observe the proportions of the tree, including the ratio of the trunk to the branches and the size of the foliage in relation to the rest of the tree. Additionally, reference images can help you capture the details of the tree, such as the texture of the bark, the shape of the needles, and the way the branches curve and twist. By incorporating these details into your drawing, you can create a more realistic and engaging representation of a Christmas tree. Furthermore, using reference images can also help you to avoid common mistakes, such as drawing a tree that is too symmetrical or too perfect. By studying the imperfections and irregularities of a real Christmas tree, you can add character and personality to your drawing, making it more unique and interesting. Overall, using reference images is a valuable tool for getting the shape and proportions of a Christmas tree right, and it can help you to create a beautiful and realistic drawing that captures the spirit of the holiday season.
Choose the Right Drawing Tools and Materials
Here is the paragraphy: To create a beautiful Christmas tree drawing, it's essential to choose the right drawing tools and materials. Start with a pencil, preferably a graphite pencil (#2), which is versatile and suitable for creating a range of lines and shading. A sharpener will come in handy to keep your pencil sharp and ready to use. For added depth and dimension, consider using a set of colored pencils or markers, such as Prismacolor or Faber-Castell. These tools will allow you to add vibrant colors and textures to your tree. Additionally, a sketchbook or drawing paper with a smooth finish will provide an ideal surface for creating your masterpiece. If you want to add some extra sparkle to your tree, consider using a metallic marker or a glitter pen. Finally, don't forget to have an eraser on hand to correct any mistakes and create a clean, crisp finish. By selecting the right tools and materials, you'll be well on your way to creating a stunning Christmas tree drawing that's sure to impress.
Adding Details and Decorations to Your Christmas Tree
When it comes to adding details and decorations to your Christmas tree, there are several ways to make it stand out. To create a visually appealing tree, you can start by drawing the trunk and branches with varying line thickness, which will give your tree a more realistic and three-dimensional look. Additionally, you can add ornaments, lights, and garlands to create a festive look that will make your tree shine. Finally, incorporating a star or angel at the top of the tree will add a touch of elegance and complete the overall look. By incorporating these details, you can create a beautiful and unique Christmas tree that will be the centerpiece of your holiday decor. To get started, let's begin with the foundation of your tree and learn how to draw the trunk and branches with varying line thickness.
Draw the Trunk and Branches with Varying Line Thickness
To create a visually appealing Christmas tree, it's essential to draw the trunk and branches with varying line thickness. Start by drawing the trunk with a thick, sturdy line, using a range of 3-5 mm in width. This will provide a solid foundation for your tree. As you move up the tree, gradually decrease the line thickness to create a sense of depth and dimension. For the main branches, use a line thickness of around 1-2 mm, and for the smaller twigs and foliage, use an even finer line, around 0.5-1 mm. This variation in line thickness will give your tree a natural, organic look and help to create a sense of texture and depth. Additionally, pay attention to the direction and curvature of your lines, using smooth, flowing curves to suggest the softness of the branches and the gentle sway of the tree in the wind. By carefully varying the line thickness and direction, you can create a beautiful, lifelike Christmas tree that will be the centerpiece of your holiday drawing.
Add Ornaments, Lights, and Garlands to Create a Festive Look
Add a festive touch to your Christmas tree with ornaments, lights, and garlands. Ornaments come in a variety of shapes, sizes, and materials, from traditional glass balls to modern ceramic and wooden designs. Hang them on the branches of your tree, making sure to space them evenly and balance the weight. For a more cohesive look, choose ornaments that match your tree's theme or color scheme. String lights, fairy lights, or LED lights can add a warm glow to your tree, making it a cozy centerpiece for your holiday decor. Wrap lights around the branches, starting from the bottom and working your way up to create a uniform look. Garlands, made from materials like pinecones, holly, or ribbons, can add a natural and rustic touch to your tree. Drape them over the branches, weaving them in and out to create a flowing, organic look. By combining ornaments, lights, and garlands, you'll create a visually appealing and inviting Christmas tree that reflects your personal style and holiday spirit.
Incorporate a Star or Angel at the Top of the Tree
Incorporating a star or angel at the top of the tree is a classic Christmas tree decorating tradition. This crowning glory adds a touch of magic and completes the overall look of the tree. When choosing a star or angel, consider the theme and color scheme of your tree. A star is a great option for a more modern or rustic-themed tree, while an angel is perfect for a traditional or vintage-inspired look. You can also opt for a bow or a finial if you prefer a more subtle look. To attach the star or angel, use a sturdy wire or a clip that can hold its weight. Make sure it's securely fastened to prevent it from toppling over. If you're using a star, you can also add some fairy lights or glitter to give it an extra sparkle. For an angel, you can add some delicate wings or a halo to give it a more ethereal look. Whatever you choose, make sure it's something that reflects your personal style and adds to the overall festive atmosphere of your Christmas tree.
Enhancing Your Christmas Tree Drawing with Texture and Shading
When it comes to creating a stunning Christmas tree drawing, it's all about the details. To take your artwork to the next level, consider incorporating texture and shading techniques. By adding these elements, you can give your tree a more realistic and inviting appearance. One effective way to start is by using hatching and cross-hatching techniques to create depth and texture. This method involves creating a series of closely spaced lines that follow the contours of the tree, giving it a sense of volume and dimensionality. Additionally, you can also experiment with adding shading to give your tree a three-dimensional appearance, making it look like it's popping off the page. Furthermore, trying out different line styles can also help suggest the texture of tree bark and needles, adding an extra layer of realism to your drawing. By incorporating these techniques, you can create a Christmas tree drawing that's truly eye-catching and memorable. Use Hatching and Cross-Hatching Techniques to Create Depth and Texture to get started.
Use Hatching and Cross-Hatching Techniques to Create Depth and Texture
To add depth and texture to your Christmas tree drawing, consider using hatching and cross-hatching techniques. Hatching involves creating a series of closely spaced parallel lines that follow the contours of the tree, while cross-hatching involves layering lines at different angles to create a more dimensional appearance. By varying the density and direction of the lines, you can create a range of values and textures that give your tree a more lifelike appearance. For example, you can use hatching to suggest the softness of the tree's needles or the roughness of the trunk, while cross-hatching can be used to create a sense of depth and dimensionality in the branches and foliage. To create a more subtle, nuanced texture, try using a range of line weights and densities, and experiment with different angles and directions to achieve the desired effect. By incorporating hatching and cross-hatching techniques into your drawing, you can add a new level of depth and visual interest to your Christmas tree, making it a truly standout piece of art.
Add Shading to Give Your Tree a Three-Dimensional Appearance
Adding shading to your Christmas tree drawing can instantly give it a three-dimensional appearance, making it look more realistic and visually appealing. To achieve this, start by identifying the light source in your drawing, which is usually assumed to be coming from the top left or right corner. This will help you determine where the shadows will fall. Begin by adding gentle, soft shading to the areas of the tree that are furthest from the light source, using a range of pencils or a blending stump. Focus on the recessed areas, such as the spaces between the branches and the trunk, where the shadows tend to be deeper. As you add more shading, pay attention to the texture of the tree, using hatching and cross-hatching techniques to create a sense of depth and dimension. You can also use a tortillon to smooth out the shading and create a more subtle transition between light and dark areas. To add even more depth, try adding some cast shadows, which are the dark areas that appear on the ground or surrounding surfaces where the tree's branches and trunk block the light. By carefully balancing light and dark areas, you can create a beautiful, three-dimensional Christmas tree that seems to leap off the page.
Experiment with Different Line Styles to Suggest Tree Bark and Needles
Experimenting with different line styles is a great way to add texture and depth to your Christmas tree drawing, particularly when it comes to suggesting tree bark and needles. To create a more realistic tree bark, try using a combination of short, curved lines and longer, more irregular lines to mimic the rough, scaly texture of real tree bark. You can also experiment with varying line weights and pressures to create a sense of depth and dimension. For the tree needles, try using short, gentle lines that curve and twist to suggest the soft, feathery texture of real needles. You can also use a range of line styles, from smooth and flowing to more jagged and irregular, to create a sense of movement and energy in your tree. By experimenting with different line styles, you can add a level of detail and realism to your Christmas tree drawing that will make it stand out and feel more dynamic.