How To String A Weed Eater With Two Holes
Here is the introduction paragraph: Stringing a weed eater with two holes can seem like a daunting task, but with the right guidance, it can be a straightforward process. To ensure a successful stringing experience, it's essential to understand the importance of preparation, the actual stringing process, and how to troubleshoot and maintain your weed eater. Preparation is key to a smooth stringing process, and it's crucial to have the right materials and a clear understanding of the process before starting. In this article, we will guide you through the steps to string a weed eater with two holes, starting with the preparation phase, where we will discuss the necessary materials and tips to get you started.
Preparation is Key
Preparation is key to a successful fishing trip. Before you head out on the water, there are several things you can do to ensure a fun and safe experience. Choosing the right string, wearing protective gear, and locating the spool are all crucial steps in preparing for a day of fishing. By taking the time to prepare, you can avoid common mistakes and ensure that your trip is enjoyable and productive. One of the most important steps in preparing for a fishing trip is choosing the right string. Note: The answer should be in paragraph form.
Choosing the Right String
Here is the paragraphy: Choosing the right string for your weed eater is crucial for effective and efficient cutting. The type of string you choose will depend on the type of weeds you are cutting, the thickness of the weeds, and the type of weed eater you are using. There are two main types of strings: monofilament and nylon. Monofilament strings are more durable and resistant to wear and tear, but they can be more expensive. Nylon strings, on the other hand, are less expensive but may not last as long. It's also important to consider the diameter of the string, as a thicker string will be more effective for cutting thicker weeds. Additionally, some strings are designed for specific types of weeds, such as heavy-duty strings for thick weeds or specialized strings for cutting in tight spaces. When selecting a string, make sure to read the manufacturer's recommendations and choose a string that is compatible with your weed eater. By choosing the right string, you can ensure that your weed eater is working efficiently and effectively, and that you are getting the best results for your lawn care needs.
Wearing Protective Gear
Wearing protective gear is a crucial step in preparing to string a weed eater with two holes. This gear includes safety glasses, gloves, long pants, and a long-sleeved shirt. Safety glasses protect your eyes from debris and string fragments that may fly off during the stringing process. Gloves prevent cuts and abrasions on your hands, while long pants and a long-sleeved shirt protect your skin from scratches and cuts. Additionally, wearing closed-toe shoes and a dust mask can provide extra protection from potential hazards. By wearing protective gear, you can minimize the risk of injury and ensure a safe and successful stringing experience.
Locating the Spool
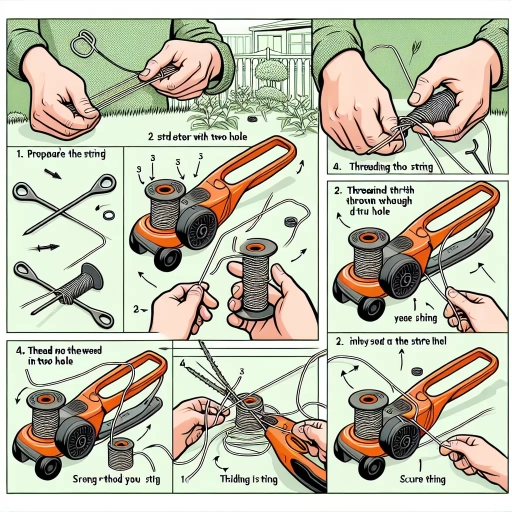
When it comes to stringing a weed eater with two holes, one of the most crucial steps is locating the spool. The spool is the cylindrical component that holds the cutting string, and it's usually located at the bottom of the weed eater's cutting head. To find the spool, start by turning off the weed eater and allowing it to cool down. Next, remove any debris or grass clippings that may be accumulated around the cutting head. You can use a screwdriver or a small tool to gently pry out any stuck material. Once the area is clear, look for a small cap or cover that protects the spool. This cap may be held in place by a screw or a clip, so be sure to remove it carefully. With the cap removed, you should see the spool and the two holes that the cutting string passes through. Take a moment to inspect the spool and the holes to ensure they are free from any debris or damage. If you find any blockages or damage, clean or replace the spool as needed before proceeding with the stringing process. By locating the spool and ensuring it's in good condition, you'll be able to string your weed eater with ease and get back to tackling those pesky weeds in no time.
Stringing the Weed Eater
Stringing a weed eater is a relatively simple process that can be completed with a few basic tools and some patience. To start, you'll need to remove the old string from the spool, which can be a bit tricky if it's been in place for a while. Once the old string is out, you can thread the new string through the machine, making sure to follow the manufacturer's instructions for the correct routing. Finally, you'll need to wind the new string onto the spool, making sure it's properly seated and not twisted. By following these steps, you'll be able to get your weed eater up and running in no time. To begin, let's start with the first step: removing the old string.
Removing the Old String
Removing the old string from your weed eater is a crucial step before installing a new one. To do this, start by locating the spool, which is usually located at the bottom of the weed eater. You'll see that the spool has two holes, one on either side, where the old string is threaded through. Take note of how the string is wound around the spool, as you'll need to replicate this pattern when installing the new string. Next, cut the old string as close to the spool as possible, taking care not to damage the spool or the surrounding area. Gently pull the old string out of the holes, working it loose from the spool. If the string is stuck, you can use a pair of needle-nose pliers to carefully pry it out. Once the old string is removed, inspect the spool for any debris or tangles, and clean it out with a small brush or cloth if necessary. This will ensure a smooth installation of the new string and prevent any issues with the weed eater's performance.
Threading the New String
Threading the new string is a crucial step in the process of stringing a weed eater with two holes. To begin, take the new string and locate the end with the metal eyelet or the loop. This end will be inserted into the first hole on the weed eater's spool. Hold the string between your thumb and index finger, with the metal eyelet facing upwards. Gently push the string into the hole until it clicks into place, ensuring it is securely seated. Next, locate the second hole on the spool and insert the other end of the string into it, following the same process as before. Make sure the string is not twisted or tangled, as this can cause problems during use. Once both ends of the string are securely in place, pull the string gently to ensure it is taut and evenly spaced. Finally, trim the excess string with a pair of scissors or pruning shears, leaving about 1-2 inches of string at the end. This will prevent the string from getting tangled or caught in the weed eater's mechanism. By following these steps, you can successfully thread the new string and get your weed eater ready for use.
Winding the String onto the Spool
Winding the string onto the spool is a crucial step in the process of stringing a weed eater with two holes. To begin, locate the spool and remove any remaining string or debris from the previous use. Next, take the new string and cut it to the recommended length, usually around 10-15 feet. Hold the spool with one hand and the string with the other, making sure the string is taut. Begin winding the string onto the spool in a clockwise direction, keeping the string tight and evenly spaced. As you wind, make sure to align the string with the holes on the spool, ensuring that the string is properly seated. Continue winding until the desired amount of string is on the spool, leaving about 1-2 inches of slack. Finally, secure the string by passing it through the retaining clip or notch on the spool, making sure it is snug and won't come loose during use. By following these steps, you'll have a properly wound spool that's ready for use, ensuring a smooth and efficient weed-eating experience.
Troubleshooting and Maintenance
Troubleshooting and maintenance are essential skills for any string instrument player to master. A well-maintained instrument not only sounds better but also lasts longer. However, even with proper care, issues can still arise. To address these problems, it's crucial to know how to deal with common issues such as tangles and knots, adjust the string tension, and regularly inspect the string. By understanding these techniques, players can prevent minor problems from becoming major headaches. For instance, learning how to deal with tangles and knots can save a significant amount of time and frustration, allowing players to focus on what matters most - making music. In this article, we will explore these essential techniques, starting with the most common issue that players face: dealing with tangles and knots.
Dealing with Tangles and Knots
Dealing with tangles and knots is an inevitable part of using a weed eater, especially when stringing it with two holes. To minimize the occurrence of tangles, it's essential to use high-quality string that is designed for weed eaters. When tangles do occur, the first step is to turn off the engine and let the machine cool down. Then, carefully remove the spool and cut the tangled string as close to the spool as possible. Next, use a pair of needle-nose pliers to gently tease out the remaining tangles, working from the end of the string. If the tangles are particularly stubborn, you can try soaking the string in warm water or using a lubricant to help loosen the knots. Once the tangles are removed, restring the weed eater according to the manufacturer's instructions, making sure to leave a small amount of slack in the string to prevent future tangles. Regular maintenance, such as cleaning the spool and string after each use, can also help prevent tangles and knots from forming. By following these steps, you can quickly and easily deal with tangles and knots, getting your weed eater back to work in no time.
Adjusting the String Tension
Adjusting the string tension is a crucial step in maintaining your weed eater's performance and longevity. If the string is too loose, it may not cut effectively, while a string that is too tight can cause the engine to work harder, leading to increased wear and tear. To adjust the string tension, start by locating the tensioning mechanism, usually a small knob or screw located near the cutting head. Turn the knob or screw clockwise to tighten the string or counterclockwise to loosen it. Check the string tension by gently pulling on the string; it should have some give but not be too loose. If you're unsure, consult your weed eater's manual for specific guidance. Proper string tension can also help prevent common issues like string breakage, uneven cutting, and engine strain. By regularly checking and adjusting the string tension, you can ensure your weed eater runs smoothly and efficiently, making quick work of even the toughest weeds and overgrowth.
Regularly Inspecting the String
Regularly inspecting the string of your weed eater is crucial to ensure optimal performance and prevent damage to the machine. Over time, the string can become worn, frayed, or damaged, which can lead to poor cutting results, increased vibration, and even engine damage. To inspect the string, start by turning off the engine and allowing the machine to cool down. Then, remove any debris or grass clippings from the cutting head and string. Visually inspect the string for any signs of wear, such as fraying, cuts, or excessive wear on the edges. Check the string's length and ensure it is at the recommended level. If the string is damaged or worn, replace it with a new one. It's also essential to check the string's tension, as loose or overly tight string can cause poor performance and damage to the machine. By regularly inspecting the string, you can identify and address any issues before they become major problems, ensuring your weed eater runs smoothly and efficiently.