How To Draw A Shirt
 Drawing a shirt is a skill that can add depth to your artistic repertoire, opening up exciting opportunities to illustrate intricate fashion designs or portray realistic individuals. This comprehensive guide will walk you through the process, starting with understanding the basics of drawing a shirt, which is essential to creating a remarkable piece of sketch. Gradually, we'll elevate your artwork with a step-by-step guide to sketching the shirt, detailing the important elements to consider for a convincing representation. Finally, we'll transition into the delicacy of artistry by demonstrating how to add texture and realism to your shirt drawing, this will make your artwork come alive. Buckle up and bring out your drawing tools! Our first stop in this journey is the bedrock of any artistic endeavor—understanding the basics of drawing a shirt.
Understanding the Basics of Drawing a Shirt
Fundamental to any sketching endeavor is the understanding of the subject's basic structures. To draw a shirt effectively, one must comprehend the rudimentary shapes that compose it, learn the proportional measurements that dictate its look, and understand the variations and unique features presented by different types of shirts. Initially, recognizing the primary shapes in a shirt's structure helps in laying a strong foundation for the sketch. This includes observation of general formations such as the collar outline, sleeves, and body of the shirt. Knowing these basics reigns supreme in creating an accurate representation on paper. Once these shapes are familiar, one can develop a more precise sketch by understanding the proportions of a shirt - the sizes and distances of the parts relative to each other. Lastly, understanding various shirt types along with their distinct features adds richness and authenticity to the drawing. As we venture further into this engaging endeavor, let's commence by familiarizing ourselves with the basic forms inherent in every shirt.
1. Familiarize yourself with the basic shapes of a shirt
of every successful shirt drawing lies in a comprehensive understanding of its basic shapes. When looked at closely, a shirt is more than just a complicated fabric design. It evolves from simple elemental forms that are quite familiar and thus, easy to replicate artistically. The first shape that majorly constitutes the shirt is the rectangle, which builds up the trunk portion of the shirt, both front and back. This rectangular piece, in essence, replicates the torso's width and height that the shirt is supposed to cover. The second significant shape is the half circle or the semi-oval shape, representing the neckline. Depending on the shirt style, this neckline can vary from a smaller, closer semi-circle for a round neck shirt to a larger, wider, more flattened semi-circle for a V-neck shirt. Thirdly, we have the sleeves, that traditionally resemble long rectangles for full sleeves and shorter ones for half sleeves. However, it's essential to remember that sleeves can come in varied shapes like bell-shaped, balloon-shaped, or butterfly, etc., customizing the look of the shirt. Moreover, the hemline of the shirt also involves a basic shape – typically a straight line for standard shirts but can vary from curves to points for styles like a high-low or asymmetrical shirts. For button-down shirts, an array of small circles or squares are present down the front, symbolizing buttons. Finally, some shirts might include a triangular or square pocket on the front. By breaking down the shirt into these fundamental shapes, your drawing task becomes more manageable. It increments the accuracy of your final output and makes the task less overwhelming. Moreover, learning these basic shapes paves the way for taking on more complex shirt styles and help create a broader range of drawings in the future.
2. Learn the proportions of a shirt and how to measure them
Learning the proportions of a shirt and how to measure them is a fundamental aspect in understanding the basics of drawing a shirt. Proportions in clothing design refer to the relative measurements or ratios of different parts of the garment. In the case of a shirt, this would include elements like the length of the sleeves, the width of the collar, the length of the shirt from the shoulder to the hem, and the width of the torso area. Understanding these dimensions and how to accurately measure them is a vital skill for anyone wishing to accurately represent a shirt in a drawing. Start by taking the measurements of a real shirt. Lay it flat and use a tape measure to record the length from the top of the collar to the bottom of the hem, the width at the widest point, usually across the chest under the arms, and the length from the shoulder to the end of the sleeve. Also, measure the diameter of the sleeve and the width of the collar. This information will serve as a reference when you start your drawing. Once you understand these proportions, translate them into your drawing. Notably, this is where artistic skill plays a substantial role – your ability to translate these measurements into a two-dimensional representation. Each part of the shirt serves as a puzzle piece; you'll need to draw each with the correct proportions to create a realistic representation of the shirt. Furthermore, remember that proportions may vary depending on the style and cut of the shirt. A slim-fit men's shirt will have different proportions compared to a loose blouse for women, for instance. The same goes to long-sleeve versus short-sleeve shirts. The shape and width of the collar also vary. A polo shirt, for example, has a much more structured and narrower collar than a casual T-shirt. Measuring and understanding proportions is a fundamental part of clothing representation, whether you're creating a fashion portfolio, designing clothes, or just practicing your drawing skills. Mastering these measurements and establishing a clear idea of proportion in your mind will enhance your drawings, providing them with a more professional, believable, and accurate appearance.
3. Understand the different types of shirts and their unique features
The process of drawing a shirt goes beyond artistry. It requires a basic understanding of various types of shirts and their unique features. The first shirt type is the t-shirt, which is quite common and renowned for its simplicity. Featuring a round neck, often ribbed, and a body that's devoid of buttons, t-shirts are typically loosely-fitted and designed for casual wear. When drawing, the challenge lies in illustrating the relaxed fit while keeping the perspective right. The second shirt type is the polo shirt. Noted for its neat casual look, polo shirts feature a collar, a short placket with two or three buttons, and usually short sleeves. The challenge in drawing polo shirts lies in meticulously detailing the collar and the button placket. The ribbing on the sleeves and the hem can also be a tricky aspect to capture precisely in your illustrations. Thirdly, we have the dress shirts, more formal and structured than the t-shirts and polo shirts. Dress shirts usually come with a stiff collar, a full-length opening at the front from the collar to the hem, and sleeves with cuffs. Highlighting the cut, seams, and crispiness of a dress shirt, mainly when it is well-ironed, can be a challenging task for artists. The cuffs alone may require detailed attention, as they may come in different styles like the French cuffs or barrel cuffs. Then we have the Hawaiian shirts, known for their vibrant prints and loose fit. This type of shirt generally features short sleeves and a collar, and a front opening with buttons. When drawing Hawaiian shirts, the most complicated part might be replicating the rich, colorful prints and patterns that often depict themes from nature. Moreover, understanding how the fabric of the shirt drapes and folds, the way the collar sits around the neck, plus the placement and style of pockets and buttons – all these elements make every type of shirt unique and add a layer of complexity to your drawings. The more you comprehend these characteristics and styles, the better your shirt drawings will become, bringing out the beauty and essence of the garment.
Sketching the Shirt: Step-by-Step Guide
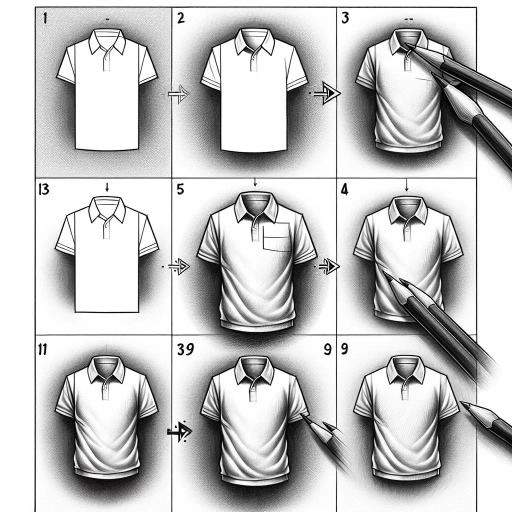
Crafting a detailed and dimensional sketch of a shirt doesn't have to be a daunting task. Instead, it can be an enjoyable and rewarding creative exercise with the right guidance. This article aims to guide you through a step-by-step process to help you create a shirt sketch with accuracy and precision. Primarily, we'll start with the basic outline of the shirt, which includes drawing the collar and sleeves. Then, we'll progressively add character and depth to our sketch by incorporating specific details like buttons, cuffs, and a hemline. Finally, we'll focus on refining the overall shape and proportions of the shirt sketch, being particularly mindful of capturing the realistic folds and creases. Starting with the basic outline gives us a robust foundation to build upon, ensuring our sketch gains complexity and form gradually. So, let's get started with conceptualizing the framework of the shirt, which begins with the collar and sleeves.
1. Start with the basic outline of the shirt, including the collar and sleeves
of garment rendering is by initiating the sketch with the basic outline of the shirt, this serves as your sketch’s foundation. This procedure involves mapping out the shirt's basic features like the collar and the sleeves. The neckline, also referred to as the collar, is a defining feature of the shirt. When outlining the collar, keep in mind that there are numerous collar styles available, from the crew neck and V-neck to the turtle neck and sailor collar. Each collar type conveys a different style and personality, which can greatly influence the overall look of your shirt design. For instance, the crew neck is deemed as casual and versatile, whereas the turtle neck is seen as sophisticated and stylish. While drawing the collar, consider the measurement, shape, and dimension to ensure accuracy and proportion in your sketch. As for the sleeves, they have an essential function in providing the shirt its structure. The outline of the sleeves ought to reflect their length and form correctly. Basic sleeve types include full length, three-quarter length, short, and sleeveless, each possessing its distinct look and flair. For example, full-length sleeves give off a formal vibe, while short sleeves or sleeveless designs offer a more casual and breezy feel. To accurately portray this element, the armhole’s shape – where the sleeve meets the body of the shirt – should be carefully considered. Since the sleeve’s width usually varies, sketch the top (shoulder part) broader compared to the bottom (near the wrist or arm, depending on the sleeve type). Also, observe how fabric wrinkles and folds are formed at the elbow level when drawing the sleeves. Starting with the basic outline sets the groundwork and provides your sketch an initial form. It helps you visualize and coordinate the rest of the design elements you plan to incorporate, such as prints, patterns, colors, and other embellishments, in a harmonious fashion. Moreover, it enables you to see any potential issues or inconsistencies early on, allowing you to fix them before proceeding to the more detailed parts of your sketch. This step, albeit seemingly simple, requires concentration and precision. Owning a keen understanding of the different collar and sleeve types, along with their characteristic shapes and dimensions, is crucial. This knowledge not only elevates the level of detail and accuracy in your shirt sketch but also broadens your design repertoire, empowering you to tactfully manipulate these elements thereby creating unique, self-expressive, and visually interesting shirt designs.
2. Add details such as buttons, cuffs, and a hemline
The second step involves a more detailed and intricate aspect of the shirt sketch, mainly focusing on the incorporation of buttons, cuffs, and the hemline. These nuanced components of a shirt, while often overlooked, give a shirt its unique character and identity, and successfully sketching them can significantly autocorrect the realism of your artwork. Starting with the buttons, they are typically placed down the center of the shirt and may vary in size and number depending on the shirt's style. Sketch the buttons as small circles or ovals, ensuring they are aligned centrally and spaced evenly. The buttons should be drawn using light, careful strokes, bearing in mind their orientation in relation to the shirt's folds. A common technique is to add a small highlight within each button to create a more realistic, three-dimensional effect. Cuffs are the next distinctive feature on a shirt, found at the end of the sleeves. They can greatly influence the shirt's overall style, whether it be casual, formal, or dressy. Start by marking the width of the cuff at the end of the sleeve, which is usually a straight or slightly curved line for a loose fit. For formal shirts, cuffs might be wider and visibly stand out. Then, add details such as buttons on the cuffs, using the same principles for sketching buttons as before. Lastly, the hemline. The hemline of a shirt is the finishing touch and can really differentiate the type of shirt - whether it's a straight hem found on formal shirts or curved like on many casual designs. The hemline should follow the general shape of the shirt, looping around the bottom edge. Fabric should appear to gather slightly here, so don't forget to add a few soft creases to sell the effect. The meticulous detailing for these integral features - buttons, cuffs, and the hemline, greatly enhance the sketch's authenticity and aesthetic value. By focusing not just on the overall framework, but also on the minute aspects that compose it, these components enable artists to deliver an accurate, compelling representation of a shirt. Remember, the key to mastering these nuances lies in observation and practice. Try sketching different kinds of shirts, experimenting with various button positions, cuff styles, and hemlines to get the hang of it. As with each stage of the drawing process, patience and fine adjustments can yield a tremendous improvement in the end product.
3. Refine the shape and proportions of the shirt, paying attention to folds and creases
In the third step of our guide, we delve into the aspect of refining the overall shape and proportions of the shirt, a critical phase that largely determines the overall aesthetic outlook of the sketch. Consideration of folds and creases plays a fundamental part in granting the sketch a more realistic and detailed appearance. Shirt folds and creases are present due to the movement of the body and the way the garment hangs or lies on a surface, confronting gravity. Ignoring these finer details can result in a shirt that looks flat and stiff, devoid of any naturalness and life. At this stage of the sketching process, begin by lightening your initial lines with an eraser, so the initial figure appears more like a faint guideline. Now, refine the shape of your shirt. This might involve making it narrower or broader, depending on your preference, or correcting the initial shirt outline to look more symmetrical. During this process, it’s important to remember to maintain the relation between the shirt and the body shape, if you are drawing it on a figure. Bear in mind that the shirt has to follow the form of the body underneath and reflect its movements. Having adjusted the outline, turn your attention to defining the folds and creases. These are fundamentally essential to sketching a shirt, or any clothing item for that matter. Folds form from the flow of the fabric, the way it wraps and moves around the body. Therefore, they reveal a lot about the pose and the shape of the body, as well as the type of material of the shirt. For instance, if you are sketching a cotton shirt, remember the fabric is natural and soft, hence it tends to form flowing, gentle wrinkles. On the other hand, a shirt made from a more structured material like denim will have bold, sharp crease lines. Creases are best represented by a series of C and S shaped curves scattered across the shirt, particularly in areas where the fabric bunches up like the elbows and waist or where the cloth is tucked in. Pay attention to the direction of these shapes. They should flow in a way that shows how the fabric stretches or shrinks in response to movement. Draw these curvatures lightly and smoothly, paying particular attention to their distribution, size, and shape. As you become more comfortable drawing these, you can begin to deepen the lines to bring out the contrasts and lend a three dimensional look to the shirt. Do keep in mind that every crevice is not drawn darkly or emphasized, rather, a balance is maintained to avoid a mess. The darkened lines convey depth, and the lighter lines appear as the cloth's surface, reflecting light. In essence, the art of refining the shape, proportion, and particularly, the folds and creases of your shirt sketch, bridging the gap between a flat, lifeless outline and a dynamic and realistic illustration. This step's success rests on detailed observation, practice, and patience, but when effectively mastered, it adds life and depth to your drawing, transforming the simplest of sketches into a masterpiece.
Adding Texture and Realism to Your Shirt Drawing
of a good shirt drawing lies not just in the accuracy of the form but in the artist's valuable deep understanding of shading techniques, fabric texturing, and the shirt's interaction with the wearer's body. In diving into a seemingly mundane subject like a shirt, it's essential to realize that no fabric is completely flat or perfectly even. Shading techniques are crucial tools that empower an artist to capture the garment's full depth and dimension, providing an almost three-dimensional appearance. To create an accurate lifelike representation, one must also integrate texture – wrinkles, folds, patterns – these are the details that make your drawing realistic and visually captivating. Moreover, an artist must harbor an acute awareness of how a shirt molds itself around the human form, every fold and crease speaks volumes about the dynamics of the fabric and the posture of the wearer. The idea is to express not just what you see but to translate what you understand about your subject onto the canvas. So let's begin this journey by exploring different shading techniques which act as the base for enhancing depth and dimension in your shirt drawing.
1. Use different shading techniques to create depth and dimension
Understanding the use of shading techniques to create depth and dimension can greatly amplify the visual appeal and realism of your shirt drawing. Shading is the process of applying varying degrees of darkness to create the illusion of dimension and depth, offering a three-dimensional look on a two-dimensional surface. Essentially, shading enhances the perceptive elements of light and shadow to replicate textures, giving your drawings a more authentic and tangible outlook. Begin by determining your light source for realistic shading. The light source dictates where the lighter hues and darker shades will fall on the shirt, giving it a more believable appearance. Always remember that the parts of the shirt closer to the light source will generally have lighter shades, while the areas further away, will have darker shades. Several shading techniques can be utilized depending on the fabric type and desired effects. The first technique you can apply is smooth shading, which involves creating an even values transition from light to dark. It's highly useful when dealing with flat and smooth fabric surfaces, as it provides a silkier look to your shirt drawing. Another valuable technique is cross-hatching. Cross hatching involves drawing a series of intersecting sets of parallel lines to create a mesh-like pattern. This technique is excellent in portraying rough textures, making it ideal for giving your shirt a textured or wrinkled appearance. Further lines may be added for darker areas to depict deeper tones and therefore, more depth. If the shirt you're drawing has patterns, stippling can be a great method. Stippling involves using pointillism, or the application of tiny dots to simulate varying degrees of solidity or shading. This demanding and time-consuming technique is generally used for more detailed work, giving a distinctive texture to the fabric. Another technique involves using contour lines in your shading. Align the direction of your strokes with the shape of the shirt to enhance its roundness and volume. For instance, if you are drawing a flowing shirt, your shading lines should follow the wave-like fabric form to suggest movement and dimension. Lastly, blending can help you achieve a smooth gradient from dark to light, making the fabric appear soft and cuddly. Blending tools like a tortillon or a simple tissue can be utilized to integrate the varying tones of shading. Learning to incorporate these shading techniques in your shirt drawing offers more depth, volume, and a real-life texture to your work. It elevates the realism of your drawing, making it not just a flat representation, but an artistic rendition embodying depth and dimension. Ironing out your shading skills profoundly impacts your capacity to replicate the intricacy and beauty of fabrics in drawing. Your understanding and application of shading techniques are integral components in advancing your quest of adding texture and realism to your shirt drawing.
2. Add texture to the fabric, such as wrinkles, folds, and patterns
Adding texture to the fabric is a fundamental step to enhance the visual interest and realism of your shirt drawing. One of the best ways to beautifully depict the texture of a shirt is by incorporating wrinkles, folds, and patterns into the drawing. It's crucial to understand that the way fabric hangs, folds, or wrinkles can greatly suggest its type and weight. So, when drawing a shirt, you should visualize and represent these aspects accurately to give your sketch a realistic look. For instance, drawing wrinkles on the shirt gives an impression of movement to the fabric, making the drawing appear more lifelike. These visual cues suggest that the shirt is not a rigid form, but rather a flexible and dynamic material that adapts to the wearer's movements. Also, the positioning of folds can indicate the areas of tension or relaxation in the garment. Note that folds frequently appear where fabric is being pulled or hangs loosely, such as at the armpits, waistline, or elbows, and, thus, concentrating on these areas will ultimately add depth to your shirt drawing. Furthermore, adding patterns to the shirt fabric brings a second layer of complexity to your drawing, not to mention it adds an element of creativity and self-expression. Patterns can vary tremendously, from the classic solid colors, plaids, polka dots, to more intricate designs. Therefore, when drawing patterns, be patient and pay attention to details- the alignment and repetition of design should be consistent across the fabric’s drapery and folds. Remember that while adding texture to the fabric may initially seem complex, it can be a thrilling and fulfilling process. The keys are observation and practice to truly grasp how fabric behaves realistically. This allows you to translate these visual cues into your drawing and showcase your artistic skills fully. Therefore, don't be afraid to experiment and let your creativity fly – add interesting wrinkles, fold your shirt in different ways, play around with various patterns. Your shirt drawing will soon embody an expressive texture that communicates depth, detail, and personality, truly making your artwork stand out.
3. Pay attention to the way the shirt interacts with the body, including folds and creases
of improving your shirt drawing is understanding how it interacts with the body beneath. It's essential to observe and notice how the shirt folds, creases, and drapes over the wearer's body as these can greatly enhance the realism of your drawing. In the realm of fabric drawing, it's important to consider not only the body silhouette but also the complex topography of different body forms. This has significant repercussions on how a shirt will wrap around and sit on the body. For instance, a shirt on a well-built body creates different creases, stretch marks, and folds compared to one worn by a person with a slim frame. Additionally, different postures and movements could also impact how the shirt lays on the body. An uplifted arm, for instance, could cause the shirt to crease under the armpit area and result in horizontal folds across the chest. Emphasize the creases where the fabric pulls tight and the folds where it bunches up. Equally important is how the shirt interacts with the contours of the body in different actions and movements. During movement; bending, lifting, or twisting, the shirt will naturally fold and crease along the lines of the body. Understanding these dynamics requires observing real-life scenarios, clothing catalogues, or even using a mannequin to analyze these fabric movements. You also need to consider the type of material. A silk shirt will fall and fold differently from a cotton shirt or a denim one, while a loose fitting one will behave differently from a tight-fitted shirt. Adding texture to your drawn shirt imparts depth and interest, giving the drawing a three-dimensional feel. The texture, whether it's the delicate weave of cotton or the rugged lines in denim, will dictate the way the shirt forms folds and creases. A softer fabric like silk or satin will have gentler, flowing folds, while a stiffer fabric like denim or linen will have sharper, more defined creases. Practice rendering these textures by drawing several swatches of different fabrics. Further, lighting also plays a part in illustrating a realistic shirt drawing. It shows the volume of the shirt and helps define the creases and folds, giving your drawing a more three-dimensional look. Pay close attention to how light falls on the shirt's creases and how shadows are formed, this will add a dramatic effect to your drawing. In summary, when drawing a shirt, remember that how it interacts with the body is essential. The folds and creases that a shirt makes over the contours of the body contribute to a realistic depiction. Constant practice combined with keen observation will ensure that your ability to capture these intricate details in your drawings continuously improves. Understanding fabric texture and how light plays on these surfaces will only add more depth and realism to your shirt drawings. It's not just about capturing the outline of a shirt; it's about bringing it to life with as much realism as possible.