How To Draw Curly Hair
Understanding the Basics of Drawing Curly Hair
The Importance of Observation
When it comes to learning how to draw curly hair, the first step is understanding the importance of observation. Curly hair is a complex structure of twists and turns, and pays attention to the way it falls, the way the light hits it, and the shadows it creates is crucial. Spend time observing different types of curls, from tight coils to loose waves. Notice how each strand seems to have a life of its own, how some curls bunch together while others stand alone, and how the hair as a whole forms a sort of halo around the head. Taking the time to observe can make a huge difference in your drawings. This is the foundation from which all your curly hair drawings will be built.
Identifying the Curl Pattern
Different people have different curl patterns. While some have coils that are tight and compact, others have loose, flowing curls. This is an important feature you must consider in your drawings. One way of identifying the curl pattern is by observing the hair when it is wet, as this is when the curls are usually more defined. When drawing, it's important to be accurate in depicting this pattern as it adds to the believability of the portrayed character.
Utilizing the Right Tools
A successful drawing isn't only about skill and observation—it's also about using the right tools. When drawing curly hair, consider using a variety of pencils for different aspects of the hair. For the outline, a harder pencil such as a 2H can provide a thin, precise line. For shading and defining the texture of the hair, a softer B or 2B pencil may be suitable. Meanwhile, a blending stump can be useful for smoothly transitioning between the dark and light areas and achieving a more realistic look.
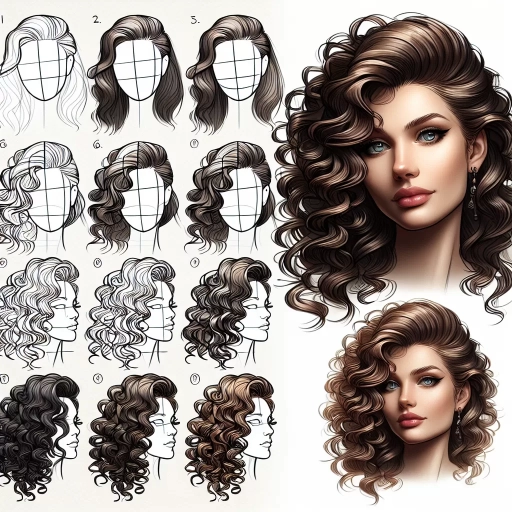
Step-by-Step Guide to Drawing Curly Hair
Creating the Basic Shape
The first step to drawing curly hair is to create its basic shape. This can be done by sketching a simple, general outline of the hair. As curly hair tends to have a lot of volume, this initial shape should be larger and wider than you'd expect. Remember, the basic shape does not have to be perfectly detailed at this stage—it is merely a guideline for the details that will be added later.
Adding the Curls
Once you have your basic shape, the next step is to start adding the curls. To do this, start from the roots and work your way down, drawing the curls as they naturally fall. Remember that each curl is different and its form can change direction at any given point. Some may be tight and others loose, and some will overlap while others won’t. The more varied the curls, the more realistic and interesting the hair will look.
Shading and Detailing
Once you've added the curls, the final step is shading and detailing. Focus on the darkest areas first—the roots, under the curls, and any overlapping areas—and gradually move to the lighter areas. Be mindful of the way the light hits the hair and casts shadows. To create texture within the hair, use short, curved lines that follow the direction of the curl. Finally, add in highlights to create depth and dimension to the curls.
Tips and Tricks for Drawing Realistic Curly Hair
Understanding Light and Shadow
Understanding how light and shadow work is key to creating realistic drawings of curly hair. When the light hits the curls, it creates highlights that can vary in brightness and size depending on the hair’s texture and the light source’s intensity and direction. Shadows are often found at the roots, underneath the curls, and in overlapping areas. Observing and accurately portraying these elements will add depth and dimension to your drawings.
Maintaining the Hair's Volume
Curly hair is known for its volume. When drawing, it's important to maintain this by ensuring that the hair doesn't appear flat. This can be achieved by focusing on the overall shape of the hair, rather than getting caught up in individual strands or curls. Make sure there are both dense, detailed areas as well as lighter, less defined ones. This contrast will give your drawing a balanced and voluminous appearance.
Practicing Different Curl Patterns
The key to mastering the art of drawing curly hair lies in practicing different curl patterns. Each type of curl is unique and requires a different approach to accurately portray its characteristics. Make sure to experiment with a variety of curls, ranging from tight coils to wavy strands. With enough practice, you will become more comfortable and adept at capturing the unique beauty of curly hair.