How To Fillet A Walleye
 Welcome to our comprehensive guide on how to fillet a walleye - a rewarding skill for any angler passionate about enjoying their catch on the dining table. In our quest to provide high-quality, engaging, and informative content, we will delve into the art of filleting this delectable fish, perfect for both the beginner angler and the experienced fisherman yearning to perfect their filleting techniques. This article promises to take you on a journey through every crucial step of the process, ensuring you can enjoy your catch to its full potential. We begin by laying the foundation with 'Understanding the Basics of Walleye Filleting,' where we will introduce the fundamental principles of walleye filleting. Following, we will guide you through the actual fish filleting process in 'Step-By-Step Guide to Filleting a Walleye'. Lastly, to help you master the art, we share 'Tips and Techniques for Perfect Walleye Fillets', which will act as your manual to enhance your filleting skills. Prepare to immerse yourself in the gratifying world of Walleye filleting, and let's start with understanding its basic principles.
Understanding the Basics of Walleye Filleting
Delving into the world of walleye filleting can be a rewarding experience if you understand three fundamental areas: the anatomy of a walleye, essential tools for filleting, and preparations before filleting. Grasping a walleye's physical structure, which we will further probe in "The Anatomy of a Walleye," equips any angler with the indispensable knowledge of the fish's internals, thus driving an efficient and effective filleting process. In our discussion titled, "Essential Tools for Walleye Filleting," we will discuss the right instruments that make filleting not just comfortable, but also a precise art, from knives that give you control and accuracy to cutting boards that keep the fish steady. And finally, knowing what to do in preparation before filleting, which we'll detail in "Preparation Before Filleting," allows you to maintain the fish's freshness and maximize its flavors. Mastering these areas thrusts any aspiring angler into a rewarding path of creating enjoyable walleye dishes. Now, let's take our journey deeper down this underwater path by first understanding the unique anatomy of a walleye.
The Anatomy of a Walleye
The Anatomy of a Walleye is integral to understand before exploring the method of filleting a Walleye. This North American freshwater species, Scientifically known as Sander vitreus, is popular among anglers for its unique taste. The magnificently streamlined body of a Walleye is equipped with an anatomy that makes it a skilled predator in the water. A full-grown Walleye can grow up to 31 inches, though is typically closer to 20 inches, giving it formidable size in freshwater bodies. The Walleye is covered in a layer of thick and rough, yet fine-tuned, scales that cover its entire body including its dorsal side, lateral sides, and ventral side. It has an elongated and robust frame, possessing a conical snout at the front and a powerful tail at the back which aids in high-speed propulsion. Two of its key distinguishing characteristics are its pearlescent eyes that shine eerily in torchlight—a result of the tapetum lucidum, a layer of cells in the eye that aid in low-light vision, allowing these night feeders to see their prey easily—and its sharp, carnivorous teeth that it uses to capture prey, chew, and breakdown food. Looking closely, one notices the Walleye’s dorsal fin which is divided into two – the anterior spiny portion and the posterior soft-rayed portion. The spiny dorsal fin acts as a defense mechanism against predators while the soft dorsal fin assists in maintaining balance. The anal fin mirrors a similar structure, proving valuable for both speed and stability. Its ventral parts, the pectoral, and pelvic fins enable precision steering, lending the Walleye exceptional maneuverability. Internally, Walleye hosts two stomachs. The cardiac stomach digests and moves food while the pyloric stomach breaks down the food further using enzymes. The Walleye’s kidney, liver, and heart form other vital organs of the digestive system. Its robust skeletal system composed of numerous vertebrae houses the spinal cord and supports swimming movements. Knowing the ins and outs of a Walleye’s anatomy not only helps understand the prowess of this fantastic creature, but it also provides a sense of the challenges and precautions needed when filleting a Walleye. Filleting requires careful techniques to avoid damage to its anatomy and to ensure the utmost yield of meat. Thus, understanding a Walleye's anatomy is a paramount and intricately linked aspect that greatly influences the art of filleting.
Essential Tools for Walleye Filleting
Filleting a walleye, like any other type of fish, necessitates the use of certain essential tools. These tools not only help you get the job done but also ensure your safety in the process. Arguably, the most critical element in walleye filleting is an excellent quality fillet knife. This specialized knife possesses a long, thin, and most importantly, incredibly sharp blade. The sharpness of the blade effortlessly separates the skin from the meat, allowing for precision cuts and reducing the risk of mishaps. Additionally, another tool that you might find very handy is a fillet glove. Although often overlooked, an excellent cut-resistant glove is fundamental to protect your hands from potential incidents and granting an extra grip to handle the fish better. The investment made to purchase one goes a long way as it not only guarantees safety but also greatly enhances the filleting experience. As you get more comfortable with the filleting process, you might want to consider using an electric fillet knife. An electric knife easily glides through the meat, making it particularly useful when filleting larger catches of walleye or when dealing with a significant amount of fish. Lastly, having a fillet board or a mat makes the filleting process considerably more manageable. These tools help in securing the fish, thus preventing it from slipping and sliding on the surface while you work. Furthermore, these boards are usually quite easy to clean and can also prevent knife cuts from damaging your countertops. Each tool plays a vital role in the process, and together they ensure you get perfectly filleted walleye each time. Moreover, these instruments significantly decrease the risk of injuring yourself; nevertheless, remember that knowing how to use them correctly and safely is as essential as the tools themselves. The correct use of these tools, paired with practice over time, will make you a master in walleye filleting. All in all, the right tools simplify the filleting process, create a safer environment, and result in neatly filleted walleye, all the while adding to your overall comfort and efficiency during the process.
Preparation Before Filleting
Before diving directly into the process of filleting walleye, it's essential to prepare adequately. Equipping yourself with proper knowledge and tools can make the entire procedure more straightforward and more pleasing. Start by ensuring you have a clean, spacious, and well-lit workspace. Filleting a walleye is a meticulous task that requires precise cuts and steady hands. A cluttered or poorly lit space can lead to accidents or improper filleting. Next, ensure you have a sharp and high-quality fillet knife. A blunt knife can result in ragged cuts, damaging the delicate meat of the walleye and making your filleting process challenging. An ideal fillet knife should be flexible enough to navigate the fish bones easily. Before starting, it's vital to put on a cut-resistant glove. Filleting involves handling sharp tools around a potentially slippery object; therefore, safety precautions are justified. Keeping a bucket or plastic bag nearby can come in handy. Filleting, like most cooking preparations, creates waste, like skin and fish bones. To maintain a clean working area, promptly dispose of these. Next, consider what to do with the fillet once it's removed. Do you plan to cook it immediately, or store it for future use? If you're looking to store it, ensure your refrigerator or freezer has enough space and is at the correct temperature. Lastly, get familiar with the walleye's anatomy. Knowing where the spine, rib cage, and other vital parts are will help you make clean, careful cuts. Identify the dorsal side (the fish's top side), which is usually darker, and the belly, which is lighter. In conclusion, proper planning and preparation are as significant as the filleting skills when it comes to processing walleye. By giving due importance to this step, you can not only ensure safety and hygiene but also get the best out of the walleye fillet.
Step-By-Step Guide to Filleting a Walleye
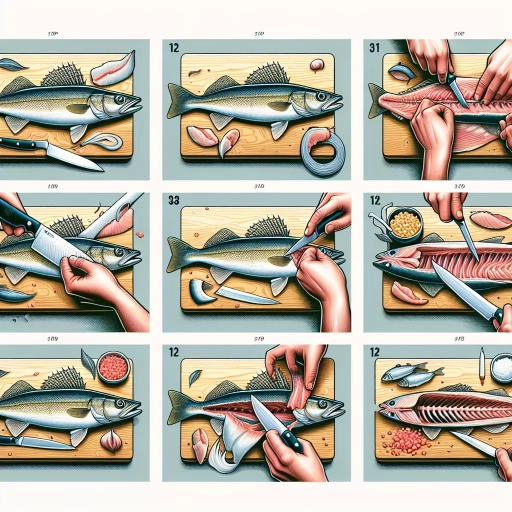
Getting to know the art of filleting a walleye can elevate your fishing experiences to new heights. This comprehensive step-by-step guide will walk you through the process, beginning with making the initial cut, progressing to separating the fillet from the body, and finally, dealing with the rib bones and skin. Delving into the intricacies of each step, we will cover the tools you’ll need, the techniques to employ, and the mistakes to avoid. This is not just a tutorial, it is a deep journey into the practical and aesthetic aspects of processing this incredible fish. So, whether you are an angling enthusiast or an aspiring chef, this guide will equip you with the knowledge and confidence to expertly fillet a walleye. Let us begin our journey with the first necessary step: making the initial cut on a walleye. This critical stage sets up the method and rhythm for the filleting process, effectively defining the quality of your final dish. Proper technique and precision are crucial here, which we’re about to dive into in detail.
How to Make the Initial Cut on a Walleye
Filleting a fish like Walleye is a delicate process, with key steps in order to achieve the best meat quality and texture for your meals. The initial cut is critical as it determines the quality and size of fillets that will be part of your delicious treat. To make the initial cut on Walleye, you need a sharp fillet knife and a clean, stable surface to work upon. Begin by positioning the Walleye on one side, ensuring it's secure, and the head is towards your dominant hand. The very first incision will be right behind the fish's gills and pectoral fin, slicing down to its backbone; take care not to cut into the spine. Next, starting from this incision, run your knife along the upper side of the spine toward the tail without slicing all through. Operate with a touch of finesse to separate the meat from bones and retain the maximum fillet size and possible. The idea behind this practice is to slide your knife, not chop. The motion is almost like you're freeing the flesh from the frame, using the blade's edge against the bone. The secret of getting it right is to follow the backbone structure of the fish - nature’s guideline engraved right onto your Walleye. By following these lines, you are ensuring a fillet cut that reaps the maximum meat and leaves minimal waste. This process might seem intimidating at first sight due to Walleye's thick scales and conspicuous bones. However, it only requires a bit of practice and patience in handling your knife and fish. Remember, the sharper your knife, the cleaner your cut will be, presenting you with whole and plump Walleye fillets. Substantial precision in this initial stage translates into less waste and more meat to savor, bolstering the satisfaction of your carnivorous cravings. The technique can be part science, part art but wholly satisfying once you master the knack. Key here is to keep in mind the fish anatomy, the fineness of your knife, your speed and accuracy, and you'll never be far from perfecting your fillet skills. With these elements intact, making an initial cut on Walleye can already feel like a breeze. This mastery represents not just a mundane kitchen chore but a testament to an angler's sophistication and connection to this noble creature. By honoring every bit of the Walleye through proper filleting, you are celebrating the life cycle, nature, and food at its finest – all culminating in that delightful moment when diners experience the succulence of your perfectly filleted Walleye.
How to Separate the Fillet from the Body
In the journey of filleting a Walleye, one of the most crucial steps is separating the fillet from the body. This is a meticulous process that requires precision, but with practice and the right tools, it becomes a breeze. First, you will need a sharp fillet knife to seamlessly run along the body of the Walleye, which will ensure a clean cut without damaging the delicate meat tissue. Having positioned your Walleye on a steady surface, the first incision begins at the dorsal fin, moving down towards the tail in a gently sawing motion. Keep your blade tightly against the rib cage as you go, following the contour of the fish’s body. You don’t want to penetrate the rib cage, so keep a close eye on your knife and apply gentle pressure. It is important to maintain an even pace and keep your knife's blade slightly angled downwards while cutting along the spine. Along this incision, the fillet starts to separate from the body, unveiling the beautiful, pearly white flesh. Some tend to leave the skin on during this process, but this largely depends on personal preference. Continue your cut until you reach the tail, but don't cut through it - instead, stop just before the end, leaving the fillet loosely attached. The next step is to carefully slide your knife under the fillet, moving from the tail to the head while ensuring the blade stays close to the skin. This will separate the flesh from the skin, culminating in a clean, skinless fillet. The key to this step is technique over strength. This is not simply about separating the fillet from the body but ensuring the flesh is as intact as possible, promising a delicious end product - be it a pan-fried Walleye to serve up at a summer barbeque or a hearty Walleye chowder for the colder months. With patience and precision, you'll make the most out of your catch, avoiding wastage and ensuring the entire fillet is retrieved from the body. Remember, the filleting process is a skill that is perfected over time, making every Walleye you catch a new opportunity to refine your technique. In the realm of fish filleting, separating the fillet from the body is as much a science as it is an art, making the mastery of this step a true testament to a keen angler's finesse and expertise. While it can be a little daunting at first, with repeated practice, you will find yourself producing restaurant-quality Walleye fillets right at home.
Dealing with the Rib Bones and Skin
Dealing with rib bones and skin in walleye can be a meticulous process and crucial step in achieving a supreme-quality fillet. Mastering this step correctly is essential as it determines the ultimate quality and taste of your fish meal. Directly linked to your cooking experience, the subtlety of the process can enhance not just the culinary experience but also the sensory satisfaction associated with it. To kickstart the procedure, utilize a sharp and flexible filleting knife. You need to make sure it’s sharp enough to smoothly cut through the skin and bones without tearing the meat. A significant trick in the book is to start at the tail end. Place your knife flat against the fillet with the blade facing the rib bones, and gently slide it along the ribs. The mastery involved while hinging the tip of the knife along the rib bones can contribute majorly to minimizing meat wastage. Meanwhile, to address the skin, it's absolutely pivotal to understand the tautness level. At this point, maintaining a steady pressure while sliding the knife between the meat and the skin turns crucial to avoid ripping the fillet apart. Ideally, you should aim to keep your knife at a slight angle, ensuring that it stays closer to the skin rather than the meat. Importantly, adept handling of the rib bones and skin does not only create a succulent and boneless fillet but also ensures an enriched palate appeal. It demands substantial practice and precision, making it a valued skill in the realm of culinary fish preparation. Such skillful post-processing can incredibly enhance the delicacy that walleye inherently offers, thereby raising the delight in every bite. A better understanding and execution of this step can dramatically impact your fillet's texture and taste, ultimately marking it as an essential part in filleting a walleye. Regular practice and developing familiarity with the knife's handling can be elemental in achieving mastery over this step. Every step plays a pivotal role in the magnified narrative of filleting a walleye, and dealing with the rib bones and skin is undoubtedly an influential chapter in this culinary story.
Tips and Techniques for Perfect Walleye Fillets
In the culinary world, successfully preparing a walleye fillet is an art that requires a fine blend of precision, knowledge, and experience. Our in-depth guide to Tips and Techniques for Perfect Walleye Fillets is a comprehensive primer aimed to enhance your fish preparation skills. We delve into three critical aspects that contribute to a perfectly filleted walleye: the vitality of sharp knives, strategies to evade common mistakes during the filleting process, and advice on the correct storage and cooking methods. In the following sections, we will first place a critical eye on one of the most essential tools in fish filleting - the knife. We aim to detail the importance of sharp knives, their effect on the overall preparation process and their contribution to the ultimate taste and presentation of walleye fillets. A tour de force on the subject, this guide would provide valuable insights for both novice cooks and seasoned chefs. As we transition to our first element, "Understanding the Importance of Sharp Knives," we invite you to sharpen your blade and your curiosity. Dive into the heart of the matter with us, to unravel the secrets of the perfect walleye fillets.
Understanding the Importance of Sharp Knives
Understanding the importance of sharp knives is integral when transitioning to the practical process of filleting a Walleye. It's much more than just an issue of efficiency - the cleanliness of your cut, the safety of your fingers and the overall end result of your filleting dramatically hinge on the sharpness of your blade. A dull knife is likely to slip, possibly causing injury or wasting precious meat. Imagine attempting to fillet a delectable walleye with a blade that's as blunt as a butter knife. You will be exerting unnecessary force, and instead of carefully separating the fillets, you might mangle the delicate fish or even harm yourself in the process. Your presentation will be poor and you'll be left with a plate that resembles a fish massacre more than a filleted walleye. Conversely, a sharp knife easily slices through the flesh, separating skin, bones and meat smoothly, preserving the structure of the meat and leaving behind the unwanted parts. This results in a finer, more professional level of food preparation, enhancing not just the look, but also the taste of your walleye fillets. The fillet will cook evenly and the flavors will be uniformly absorbed; leading to a tastier, more appetizing dish. Moreover, using a sharp knife reduces the time and energy required to fillet your fish, thereby making the whole process less daunting and more efficient. This means you can move onto the creative process of cooking sooner, and your precious catch won't spend unnecessary time on the cutting board, risking spoilage. Lastly, it's vital to remember that each type of fish may require different types of blades. Walleyes, for example, require a knife that's flexible and razor sharp; so it can easily navigate around bones while maximizing the amount of meat obtained from the fish. Thanks to sharp knives, filleting passes from being a chore to a delicate task where skill and precision make the difference in the quality of your dinner plate. So, don't underestimate their value - a sharp knife is a worthwhile investment for any fishing enthusiast and culinary aficionado who is eager to create perfect walleye fillets.
How to Avoid Common Mistakes When Filleting Walleyes
When embarking on the skillful task of filleting walleyes, it's paramount to avoid common mistakes that can lead to less-than-favorable results. Fortunately, with pertinent attention to detail, these errors can be wholly precluded lending to perfect, delectable walleye fillets. One common, albeit underestimated, mistake is rushing the process. The art of filleting demands patience for precision. Attempting to rush correlates directly with rough cuts, torn meat, and excess flesh left on the bone. This is not only unsatisfactory aesthetically but could also diminish the quality of your final culinary creation. Choosing the right knife is another critical factor. Not all knives are made equal and this holds true in the realm of filleting. A dull or unsuitable blade can lead to torn fillets, wasted meat, and even potential injuries. An optimal choice is a sharp, flexible filleting knife that allows precise, smooth, and flowing cuts. Proper maintenance of your tools is also important; always clean and sharpen your knife before and after the filleting process. Understanding the fish anatomy is crucial for avoiding mistakes. Walleyes, like all fish, have a specific structure – bones, fins, and a particular grain to the flesh. Familiarize yourself with this and the whole process will become easier and more rewarding. Make sure to cut along the backbone, work your way towards the tail, not against it, and to do so in one smooth motion. Filleting in poor lighting conditions is another often overlook mistake. Proper visibility is essential to accurately see and follow the fish's natural lines and safely handle your tools. Always ensure good lighting condition before you start your work to avoid unnecessary mishaps or poor quality fillets. Overlooking the skinning process is another common mistake. After separating the fillet from the bones, it’s imperative to remove the skin. This process, although seeming tricky initially, becomes fluid with practice. Lay the fillet skin-side down, make a small incision between meat and skin at the tail end, then hold down the skin and simultaneously slide the knife along - separating the skin from the meat. This might sound like a long, meticulous process to avoid common mistakes, but practice definitely makes perfect, or in this case, perfect walleye fillets. Avoiding these common mistakes not only boosts the quality of fish meat but also enhances the entire culinary experience. The final reward tastes all the better when you've primarily taken the time to master your filleting skills.
Proper Storage and Cooking Methods for Walleye Fillets
When it comes to savoring the delicious flavor of walleye fillets, the method of storage and cooking is of utmost importance. Effective storage extends the longevity and freshness of the fillets, with proper freezing techniques establishing a cornerstone of quality maintenance. Before freezing, walleye fillets should be rinsed and patted dry, then tightly wrapped in plastic or vacuum-sealed to prevent air exposure and then stored in the coldest part of the freezer. Equally essential, the countenance towards the cooking process can significantly impact the final result. Walleye fillets are known for their tender, succulent texture and delicate flavor. Thus, the cooking methods should only accentuate these natural properties rather than overpower them. Pan-searing is a highly recommended method that provides a crisp outer layer and keeps the inside moist and juicy. For this, you’ll need a high-quality non-stick pan, a small amount of oil, and even heat. Slowly cook the fillets on medium heat on each side until they're golden brown, typically taking about 3-4 minutes per side depending on thickness. Baking or broiling walleye fillets in the oven is another excellent method that promotes even cooking and flavor retention. Baked at 350 to 375 degrees Fahrenheit for about 10-12 minutes per inch of thickness, these fillets come out brilliantly flavored and perfectly textured. Grilling offers the added benefit of imbuing the fillets with a subtle smoky hint. However, grilling requires expertise and careful handling to avoid the risk of overcooking, which can diminish flavor and tenderness. Lastly, a quick tip for getting an added burst of flavor is marinating, which allows for an impressive depth and complexity of taste without compromising the natural flavors of the fish. Whether you choose a simple blend of lemon, herbs, and olive oil or something more adventurous, a good marinade greatly enhances the walleye experience. By aligning proper storage and selecting the right cooking method, a perfectly delectable walleye fillet is achievable time after time. Remember, the aim here is to celebrate the walleye's delicate flavor -- so keep it simple, keep it fresh, and most importantly, enjoy every bite.