How To Draw Charmander
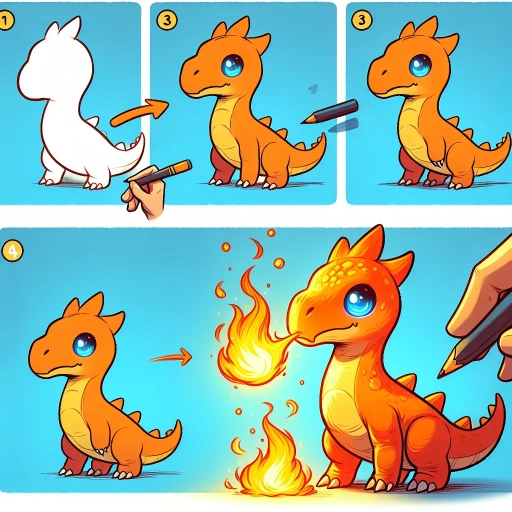
Charmander, the beloved Fire-type Pokémon, has been a fan favorite since its introduction in the first generation of Pokémon games. With its lizard-like appearance and flame on the end of its tail, Charmander is a unique and iconic character that many fans love to draw. However, drawing Charmander can be a challenging task, especially for beginners. To help you master the art of drawing Charmander, this article will guide you through the process, starting with understanding its physical characteristics, then sketching its basic form, and finally adding details and refining the drawing. By following these steps, you'll be able to create a high-quality drawing of Charmander that showcases its fiery personality. So, let's start by taking a closer look at Charmander's physical characteristics, which will serve as the foundation for our drawing.
Understanding Charmander's Physical Characteristics
Charmander, a popular Pokémon species, is known for its distinctive physical characteristics that set it apart from other creatures. To truly understand this species, it's essential to delve into its physical attributes, which can be broken down into three key areas: body proportions and posture, facial features and expressions, and scaly texture and patterns. By examining these aspects, we can gain a deeper appreciation for Charmander's unique appearance and how it contributes to its overall identity. In this article, we'll explore each of these areas in detail, starting with Charmander's body proportions and posture, which play a crucial role in its overall physical presence.
Body Proportions and Posture
The proportions and posture of a Charmander are crucial in capturing its lizard-like appearance. To draw a Charmander, start by sketching a rough outline of its body, paying attention to the proportions. Charmander's body is roughly 1.5 to 2 times the length of its head, with the tail making up about half of the total body length. The arms and legs are relatively short, with the arms being slightly longer than the legs. The hands and feet are small, with the hands having three claws and the feet having four. When it comes to posture, Charmander is often depicted with a slight arch in its back, giving it a subtle curve. The head is held high, with the chin slightly tucked in, and the tail is usually held straight out behind the body. The arms and legs are often positioned in a way that suggests movement, with the arms slightly bent and the legs slightly flexed. By paying attention to these proportions and posture, you can create a Charmander that looks dynamic and full of life. Additionally, consider the texture and pattern of Charmander's skin, which is often depicted as being rough and scaly, with a distinctive flame pattern on the end of its tail. By incorporating these details, you can add depth and realism to your drawing.
Facial Features and Expressions
Facial features and expressions play a crucial role in bringing Charmander to life. To draw a believable Charmander, it's essential to capture its distinctive facial characteristics. Start by drawing two small, beady eyes that are positioned on either side of the head, making sure to leave enough space between them to create a sense of depth. The eyes should be slightly angled, giving Charmander a perpetually curious and alert expression. Next, draw a small, button nose that is centered between the eyes, making sure it's in proportion to the rest of the face. The mouth is perhaps the most distinctive feature of Charmander's face, with a small, lipless slit that curves downward slightly, giving the Pokémon a somewhat stern expression. To add some personality to your Charmander, you can also draw a few subtle facial expressions, such as a slight raise of the eyebrows or a tiny smirk. By paying attention to these small details, you can create a Charmander that looks not only accurate but also full of character.
Scaly Texture and Patterns
The scaly texture and patterns on Charmander's body are one of its most distinctive features. The scales are a combination of rough and smooth textures, with a mix of small, rounded scales on its belly and larger, more plate-like scales on its back. The scales are arranged in a specific pattern, with a series of darker, more prominent scales running along its spine, and lighter, more mottled scales on its sides. The pattern of scales on Charmander's body is not just for show; it also serves as a form of camouflage, helping the Pokémon to blend in with its surroundings. The scaly texture and patterns on Charmander's body are also reflective of its lizard-like appearance, and are a key part of what makes the Pokémon so recognizable. In order to accurately draw Charmander, it's essential to capture the texture and pattern of its scales, as well as the way they reflect light and shadow. By paying close attention to the details of Charmander's scaly texture and patterns, artists can create a drawing that is both visually striking and true to the Pokémon's unique appearance.
Sketching Charmander's Basic Form
Sketching Charmander's basic form requires a combination of creativity and technical skill. To bring this beloved Pokémon to life on paper, artists must first understand the fundamental elements of its design. This involves breaking down the character into simple shapes to block out the body, adding guidelines for proportions and symmetry to ensure accuracy, and defining the basic form with lines and curves to capture its unique features. By mastering these essential techniques, artists can create a solid foundation for their sketch and set themselves up for success in the next stages of the drawing process. With a clear understanding of these principles, let's start by using simple shapes to block out the body, a crucial step in sketching Charmander's basic form.
Using Simple Shapes to Block Out the Body
When sketching Charmander's basic form, using simple shapes to block out the body is a great way to get started. Begin by drawing a large oval for the body, making sure to leave enough space at the top for the head and neck. The oval should be slightly tilted, with the top end leaning towards the back. This will help give Charmander its signature lizard-like posture. Next, add a smaller oval for the head, connected to the body by a neck that's roughly the same width as the head. The head should be positioned at a slight angle, with the nose pointing downwards. For the tail, draw a long, curved rectangle that tapers off towards the end. The tail should be roughly the same length as the body, and should be positioned at the back of the oval body shape. Finally, add two small circles for the legs, one on either side of the body. These will serve as the foundation for Charmander's arms and legs, which can be added later. By using simple shapes to block out the body, you'll be able to get a sense of Charmander's overall proportions and posture, making it easier to add details and refine the drawing later on.
Adding Guidelines for Proportions and Symmetry
When adding guidelines for proportions and symmetry, it's essential to consider the overall structure of Charmander's body. Start by drawing a vertical line down the center of the paper to establish the character's midline. This line will serve as a reference point for ensuring symmetry in the drawing. Next, draw a horizontal line across the paper to indicate the placement of Charmander's shoulders. The distance between the midline and the shoulder line should be roughly one-quarter of the way down from the top of the paper. This will help establish the proportions of the character's head and body. Additional guidelines can be added to indicate the placement of the arms, legs, and tail, using simple shapes such as circles and rectangles to help block out the forms. By using these guidelines, you can ensure that your drawing of Charmander is proportionate and symmetrical, providing a solid foundation for adding details and textures later on.
Defining the Basic Form with Lines and Curves
Defining the Basic Form with Lines and Curves. To start sketching Charmander's basic form, begin by drawing a large oval for the body, making sure it's tall rather than wide. The oval should be slightly tilted, with the top end leaning towards the left side of the paper. Next, draw a smaller oval for the head, connected to the body by a neck. The head oval should be positioned at a slight angle, with the top end pointing towards the right side of the paper. Use gentle, flowing lines to sketch the curves of the body and head, making sure to capture the smooth, rounded shape of Charmander's form. Add a small triangle for the nose and a curved line for the mouth, and use a series of short, curved lines to suggest the texture of the skin. Finally, use a long, curved line to define the tail, making sure it's long and slender. By using a combination of lines and curves, you can create a solid foundation for your Charmander drawing and capture the character's iconic shape.
Adding Details and Refining the Drawing
Adding details and refining the drawing is a crucial step in creating a high-quality piece of art. This process involves enhancing various aspects of the drawing, including facial features and expressions, adding textures such as scales and flames, and refining the overall image with shading and color. By focusing on these elements, artists can bring their drawings to life and create a more engaging and realistic visual experience. In this article, we will explore the importance of adding details and refining the drawing, starting with the enhancement of facial features and expressions. By paying attention to the subtleties of facial expressions, artists can convey emotions and personality, making their drawings more relatable and captivating. We will also discuss the techniques involved in adding scales, flames, and other textures, as well as the role of shading and color in refining the drawing. By mastering these techniques, artists can take their drawings to the next level and create truly stunning works of art. By enhancing facial features and expressions, artists can set the tone for the rest of the drawing, creating a foundation for a truly exceptional piece of art.
Enhancing Facial Features and Expressions
When it comes to enhancing facial features and expressions, there are several techniques you can use to bring your Charmander drawing to life. To start, pay attention to the shape and size of the eyes, as they are the most expressive feature of any Pokémon. Charmander's eyes are typically depicted as being quite large and rounded, with a sharp, pointed pupil that gives them a fierce and alert appearance. You can use a range of lines and shading techniques to create depth and dimension in the eyes, from soft, gentle curves to sharp, angular lines. Next, consider the shape and position of the mouth, which can greatly impact the overall expression of your Charmander. A curved, smiling mouth can give your Charmander a friendly and approachable appearance, while a straight or downturned mouth can make it look more serious or intimidating. Don't forget to add some texture and detail to the mouth, such as the small, pointed teeth that are characteristic of many Pokémon. Finally, think about the overall shape and proportions of the face, including the size and shape of the nose, the position of the ears, and the shape of the jawline. By carefully balancing these different features, you can create a Charmander that looks both realistic and expressive.
Adding Scales, Flames, and Other Textures
Adding scales, flames, and other textures to your Charmander drawing can elevate it from a simple outline to a detailed and engaging piece of art. To add scales, start by drawing small, rounded triangles along the length of Charmander's body, overlapping them slightly to create a layered effect. You can also add a slight curve to each scale to give them a more organic look. For the flames on Charmander's tail, use a combination of curved and straight lines to create a flowing, dynamic shape. You can also add some texture to the flames by drawing short, curved lines that suggest the movement of the fire. Additionally, you can add some texture to Charmander's skin by drawing short, curved lines that suggest the rough, scaly texture of a lizard. By adding these textures and details, you can create a more realistic and engaging drawing of Charmander.
Refining the Drawing with Shading and Color
Refining the drawing with shading and color is a crucial step in bringing Charmander to life. To start, use a range of shading techniques to add depth and dimension to the drawing. Begin by identifying the light source and using gentle hatching lines to suggest the contours of the body. Gradually build up the shading, using softer pencils for lighter areas and harder pencils for darker areas. Pay particular attention to the texture of the skin, using short, curved lines to suggest the scaly texture. Next, add color to the drawing, using a range of warm, earthy tones to capture Charmander's fiery personality. Start with the base color, a warm orange-yellow, and gradually build up layers of color to add depth and dimension. Use a range of colored pencils or markers to add subtle shading and texture to the drawing, and don't be afraid to experiment with different colors and techniques to capture the unique characteristics of Charmander. Finally, use a black pen or marker to add fine details, such as the eyes, nostrils, and mouth, and to define the edges of the body. With patience and practice, the drawing will come alive with shading and color, capturing the spirit of this beloved Pokémon.