How To Tie A Shoe
Tying a shoe is a fundamental skill that is often overlooked, but it is an essential part of our daily lives. From a young age, we are taught how to tie our shoes, but for some, it can be a daunting task. However, with practice and patience, anyone can master the art of shoelace tying. In this article, we will take you through the process of tying a shoe, from the basics to troubleshooting common issues. We will start by mastering the basics of shoelace tying, including understanding the different types of laces and how to properly thread them through the eyelets. Then, we will provide a step-by-step guide to tying a shoe, breaking down the process into simple and easy-to-follow steps. Finally, we will address common issues that may arise when tying a shoe, such as laces that come undone or are too tight. By the end of this article, you will be a pro at tying your shoes. So, let's get started by mastering the basics of shoelace tying.
Mastering the Basics of Shoelace Tying
Mastering the basics of shoelace tying is an essential skill that can be achieved with practice and patience. To begin with, it's crucial to understand the shoelace structure, including the different parts of the lace and how they interact with each other. Additionally, choosing the right shoelace material can make a significant difference in the ease of tying, as some materials are more prone to tangling or slipping. Furthermore, developing hand-eye coordination is vital in mastering the intricate movements required for shoelace tying. By focusing on these key aspects, individuals can build a strong foundation for tying their shoelaces efficiently and effectively. In this article, we will delve into the first crucial step: understanding the shoelace structure.
Understanding the Shoelace Structure
Understanding the shoelace structure is a crucial step in mastering the basics of shoelace tying. A standard shoelace consists of two long, thin strings with a series of holes and a metal or plastic tip at the end. The holes are spaced evenly apart and are used to create the foundation of the knot. The metal or plastic tip, also known as the aglet, prevents the lace from fraying and makes it easier to thread through the holes. The shoelace structure is designed to be flexible and adjustable, allowing it to conform to the shape of the shoe and the foot. By understanding the shoelace structure, you can better appreciate the mechanics of shoelace tying and develop the necessary skills to tie your shoes quickly and efficiently. With practice and patience, you can master the basics of shoelace tying and move on to more advanced techniques, such as creating different types of knots and patterns. By mastering the shoelace structure, you can take your shoelace tying skills to the next level and develop a sense of confidence and independence.
Choosing the Right Shoelace Material
Choosing the right shoelace material is crucial for a comfortable and secure fit. The most common materials used for shoelaces are cotton, nylon, and elastic. Cotton laces are a popular choice due to their softness and breathability, making them ideal for casual wear. However, they can be prone to fraying and may not be as durable as other materials. Nylon laces, on the other hand, are more durable and resistant to fraying, but can be stiff and rough on the skin. Elastic laces are a great option for those who want a hassle-free experience, as they can be stretched to fit the foot and do not require tying. Ultimately, the choice of shoelace material depends on personal preference, lifestyle, and the type of shoe being worn. For example, athletes may prefer elastic laces for their convenience and comfort during intense activities, while individuals with sensitive skin may opt for cotton laces for their softness. By selecting the right shoelace material, individuals can ensure a comfortable and secure fit that meets their specific needs.
Developing Hand-Eye Coordination
Developing hand-eye coordination is a crucial aspect of mastering the basics of shoelace tying. Hand-eye coordination refers to the ability to track objects with your eyes and react with your hands, which is essential for tasks that require precision and dexterity, such as tying shoelaces. To develop hand-eye coordination, start by practicing simple exercises like catching a ball, tossing a beanbag, or even playing video games that require quick reflexes. As you progress, move on to more complex activities like juggling, playing a musical instrument, or participating in sports that require hand-eye coordination, such as tennis or basketball. Additionally, you can try activities that specifically target hand-eye coordination, such as using a reaction ball or a hand-eye coordination trainer. By incorporating these exercises into your daily routine, you can improve your hand-eye coordination and enhance your ability to tie your shoelaces quickly and efficiently. Furthermore, developing hand-eye coordination can also benefit other areas of your life, such as sports, music, and even everyday activities like cooking or typing. By taking the time to develop this essential skill, you can improve your overall dexterity and coordination, making it easier to master the basics of shoelace tying and other tasks that require precision and skill.
Step-by-Step Guide to Tying a Shoe
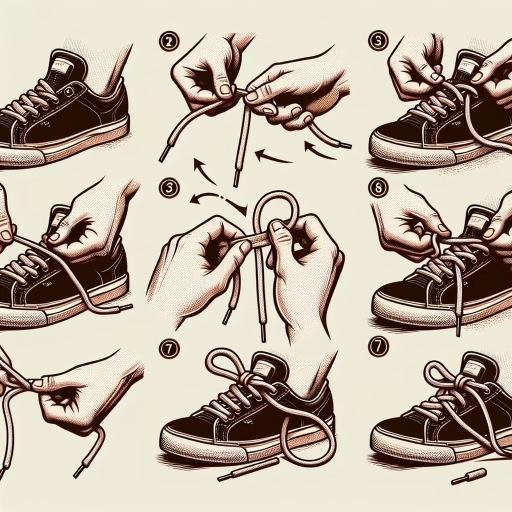
Tying a shoe is a fundamental skill that everyone should master, regardless of age or profession. It's a simple yet essential task that can be accomplished with a little practice and patience. In this article, we will provide a step-by-step guide on how to tie a shoe, breaking down the process into three manageable parts. First, we will show you how to create the initial bunny ear, which is the foundation of the knot. Then, we will demonstrate how to wrap the laces around the bunny ear, securing it in place. Finally, we will explain how to pull the laces tight to secure the knot, ensuring that your shoe stays tied all day long. By following these simple steps, you'll be able to tie your shoe with ease and confidence. So, let's get started by creating the initial bunny ear.
Creating the Initial Bunny Ear
To create the initial bunny ear, start by holding the shoelaces together in one hand, with the ends facing away from you. Cross one lace over the other, forming an "X" shape. Take the lace that is now on top and wrap it around the bottom lace, forming a loop. Hold the loop in place with your thumb and index finger, making sure it's snug but not too tight. You should now have a small, rounded shape starting to form. This is the beginning of your first bunny ear. To secure it, pass the top lace through the loop you just created. Pull it gently to tighten the knot, but be careful not to pull too hard, as this can cause the knot to become misshapen. You should now have a small, neat bunny ear that will serve as the foundation for the rest of the knot.
Wrapping the Laces Around the Bunny Ear
To wrap the laces around the bunny ear, start by holding the lace in your non-dominant hand, with the ends facing away from you. Take the lace and wrap it around the bottom lace, forming a loop. The loop should be snug but not too tight, as you want to be able to easily pass the top lace through it. As you wrap the lace, keep your thumb on top of the loop to hold it in place. This will help you maintain control and prevent the loop from coming undone. Once you've wrapped the lace around the bottom lace, you should see the beginnings of the bunny ear take shape. The loop should be facing upwards, with the ends of the lace hanging down. Make sure the loop is even and symmetrical, as this will affect the overall appearance of the knot. With the loop in place, you can now move on to the next step, which is to pass the top lace through the loop.
Pulling the Laces Tight to Secure the Knot
Pulling the laces tight to secure the knot is a crucial step in tying a shoe. This step ensures that the knot is snug and will not come undone easily. To pull the laces tight, start by holding the two laces together in one hand, with the ends facing away from you. Then, use your other hand to gently pull the laces tight, making sure to keep the knot centered. As you pull, you should feel the knot start to tighten and the laces begin to secure. Be careful not to pull too hard, as this can cause the knot to become too tight and uncomfortable. Instead, aim for a snug fit that feels secure but not constricting. Once you have pulled the laces tight, give the knot a gentle tug to make sure it is secure. If the knot feels loose, you can repeat the process until it feels snug and secure. By pulling the laces tight, you can ensure that your shoe stays tied and you can go about your day with confidence.
Troubleshooting Common Shoelace Tying Issues
Troubleshooting common shoelace tying issues can be a frustrating experience, especially when you're in a hurry. However, with the right techniques and strategies, you can overcome these problems and achieve a secure and comfortable fit. Three common issues that people face when tying their shoelaces are uneven laces, slipping knots, and laces that are too long or too short. To address these problems, it's essential to understand the underlying causes and learn effective solutions. By dealing with uneven laces, fixing a slipping knot, and managing laces that are too long or too short, you can ensure that your shoelaces stay tied and comfortable throughout the day. Let's start by exploring the first issue: dealing with uneven laces.
Dealing with Uneven Laces
Dealing with uneven laces can be frustrating, especially when you're in a hurry. If you find that one lace is consistently longer than the other, try adjusting the way you tie your shoes. Start by holding the laces together and pulling them tight to even them out. Then, as you begin to tie your shoes, make sure to keep the laces taut and evenly spaced. If the problem persists, you can try trimming the longer lace to match the shorter one. However, be careful not to cut too much, as this can affect the overall fit of your shoe. Another solution is to use lace locks or lace tighteners, which can help keep your laces evenly spaced and prevent them from coming undone. By implementing these simple adjustments, you can ensure that your laces are even and your shoes are securely tied.
Fixing a Slipping Knot
When a knot starts to slip, it can be frustrating and affect the overall security of the shoelace. To fix a slipping knot, start by identifying the source of the problem. Check if the knot is not tight enough or if the laces are too long. If the knot is loose, try tightening it by pulling on both laces. If the laces are too long, consider trimming them to the desired length. Next, inspect the knot for any signs of wear or damage. If the knot is damaged, it may be necessary to re-tie the shoelace entirely. If the knot is still in good condition, try adjusting the tension of the laces by pulling on one lace and then the other. This can help to redistribute the tension and prevent the knot from slipping. Additionally, you can try using a lace lock or a knot-securing device to add extra security to the knot. These devices can be especially helpful for people with fine motor skill difficulties or for those who have trouble tying their shoes. By following these steps, you should be able to fix a slipping knot and ensure that your shoelace stays secure throughout the day.
Managing Laces that are Too Long or Too Short
Managing laces that are too long or too short can be a frustrating issue when trying to tie your shoes. If your laces are too long, they can get in the way and make it difficult to tie a secure knot. On the other hand, if your laces are too short, you may not have enough length to create a comfortable and secure bow. To manage laces that are too long, you can try trimming them to the desired length using scissors or a lace trimmer. Alternatively, you can use lace clips or lace locks to keep the excess lace from getting in the way. If your laces are too short, you can try using lace extenders or purchasing new laces that are the correct length. It's also a good idea to check the manufacturer's instructions for the recommended lace length for your specific shoe style. By managing your laces effectively, you can ensure a comfortable and secure fit, and make tying your shoes a breeze.