How To Draw A Hedgehog
 Artistry is an individualistic expression reflecting their interpretation of the world. To create faithful reproductions or imaginative interpretations of nature, understanding the subject is vital; a concept especially true when attempting to draw a hedgehog. This fun and spiky creature brings spark and intrigue to any work, but capturing its essence requires understanding its anatomy, mastering basic sketching techniques, and refining the drawing with details. The objective of this insightful article is not just to guide you on how to draw a hedgehog but to help you become a better artist by comprehending the unique aspects of the hedgehog anatomy, establishing a reliable sketching base, and embellishing your masterpiece with precision. Let's embark on a creative journey and take the first step by delving into the Hedgehog's intricate anatomy.
Understanding Hedgehog Anatomy
Understanding the unique anatomy of the hedgehog can be a fascinating study. These tiny, spiky animals have an array of distinctive physical features that not only make them a cute pet, but also have specific functions for their survival. By familiarizing ourselves with their body structure, learning about their facial features, and studying their quill patterns and textures, we can gain a more comprehensive knowledge of these adorable creatures. Firstly, let's delve into the hedgehog's body structure. The rounded, compact structure of their bodies is particularly adapted for their defense strategy. From their flexible skeletal features to the compactness of their design, each characteristic has a specific purpose. Understanding these physical traits can give interesting insight into how their bodies are designed for manoeuvrability, defense and search of food.
1. Familiarize yourself with hedgehog body structure
Familiarizing yourself with the hedgehog’s body structure is an important step when learning how to draw a hedgehog. The hedgehog is not your regular pet, and even among the species of small mammals, its physical traits stand out. Their bodies are small, but compact and quite sturdy, measuring anywhere between 5-12 inches long, depending on the species. The most peculiar aspect about their anatomy is their covering of spines. Unlike porcupines, hedgehog’s spines are not easily detached. These unique spines serve as a protective shield against predators and are an essential feature to bear in mind while sketching a hedgehog. The hedgehog’s face is petite and tapers down to a small, pointed snout. Their round, bright eyes give them an inquisitive look while depicting their alertness and keen sense of surroundings. A pair of petite ears that stand high on their heads adds to their distinctive silhouette. Don’t overlook their small, paw-like legs and their short tail when drawing a hedgehog. These elements contribute to their characteristically shuffling walk which can be fascinating to capture in your artwork. The body of a hedgehog is predominantly covered in spines, except the underside, which is fur-covered and soft. When threatened, a hedgehog can roll into a perfect ball, making only the spines visible and hiding the vulnerable underbelly. The spines, however, are devoid of any venom or sharp ends and are filled with air pockets, which gives them a flexible attribute. This is something worth taking note of while drawing a hedgehog. When sketching a hedgehog, you'll notice that their small, robust bodies follow a teardrop shape. Their back gradually sloping down into their rear is distinctive, so that even without the spines, their outline is still easily recognizable. In essence, understanding the hedgehog's unique body structure is vital to accurately drawing one. Their compact bodies, rounded, spiny backs, small faces with pointed snouts, shining eyes, modest ears and limbs all contribute to their charm and present a delightful subject for your sketches. Their ability to protect themselves by rolling into a ball with their spines sticking out is another intriguing feature that can add dynamism and interest to your work. Therefore, comprehending these distinct qualities is a fundamental step in mastering to illustratively depict a hedgehog.
2. Learn about hedgehog facial features
The facial features of a hedgehog are genuinely distinct and contribute considerably to their unique charm, which an artist must carefully capture when sketching these captivating creatures. The configuration and size of the face of a hedgehog, including the size and shape of its eyes, nose, and mouth, can differ significantly from one species to another. Nevertheless, some common features stand out. Typically, hedgehogs have elongated snouts that are slightly curved upward, which aid in sniffing out food while foraging on the ground during twilight or nocturnal hours. At the end of this snout is a moist, dark, button-like nose, quite analogous to that of a dog. Most striking are their small, bright eyes set on either side of their noses which are profoundly adapted to low light conditions. Their eyes, being tiny, maintain a certain intensity and alertness, crucial to depict when drawing a hedgehog. Furthermore, located near the bottom of their faces, their mouths are relatively petite but extremely functional, featuring sharp teeth for crunching insects, their primary diet. It’s essential to note that hedgehogs have quite prominent whiskers as well, which help them navigate through their surroundings and detect prey. Lastly, above their forehead, there is the commencement of the spiky coat, the erect prickly spines. These are not present on the face but start in an evenly spaced carpet-like pattern from the crown of the head, descending toward their rounded bodies. A correctly angled brow line can efficiently represent this differentiation. Each of these features plays an integral role in carving out the facial silhouette of a hedgehog, thus understanding and intricately capturing all these details would empower you to create a perfectly proportioned rendering of a hedgehog's face, thus making your sketches more accurate and visually appealing. Indeed, studying the hedgehog's face is a fascinating and enlightening window into their behavior, anatomy, and endearing uniqueness.
3. Study hedgehog quill patterns and textures
The study of hedgehog quill patterns and textures is a fascinating aspect of comprehending hedgehog anatomy, offering valuable insights when attempting to accurately draw a hedgehog. Hedgehogs, which are easily recognized by their spiny coat, carry about 5000 to 7000 quills on their body, each featuring a unique pattern and texture that contributes significantly to their unique visual appearance. These quills or spines are a form of modified hair, predominantly filled with keratin, and serve as the hedgehog's primary line of defense against predators. The quill's structure plays a crucial role in the hedgehog's survival strategy; each quill is stiff and sharp, with a pointed end and a hollow shaft. When the hedgehog senses danger, the muscles along the animal's back tighten, causing these quills to stand erect effectively turning the creature into a spiky ball, deterring most predators. Upon closer inspection, it becomes apparent that these quills showcase a fascinating pattern - they are not randomly arranged but follow a precise formation, running in a uniform direction, from the head down towards the back and sides of the animal. These quills exhibit a beautiful array of staggered stripes or bands that alternate between dark and light shades, particularly in the case of species like the European hedgehog. Studying the texture of hedgehog quills, on the other hand, provides an apprehension of the tactile aspect of its anatomy. Unlike fur or normal hair, these quills have a coarse texture, more akin to the bristles of a brush. They are incredibly rigid and sharp, yet lightweight, intended to provide maximum defense with minimal burden on the agile creature. Understanding these quill patterns and textures is imperative for anyone willing to accurately draw a hedgehog, as it significantly enhances the authenticity of the portrayal. Capturing the directional flow of the patterns and the gradation in colors of the staggered stripes can create a visually pleasing representation, while a faithful reproduction of the quill's coarse texture can provide a convincing touch of realism. It deepens the overall understanding of the creature's anatomy and its adaptations, enriching the artistic rendition of this fascinating and unique specimen of wildlife. In conclusion, the comprehension of hedgehog's quill patterns and textures is an intriguing foray into the domain of hedgehog anatomy, providing vital insights that can considerably uplift the quality of any hedgehog illustration. The subsequent artistry imbued with an informed understanding of these facets can result in sketches that are not only aesthetically pleasing but also anatomically faithful, successfully encapsulating the beauty and biological genius of the humble hedgehog. It is time that these intricate details find their deserving representation on canvas, even as we continue exploring the marvels of the natural world.
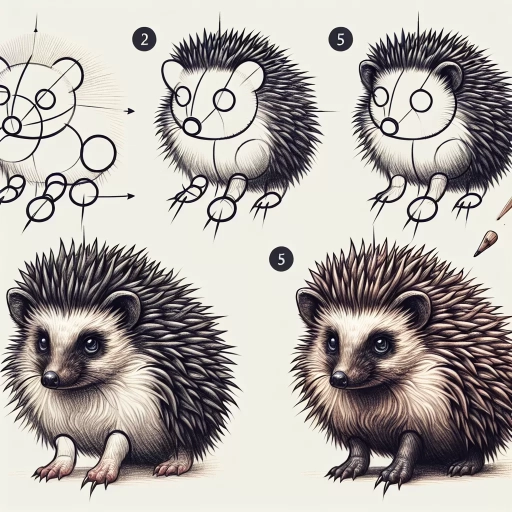
Sketching Hedgehog Basics
Sketching a hedgehog, while seeming difficult, can be simplified down to a mix of basic shapes, details, and texture patterns. The initial stage involves creating the body, which is comprised of mostly oval and circular shapes. Subsequently, you bring the sketch to life by adding facial attributes and conveying the hedgehog's mood through its expressions. Finally, depicting the distinct texture of the hedgehog's body translates to accurately capturing the quill patterns and its distinctive textures, this is certainly the key to making the artwork realistic and visually attractive. These three aspects form the central part of learning the art of sketching a hedgehog efficiently, which will be dealt with in-depth in the ensuing article. Starting on a blank canvas can be daunting, but by breaking down the task into step-by-step procedures, the process becomes less intimidating. The first key step involves sketching out simple shapes to form the body and this acts as the fundamental step towards your successful hedgehog sketch. But how exactly do you transition from a blank canvas to a beautifully sketched body of a hedgehog? Let’s delve right in!
1. Start with simple shapes to form the body
When drawing a hedgehog, one fundamental technique often used by artists is starting with basic shapes to establish the body. It's relatively uncomplicated, as the overall structure of a hedgehog is somewhat spherical in nature. Start by sketching a circle for the head and an oval or ellipse for the body, juxtaposed to resemble a pear shape. Some artists prefer to sketch the body with a more triangular approach, akin to a teardrop, with the pointed end signifying the nose. These initial shapes serve as fundamental building blocks and guidelines that will eventually give way to the intricacies that define a hedgehog’s appearance. Once the primary forms are established, you can then commence detailing. The circle will be transformed to include the facial features of the hedgehog, which includes small, button-like eyes and a small snout. For the body, your drawing can begin to accommodate the characteristic spines or quills, setting them apart from other small mammals. Notably, as you draw these shapes and lines, remember to keep them as light as possible so they can be easily erased or modified without leaving marks on the paper. When adding the details, start from scratch if you need to. The purpose of beginning with simple shapes is not to bind your creativity, but rather to give you a loose framework within which to work. As your illustration progresses, pay particular attention to the texture and direction of the hedgehog's quills, as getting this right contributes significantly to the authenticity of the sketch. Since hedgehogs have a lot of quills, not all of them need to be individually drawn. Instead, use texture and shading to suggest the presence of multiple quills. Starting with simple shapes allows you to focus on sizing and proportion, as well as positioning. It is an elementary way of sketching that ensures your drawing maintains the right form throughout the process. The size of your shapes will ultimately determine the size of your hedgehog drawing, so this initial stage is crucial. If you are new to sketching hedgehogs, this simple method will help you overcome any initial hesitation and provide you with the confidence to explore and perfect your technique. Irrespective of your drawing abilities or experience, a solid foundation built on simple shapes will invariably result in a more accurate and pleasing sketch. This method of starting with basic shapes to form the body of a hedgehog thereby proves to be an indispensable step in the illustrative process, enabling artists to grasp and depict the complex form and texture qualities that make a hedgehog uniquely delightful and challenging to sketch.
2. Add facial features and expressions
The second phase in sketching a vivid and lifelike hedgehog is adding facial features and expressions. This step breathes life into your sketched hedgehog, transforming it from a basic outlined shape into a more nuanced and identifiable character. Begin with the eyes, which function as the windows to the soul of your sketch. These should be prominent and placed accurately on the face of the hedgehog. Remember, the position, size, and shape of the eyes can significantly portray emotions, bringing more essence and personality to your sketch. Next, construct the hedgehog's small, triangle-shaped nose at the bottom center of the face, right between the two eyes. The snout of a hedgehog doesn't protrude much, so don't draw this part too large. Pay careful attention to proportions to keep the sketch as realistic as possible. To enhance the nose, consider adding a tiny reflection, a small circle or oval on one side of the nose's top to mimic its wetness, which helps give the illusion of a three-dimensional feature. The mouth, located just below the nose, should be crafted in a curved line forming a cute, little smile which can either be simple or detailed depending on the desired expression you want to display. To depict a happy hedgehog, you might sketch the mouth slightly curved upwards. For a more subtle, composed expression, you might opt for a straight or slightly downward curve. The last facial feature to consider is the eyebrows. While not anatomically accurate for the actual animal, adding eyebrows to your hedgehog sketch gives an additional tool for expressing emotion and personality. Thin, gently arched brows might give the hedgehog a friendly, welcoming look, while sharper, angular brows could lend a slightly more mischievous or brooding air. In sum, skilfully enhancing these facial features - eyes, nose, mouth, and eyebrows - along with their accurate positioning, appropriate sizing, and indicative shapes is pivotal in truly portraying the essential character of your sketched hedgehog. Remember, each line you add contributes to your character's expression, telling a unique story through your artwork.
3. Define the quill patterns and textures
Hedgehog quill patterns and textures offer an intricate design, shaping the animal's unique tactile and aesthetic surfaces. Notably, the quill pattern refers to the arrangement or layout of the hedgehog's spine on its back. These often project outwards in seemingly haphazard directions, creating a complex mosaic of pricks and points. Yet, upon closer examination, a sense of structured randomness becomes apparent. A typical hedgehog boasts about 5,000 to 6,000 quills, with each quill growing to about 1 inch in an adult hedgehog. The top has shorter and less noticeable 'fur' while the actual hedgehog's crown pattern orients in a slightly spiral manner from the crown's centre out to the sides and down the back. The quills act like a shield to offer protection from predators. They are often perks up when the animal feels threatened. Texture, on the other hand, relates to the hedgehog quill's surface characteristics or how the quill might feel to the touch. However, understanding texture while creating an illustration involves the simulation of these tactile qualities through visual cues. Each quill is hollow, like a straw, and features a white or pale color at the base while the tip tends to be darker, often black. The base texture is relatively smooth, bar the natural growth rings towards the darker tip that portrays a rougher exterior. The subtlety of capturing these colors and textures will significantly enhance the depth of the sketch. Each individual quill should be treated as its entity, with attention to the gradient from its wider base to its sharp tip and the overlapping pattern of the quills to render the hedgehog's 'prickly' appearance. Shadowing can be particularly useful in portraying the dimensional form and texture of the quills, giving life to your hedgehog sketch. Thus, the quill patterns and textures become an essential aspect of depicting a realistic illustration of a hedgehog. It's a stimulating challenge for the artist, pushing their attention to detail and the command of their illustrating tools. One successful, the final hedgehog sketch reflects the naturally-occurring combination of roughness and softness in the hedgehog’s unique quill coverage.
Adding Details and Refining Your Drawing
Creating a detailed and elevated drawing requires certain skills to truly bring your sketches to life. Regardless of what you’re drawing, adding details and refining your work is a crucial step on the path to producing an inspiring piece of art. In this informative article, we are going to present an exciting journey through the process of enhancing your drawings by defining three significant actions: adding shading and depth to give your subject three-dimensionality, refining quill patterns and textures to provide a sense of practicality, and finally, adding those last finishing touches that can make your artwork truly complete. Our subject is going to be a delightful creature - a hedgehog, a perfect choice to showcase our techniques. Beginning our venture, let's focus on the first step of adding shading and depth to your hedgehog, a fundamental technique that truly brings your drawing to life, offering a convincing and realistic look. This initial process gives your artwork the needed solidity and lends it a pop that sets it apart.
1. Add shading and depth to your hedgehog
Adding depth and shading to your hedgehog illustration is cultivated not only through expertise but also through understanding the nuances of the texture and form of a hedgehog. Shading gives your hedgehog dimensional life, transforming it from a flat, monotone figure to a textured, visually stimulating image. It bestows the illusion of light falling on the object, which in turn, leads to the creation of shadows and shades. In instilling depth, knowing where to add your darkest shades and lightest highlights is key. First, visualize a light source and deduce which parts of your hedgehog are bathed in light, and those which are partially or completely hidden. Now bring your crayon or pencil to play. Where the light hits the hardest, leave spaces white or add a hint of light shade, indicating the shine. Consequentially the opposite side, where light is refracted, needs to be shaded dark. Shading a hedgehog could be interesting considering it is covered with spines. These spines fan out from the center of its back. Each of these 'needles' can be drawn as elongated, inverted 'v', lightly shaded with the narrow end pointing towards the direction of the head. Remember to add a darker shade at the base, growing lighter towards the tip. The fur on the underbelly and face, softer and finer than the spines on the back, requires a different style of shading. Applying the strokes crisscross could conjure a texture of fluffy fur. Start the strokes darker and pressing hard on the pencil or crayon, and as you reach the middle of the stroke, decrease the stroke intensity, creating a gradient, which accentuates the fur's softness. The eyes of the hedgehog are generally shiny. After outlining the eyes, add a circular white space indicating the light reflection, then color the rest of the eye in black or any color you prefer. Proper shading gives it a shiny and pronounced look that engages viewers. Now for the finishing touches, the realistic gradients and drop shadows. Shadows cast by the hedgehog give the final touch to its dimensions. They establish the relative size of the hedgehog and ground it to the surface. With the light source in mind, imagine where the shadow would be. Sketch a broader, lighter area extending downwards from the hedgehog and narrow and darken it as you move further from the hedgehog. Ultimately, experimentation is the key to refine your hedgehog. Vary the intensity, stroke type, and pattern of your shading. Be bold and practice with a purpose. Soon, you should have a splendid and rich hedgehog drawing filled with shades, shadows, and details. In the process, you will learn to bring a sense of realism, dimensionality, and depth to your hedgehog, thereby adding individuality to your artistic style.
2. Refine the quill patterns and textures
Refining the quill patterns and textures of your hedgehog drawing is a crucial step in capturing the essence of this charming creature. This process entails delving into the nitty-gritty nuances of the hedgehog's defensive spines, commonly mistaken for fur. The elegance of your hedgehog's depiction largely hinges on the intricate representation of these quills. Begin refining by lightly sketching the shape and spread of the quills. Since quills don't grow uniformly on a hedgehog’s body, avoid drawing them as straight lines. Instead, consider the contours of the hedgehog’s body—they bristle up more around the hedgehog’s back and lay relatively flat on the sides. Don't feel compelled to draw every single quill, as this might result in your drawing looking rigid and unrealistic. Instead, focus on creating a visually interesting pattern that suggests volume and texture. When refining textures, observe closely and and you’ll notice that each quill is not smooth, but rather carries a pattern of its own featuring bands of color. These bands are critical in creating more depth and dimension, making your quills look real and 3-dimensional, rather than flat. Intricate detail comes in as you mark fine lines lengthwise along the quills to mimic the real-life barbs. The series of these lines along the edge of the quills lends a sense of realism to your drawing. Incorporating shadow and light areas across the quills will add another layer of authenticity. Light strokes with a sharpened pencil can create these effects, placing emphasis where the light naturally hits and shadows where the quills overlap. Equally important in refining is the aspect of color continuity. Be consistent in using the right color schemes throughout your detailing process. Typically, a hedgehog’s quills are a mix of white, brown, and black. Use these colors wisely to showcase the varying tone shifts, seamlessly blending them together. A great art piece takes patience and precision. Therefore, don't rush the process. Take your time to understand the hedgehog's quill pattern and texture. As you refine your drawing, remember to step back occasionally to view your piece as a whole. This allows you to catch any discrepancies or areas that need more work and to ensure balance in your work. In conclusion, refining your hedgehog’s quills is not simply about drawing straight lines or scalable patterns, but it is an art of keen observation and detailed representation. By ensuring that the quills' pattern, texture, color gradient, and light and shadow effect are carefully crafted, you are assured of creating a finely-detailed, realistic, and engaging hedgehog drawing. This refining process significantly adds to the depth, life, and aesthetic appeal of your artwork.
3. Add final details and finishing touches
Argument drawings can be likened to the base structure of a building; they form the broad outline and core shape but are often lackluster in their preliminary phase. To truly elevate and bring the picture to life, the addition of final details and careful refinements are indispensable steps, like adding the homey touches and decorative trimmings that transform a simple house into a vivid, character-filled home. Such is the process when rendering a charming hedgehog drawing. A mere skeleton of lines and basic shapes can convey a hedgehog's overall shape, but it cannot encapsulate the animal's exquisite charm and unique characteristics. Hence, the concluding step is to diligently work on these details and finishing touches. This process can be beautifully therapeutic, understanding the intricacies of the hedgehog, from its twitching snout to each delicate spine. While adding these finishing touches, it isn't merely about showing the hedgehog's physical characteristics but should also evince the creature's demeanor. For instance, gentle lines can be applied to depict a smiling and amiable hedgehog, while sharp, bold strokes could represent a cautious and prickly one. An essential part of completing a hedgehog drawing is adding texture. Tackling the fur of the hedgehog could be a little challenging because of its prickly spines, yet this also allows for creative freedom. One could use pointillism, creating a sea of dots that gradually reveal the hedgehog's prickly coat, or cross-hatching, skillfully crisscrossing lines to disclose the hedgehog's spiny exterior. This stage calls for patience as even the minutest stroke count. Another crucial area where final details could be poured into is the face, specifically, the eyes. They are the windows to a hedgehog's soul and add substantial emotion to the drawing. By employing simple techniques like subtle shading for depth and highlighting for glow, lifelike eyes can be achieved. Coming to the background, drafting a simple and vague environment can provide the picture with much-needed depth and perspective. For instance, sketching some foliage can subtly suggest the hedgehog's natural habitat and also add intrigue to the image without detracting from the core subject. Shadows also work wonders to add depth and make the hedgehog appear grounded. In conclusion, adding final details and finishing touches to a hedgehog drawing gives the image not just life but a soul, a personality. It transcends being a mere depiction of an animal and becomes a captivating piece of art. The act of being attentive to the most delicate details speaks volumes about the artist's understanding and reverence for the subject, translating into a drawing that is not just technically accurate but also beautifully emotive.