How To Draw Fire
Understanding the Basics of Drawing Fire
The Physics of Fire
Before attempting to draw fire, it is crucial to comprehend the underlying physics. Fire isn't a solid object but a reaction that produces heat and light. It doesn't have a definitive form; its appearance is influenced by different factors, such as temperature, fuel source, and environmental conditions. When drawing fire, it's important to represent these variables accurately to achieve a more realistic depiction.
Visual Characteristics of Fire
Fire is visually distinguished by its dynamic and brilliant hues, varying from reds and oranges to blues and whites. These colors don't follow a defined pattern; they dance and flicker in a dazzling and chaotic display. This randomness is a challenge when drawing fire, but it also adds to its allure and fascination. It's crucial to use colors carefully and intentionally to reflect the fire's vibrancy and intensity.
Common Mistakes in Drawing Fire
Many aspiring artists struggle with drawing fire. Common errors include making the fire too solid or static, using incorrect colors, or not representing the source of the fire accurately. By understanding these common mistakes, artists can avoid them and improve their fire-drawing skills thereby producing a realistic and engaging depiction of fire.
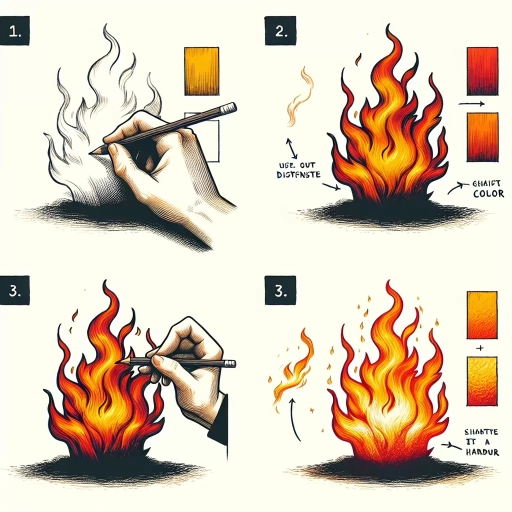
Step-by-Step Guide on How to Draw Fire
Sketching the Basic Shape
The first step to drawing fire is sketching out the basic shape. Remember, fire doesn't have a solid form; it flickers and dances around uncontrollably. Start with a simple flame shape that tapers to a point at the top. Add curves and wavy lines to represent the fire's unpredictable nature. This step is about getting the rough form down, so don't worry about details yet.
Adding Depth and Details
After you have your basic shape, it's time to add depth and details. Fire has darker spots and lighter spots, which add to its depth. Use darker colors like red and orange for the bottom part of the fire and lighter colors like yellow and white for the upper part. To draw the details of the flame, observe a real flame closely and mimic its patterns and changes.
Perfecting the Light and Shadows
The final step is adding the light and shadows. Fire is a light source, so it illuminates its surroundings while also casting shadows. When the light hits an object, it creates a bright spot known as the highlight. Meanwhile, the parts that the light doesn’t reach become the shadows. Capturing these elements can really bring your fire drawing to life.
Mastering Fire Drawing Techniques
Practice Makes Perfect
Like any other skill, mastering the art of fire drawing takes practice. Observe different fires, notice their behavior, color shifts, and how they interact with their surroundings. Then, draw them. The more you practice, the more you'll understand the fire's traits and become better at depicting them.
Experiment With Different Mediums
Different mediums offer different possibilities. For example, colored pencils can be great for detailed work and adding depth, while watercolors can better capture fire's fluidity. Don’t limit yourself to one medium. Try experimenting with different tools and techniques to find what works best for you.
Seek Critiques and Learn from Others
Being open to feedback can significantly improve your fire drawing skills. Seek critiques from other artists or art communities. They can offer invaluable insights and tips, helping you refine your artwork. Additionally, there's always something to learn from observing how others draw fire.