How To Grow Garlic Indoors
Growing garlic indoors is a rewarding and accessible way to cultivate this flavorful and health-boosting herb right in your own home. Whether you're an urban dweller with limited outdoor space or simply looking to maintain a year-round supply of fresh garlic, indoor cultivation offers a practical solution. This article will guide you through the process of growing garlic indoors, from setting up your growing environment to harvesting and storing your homegrown bulbs. We'll begin by exploring how to prepare the ideal indoor garlic growing environment, ensuring your plants have the best chance of thriving. Next, we'll delve into the specifics of planting and caring for your indoor garlic, covering essential techniques for successful growth. Finally, we'll discuss the proper methods for harvesting and storing your indoor-grown garlic, allowing you to enjoy the fruits of your labor for months to come. By following these steps, you'll be well on your way to cultivating delicious, home-grown garlic right in the comfort of your own living space. Let's start by examining how to create the perfect indoor environment for your garlic plants to flourish.
Preparing Your Indoor Garlic Growing Environment
Garlic, a versatile and flavorful herb, has been a culinary staple for thousands of years. While traditionally grown outdoors, many gardening enthusiasts are now exploring the exciting world of indoor garlic cultivation. This method offers the opportunity to grow fresh, organic garlic year-round, regardless of climate or outdoor space limitations. Successfully growing garlic indoors requires careful attention to several key factors. First, selecting the appropriate container and soil mix is crucial for providing your garlic plants with the right foundation for growth. Next, ensuring adequate light and temperature conditions will help simulate the natural environment garlic thrives in. Finally, implementing a proper watering and drainage system is essential for maintaining optimal moisture levels and preventing root rot. By mastering these three critical aspects of indoor garlic cultivation, you can create a thriving miniature garlic garden right in your home. In this article, we'll delve into the intricacies of preparing your indoor garlic growing environment, providing you with the knowledge and tools necessary to embark on this rewarding horticultural journey.
Choosing the Right Container and Soil Mix
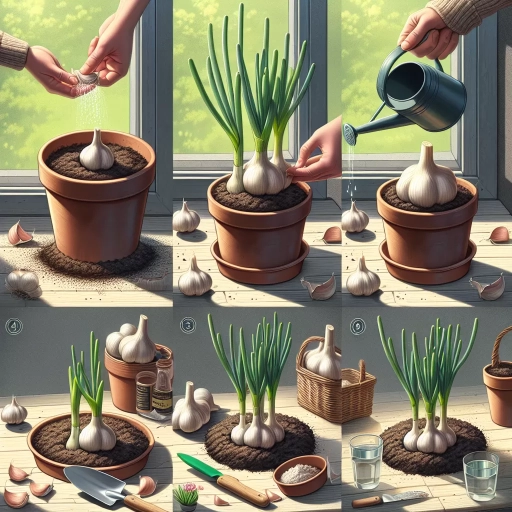
When it comes to growing garlic indoors, choosing the right container and soil mix is crucial for your plants' success. The container you select will serve as your garlic's home, while the soil mix will provide the necessary nutrients and support for healthy growth. Let's explore these essential elements in detail to ensure your indoor garlic thrives. First, consider the container size. Garlic plants need ample space for their roots to develop, so opt for a pot that's at least 6-8 inches deep and wide. This depth allows the bulbs to form properly and provides enough room for the extensive root system. Choose containers with drainage holes to prevent waterlogging, which can lead to root rot. Materials like terracotta, plastic, or fabric pots are all suitable options, each with its own benefits. Terracotta pots are breathable and help regulate moisture, while plastic containers retain water better, making them ideal for those who tend to underwater. Fabric pots offer excellent drainage and aeration but may dry out more quickly. When it comes to soil mix, garlic prefers well-draining, nutrient-rich soil. A good starting point is to use a high-quality potting mix specifically designed for container gardening. These mixes are usually lightweight and provide adequate drainage while retaining enough moisture for healthy growth. To enhance the soil's fertility and structure, consider adding organic matter such as compost or well-rotted manure. This not only improves nutrient content but also helps with moisture retention and soil aeration. For optimal results, create a custom soil mix by combining two parts potting soil, one part compost, and one part perlite or coarse sand. This blend ensures excellent drainage while providing the necessary nutrients for your garlic plants. Additionally, you can incorporate a slow-release organic fertilizer into the soil mix to provide a steady supply of nutrients throughout the growing season. Remember that garlic prefers slightly acidic to neutral soil with a pH between 6.0 and 7.0. If you're unsure about your soil's pH, use a home testing kit or consult with your local garden center for advice. Adjusting the pH, if necessary, can be done by adding lime to increase alkalinity or sulfur to increase acidity. Lastly, consider the weight of your container when filled with soil, especially if you plan to move it around. Lighter materials like plastic or fabric pots might be more manageable than heavy terracotta ones. By carefully selecting the right container and preparing a suitable soil mix, you're setting the stage for successful indoor garlic cultivation, ensuring your plants have the best possible environment to thrive and produce flavorful bulbs.
Providing Adequate Light and Temperature
Providing adequate light and temperature is crucial for successfully growing garlic indoors. Garlic plants thrive in bright, direct sunlight and require specific temperature ranges to develop properly. To ensure optimal growth, you'll need to carefully manage these environmental factors within your indoor growing space. Light is essential for photosynthesis, the process by which plants convert light energy into chemical energy to fuel their growth. Garlic plants need a minimum of 6-8 hours of direct sunlight daily, but they can benefit from even more. If you're growing garlic in a sunny window, choose a south-facing location to maximize natural light exposure. However, many indoor environments may not provide sufficient natural light, especially during shorter winter days. In such cases, supplementing with artificial grow lights becomes necessary. LED grow lights are an excellent choice for indoor garlic cultivation due to their energy efficiency and ability to produce the full spectrum of light that plants need. Position the lights about 6-12 inches above the plants and adjust the height as they grow. Use a timer to ensure consistent light exposure, mimicking natural day-night cycles. This not only promotes healthy growth but also helps regulate the plant's internal processes. Temperature management is equally important for garlic growth. Garlic is a cool-season crop that prefers temperatures between 60°F and 70°F (15°C to 21°C) during the day and slightly cooler temperatures at night. Maintaining these temperature ranges can be challenging indoors, especially if you're growing garlic in a warm kitchen or near heat sources. To address this, consider using a thermometer to monitor the temperature around your plants and adjust accordingly. You may need to move the plants away from heat vents or use a small fan to circulate air and regulate temperature. It's worth noting that garlic requires a period of cold exposure, known as vernalization, to stimulate bulb formation. For indoor growing, you can simulate this by exposing the planted cloves to temperatures between 32°F and 50°F (0°C to 10°C) for about 4-8 weeks. This can be achieved by placing the pots in a refrigerator or a cool basement before moving them to their final growing location. By carefully managing light and temperature, you create an environment that closely mimics the natural conditions garlic prefers. This attention to detail will significantly improve your chances of successfully growing flavorful, healthy garlic indoors. Remember to regularly monitor your plants and adjust these factors as needed throughout the growing cycle. With proper light and temperature management, you'll be well on your way to harvesting your own homegrown garlic, even in an indoor setting.
Setting Up a Proper Watering and Drainage System
Setting up a proper watering and drainage system is crucial for successfully growing garlic indoors. Without adequate attention to this aspect, your garlic plants may suffer from root rot, nutrient deficiencies, or stunted growth. To ensure your indoor garlic thrives, it's essential to strike a balance between providing sufficient moisture and preventing waterlogged soil. Begin by selecting containers with proper drainage holes at the bottom. These holes allow excess water to escape, preventing water from pooling around the roots. If your chosen containers lack drainage holes, carefully drill or punch some into the bottom. Place a layer of small stones or gravel at the bottom of each container to further improve drainage and prevent soil from clogging the holes. When it comes to watering, consistency is key. Garlic plants prefer soil that is consistently moist but not waterlogged. To achieve this, water your garlic plants deeply but less frequently, rather than providing shallow, frequent watering. This encourages the roots to grow deeper into the soil, promoting a stronger and more resilient plant. A useful technique for maintaining proper moisture levels is to use a moisture meter or simply insert your finger about an inch into the soil. If it feels dry at this depth, it's time to water. Alternatively, you can lift the container to gauge its weight – a lighter pot indicates that it's time to water. Consider implementing a bottom-watering system for your indoor garlic. This method involves placing the containers in a shallow tray filled with water, allowing the plants to absorb moisture through the drainage holes. Bottom watering encourages deeper root growth and helps prevent overwatering. To further optimize your watering system, use room temperature water, as cold water can shock the plants. Additionally, water in the morning to allow excess moisture to evaporate throughout the day, reducing the risk of fungal growth. Humidity also plays a role in your garlic's health. While garlic doesn't require extremely high humidity, maintaining moderate levels can be beneficial. You can increase humidity by grouping plants together, using a pebble tray filled with water near the plants, or employing a small humidifier in the growing area. Lastly, be mindful of seasonal changes and adjust your watering accordingly. During winter, when growth slows, reduce watering frequency. As spring approaches and growth resumes, gradually increase watering to support the plant's needs. By implementing these watering and drainage strategies, you'll create an optimal environment for your indoor garlic to flourish, setting the stage for a bountiful harvest of flavorful, homegrown garlic cloves.
Planting and Caring for Indoor Garlic
Growing garlic indoors is a rewarding and surprisingly accessible endeavor that can bring the fresh, pungent flavors of this beloved herb right into your home. While traditionally grown outdoors, garlic can thrive in indoor environments with the right care and attention. This article will guide you through the process of planting and nurturing indoor garlic, covering everything from selecting the perfect cloves to maintaining your plants for optimal growth. We'll explore three crucial aspects of indoor garlic cultivation: selecting and preparing garlic cloves for planting, proper planting techniques and spacing, and ongoing care, including watering, fertilizing, and pest management. By mastering these elements, you'll be well on your way to harvesting your own homegrown garlic, even in the confines of your living space. Whether you're an experienced gardener looking to expand your indoor herb collection or a novice eager to try your hand at growing this versatile allium, this guide will provide you with the knowledge and confidence to succeed. Before we delve into these specific areas, let's first consider how to prepare your indoor environment to create the ideal conditions for your garlic to flourish.
Selecting and Preparing Garlic Cloves for Planting
Selecting and preparing garlic cloves for planting is a crucial step in ensuring a successful indoor garlic growing experience. When choosing garlic for planting, opt for organic, locally grown bulbs whenever possible, as these are more likely to be well-adapted to your climate and free from harmful chemicals. Avoid using garlic purchased from supermarkets, as these are often treated with growth inhibitors to extend shelf life, which can hinder their ability to sprout. Look for firm, plump bulbs with tight, unbroken skin. Larger bulbs typically produce larger cloves, which in turn can lead to larger plants. Once you have your bulbs, carefully separate the individual cloves, keeping the papery skin intact. Select the largest, healthiest cloves for planting, as these will have the best chance of producing robust plants. Discard any cloves that show signs of damage, disease, or mold. Before planting, it's beneficial to prepare the cloves by soaking them in a mixture of water and liquid seaweed fertilizer for about 12-24 hours. This process helps to hydrate the cloves and provides them with a nutritional boost. After soaking, remove the cloves and let them dry for a few hours before planting. Some gardeners also choose to treat their cloves with a natural fungicide, such as a diluted solution of baking soda or neem oil, to protect against potential soil-borne diseases. When handling the cloves, be gentle to avoid damaging the basal plate – the flat, circular area at the bottom of the clove where roots will emerge. It's important to plant the cloves with the pointed end facing upwards and the basal plate downwards. This orientation ensures proper growth and development of the plant. For indoor planting, consider pre-sprouting your garlic cloves. Place them in a shallow dish lined with damp paper towels and cover with plastic wrap. Keep the dish in a warm, dark place and check regularly for sprouts. Once small green shoots appear, usually within a week or two, the cloves are ready for planting in your indoor containers. By taking the time to carefully select and prepare your garlic cloves, you're setting the stage for healthy, vigorous plants. This attention to detail at the beginning of the growing process can significantly impact the quality and yield of your indoor garlic crop, making your efforts more rewarding and successful in the long run.
Proper Planting Techniques and Spacing
Proper planting techniques and spacing are crucial for successfully growing garlic indoors. When cultivating garlic in containers, it's essential to provide the right environment for the bulbs to thrive and develop to their full potential. Start by selecting a container that is at least 6 inches deep and has adequate drainage holes to prevent waterlogging. Fill the container with a well-draining potting mix specifically formulated for vegetables or herbs, as garlic prefers loose, fertile soil. When it comes to planting, carefully separate the individual cloves from a fresh garlic bulb, keeping the papery skin intact. Choose the largest and healthiest cloves for planting, as they are more likely to produce robust plants. Plant each clove about 2 inches deep, with the pointed end facing upwards. This orientation ensures that the green shoots will emerge properly and grow straight. Spacing is another critical factor in indoor garlic cultivation. Allow approximately 4 to 6 inches between each clove to provide sufficient room for bulb development and to prevent competition for nutrients and water. If you're using a larger container or planter, you can arrange the cloves in rows, maintaining a distance of about 4 inches between rows. After planting, gently firm the soil around each clove to eliminate air pockets and ensure good contact between the clove and the soil. Water the container thoroughly but avoid oversaturation. Place the container in a location that receives ample sunlight, ideally near a south-facing window that provides at least 6 hours of direct sunlight daily. To maximize space and yield, consider companion planting with shallow-rooted herbs like parsley or chives. These companions can help utilize the space between garlic plants without interfering with their growth. However, avoid planting garlic with deep-rooted vegetables or those that require excessive water, as they may compete for resources. As the garlic grows, monitor the soil moisture regularly and water when the top inch of soil feels dry. Avoid overwatering, as garlic is susceptible to root rot. Fertilize the plants every 4-6 weeks with a balanced, water-soluble fertilizer to promote healthy growth and bulb development. By following these proper planting techniques and spacing guidelines, you'll create an optimal environment for your indoor garlic to flourish. Remember that patience is key, as garlic typically takes several months to mature. With proper care and attention to detail, you'll be rewarded with flavorful, homegrown garlic right from your indoor garden.
Ongoing Care: Watering, Fertilizing, and Pest Management
Ongoing Care: Watering, Fertilizing, and Pest Management Once your indoor garlic plants are established, they require consistent care to thrive and produce flavorful bulbs. Proper watering, fertilizing, and pest management are crucial aspects of maintaining healthy garlic plants indoors. Watering is a delicate balance when growing garlic indoors. These plants prefer consistently moist soil but are susceptible to root rot if overwatered. To achieve the right moisture level, water your garlic plants when the top inch of soil feels dry to the touch. Use room temperature water and apply it slowly to ensure even distribution. Avoid getting water on the leaves, as this can promote fungal growth. Good drainage is essential, so make sure your containers have adequate drainage holes and never allow plants to sit in standing water. Fertilizing indoor garlic plants is necessary to provide them with the nutrients they need to grow strong and develop flavorful bulbs. Start fertilizing about a month after planting, using a balanced, water-soluble fertilizer diluted to half strength. Apply the fertilizer every two weeks during the growing season. As the plants mature and begin to form bulbs, switch to a fertilizer higher in phosphorus and potassium to promote bulb development. Always follow the manufacturer's instructions and avoid over-fertilizing, which can lead to excessive leaf growth at the expense of bulb formation. Pest management is an ongoing task when growing garlic indoors. While indoor plants are generally less susceptible to pests than outdoor ones, they can still fall victim to common indoor plant pests such as aphids, spider mites, and fungus gnats. Regularly inspect your plants for signs of infestation, paying close attention to the undersides of leaves and the soil surface. If you detect any pests, treat them promptly using organic methods like neem oil, insecticidal soap, or by manually removing them with a damp cloth. Maintaining good air circulation around your plants and avoiding overwatering can help prevent pest problems. In addition to pest management, keep an eye out for signs of disease, such as yellowing leaves, stunted growth, or mold on the soil surface. Many garlic diseases are caused by fungal infections, which can be prevented by maintaining proper humidity levels and avoiding overwatering. If you notice any signs of disease, isolate the affected plant immediately and treat it with an appropriate fungicide if necessary. By providing consistent care through proper watering, fertilizing, and pest management, you can ensure that your indoor garlic plants remain healthy and productive throughout their growing cycle. This ongoing attention will reward you with robust plants and flavorful garlic bulbs that you can enjoy in your culinary creations.
Harvesting and Storing Your Indoor-Grown Garlic
Growing garlic indoors is a rewarding experience that allows you to enjoy fresh, flavorful bulbs year-round. As your indoor garlic plants mature, it's essential to understand the proper techniques for harvesting and storing your homegrown crop to ensure maximum flavor and longevity. This article will guide you through the crucial steps of recognizing when your garlic is ready to harvest, implementing proper harvesting and curing techniques, and exploring long-term storage methods for maintaining freshness. By mastering these skills, you'll be able to savor the fruits of your labor for months to come. We'll begin by discussing the telltale signs that indicate your garlic is ready for harvest, including changes in foliage and bulb appearance. Next, we'll delve into the best practices for harvesting and curing your garlic to preserve its quality and flavor. Finally, we'll explore various storage methods that will help you keep your garlic fresh and flavorful for extended periods. With these insights, you'll be well-equipped to make the most of your indoor garlic harvest. Before we dive into these essential topics, let's first examine how to prepare your indoor garlic growing environment to set the stage for a successful crop.
Recognizing When Your Garlic is Ready to Harvest
Recognizing when your garlic is ready to harvest is a crucial skill for any indoor garlic grower. Unlike many other plants, garlic doesn't have a clear visual cue like a ripe fruit to indicate its readiness. Instead, you'll need to rely on a combination of factors to determine the optimal harvest time. Generally, garlic planted in the fall will be ready for harvest in late spring to early summer, while spring-planted garlic matures in late summer to early fall. The first sign to look for is the yellowing and browning of the lower leaves. As the garlic bulb matures, the plant will naturally begin to die back from the bottom up. When about one-third to one-half of the leaves have turned brown and dried out, it's a good indication that your garlic is nearing harvest time. However, don't wait until all the leaves have died, as this can lead to overripe bulbs with split cloves. Another important indicator is the thickness of the central stalk, known as the scape. In hardneck varieties, this stalk will begin to soften and bend over as the plant reaches maturity. Once the scape has made a full loop or begun to straighten again, it's usually time to harvest. For softneck varieties, which don't produce scapes, focus more on the leaf coloration. Timing is crucial when harvesting garlic. Harvesting too early can result in small, underdeveloped bulbs, while waiting too long can cause the protective papery wrapper to deteriorate, leading to reduced storage life. If you're unsure, it's better to err on the side of harvesting a bit early rather than too late. To confirm if your garlic is ready, you can carefully dig around the base of one plant to check the bulb size and development. The bulb should be well-formed and plump, with clearly defined cloves. If the cloves haven't yet separated, it's too early to harvest. On the other hand, if the outer wrapper is thin and papery, and the cloves are starting to separate, it's time to harvest immediately. Indoor-grown garlic may mature slightly faster than outdoor plants due to controlled conditions and potentially higher temperatures. Keep a close eye on your plants as they approach maturity, checking them daily for signs of readiness. Remember that different garlic varieties may have slightly different maturation times and signs. Familiarize yourself with the specific characteristics of the variety you're growing for the best results. With practice and observation, you'll develop a keen sense for recognizing the perfect moment to harvest your indoor-grown garlic, ensuring the best flavor, texture, and storage life for your homegrown bulbs.
Proper Harvesting and Curing Techniques
Proper Harvesting and Curing Techniques Mastering the art of harvesting and curing your indoor-grown garlic is crucial for ensuring optimal flavor, longevity, and storage potential. As your garlic plants mature, keep a watchful eye for signs that they're ready to harvest. Typically, this occurs when about one-third to one-half of the leaves have turned yellow or brown, usually 7-8 months after planting. Avoid waiting too long, as over-mature bulbs may split their skins, reducing their storage life. To harvest, gently loosen the soil around the bulbs using a small hand trowel or fork, being careful not to damage the delicate skin. Lift the entire plant from the soil, roots and all. Resist the temptation to pull the garlic out by the stalks, as this can separate the bulbs from the stems, potentially introducing decay-causing bacteria. Once harvested, it's time to begin the curing process, which is essential for developing flavor and improving storage life. Start by gently brushing off excess soil from the bulbs and roots, taking care not to remove the protective outer skin. Avoid washing the bulbs, as moisture can lead to mold growth during curing. For indoor-grown garlic, create a makeshift drying rack by laying the plants flat on a clean, dry surface in a well-ventilated area away from direct sunlight. Ensure good air circulation by spreading the plants in a single layer and leaving space between them. Alternatively, you can bundle 5-10 plants together and hang them upside down in a dry, shaded area. The curing process typically takes 2-3 weeks, during which the garlic's flavor will intensify and its outer layers will dry and tighten. You'll know the curing is complete when the roots have become dry and brittle, and the stem has withered. At this point, trim the roots to about 1/4 inch from the bulb and cut the stem about 1-2 inches above the bulb. For long-term storage, clean any remaining dirt from the bulbs using a soft brush, being careful not to remove the papery skin. Sort your garlic, setting aside any damaged or soft bulbs for immediate use. The fully cured and cleaned garlic can now be stored in a cool, dry, and dark place with good air circulation. Ideal conditions are temperatures between 60-65°F (15-18°C) with 50-60% humidity. By following these proper harvesting and curing techniques, you'll ensure that your indoor-grown garlic retains its flavor, aroma, and nutritional value for months to come. This careful process transforms your homegrown crop into a versatile ingredient ready to enhance your culinary creations throughout the year.
Long-Term Storage Methods for Maximum Freshness
Long-term storage methods for garlic are crucial to maintaining its freshness and flavor, especially when dealing with indoor-grown garlic. Proper storage techniques can extend the shelf life of your garlic for several months, ensuring you have a steady supply of this aromatic bulb for your culinary needs. The key to successful long-term storage lies in creating an environment that mimics the ideal conditions garlic naturally prefers. One of the most effective methods for long-term garlic storage is the use of mesh bags or baskets. These allow for proper air circulation, which is essential in preventing moisture buildup and potential mold growth. Hang these mesh containers in a cool, dry, and dark area of your home, such as a pantry or cellar. The ideal temperature range for garlic storage is between 60-65°F (15-18°C), with a relative humidity of around 60-70%. If you don't have a naturally cool area in your home, consider using a dedicated mini-fridge set to the appropriate temperature. For those looking to preserve their garlic for an extended period, braiding is an excellent option. This traditional method not only looks aesthetically pleasing but also provides optimal airflow around each bulb. To create a garlic braid, leave the stalks attached to the bulbs and weave them together, hanging the braid in a suitable storage area. This technique works particularly well for softneck garlic varieties, which are more commonly grown indoors. Another effective long-term storage method is using food-grade diatomaceous earth (DE). This natural, powdery substance helps absorb excess moisture and can deter pests. To use DE, place a layer at the bottom of a wooden or cardboard box, arrange your garlic bulbs in a single layer, and cover them with another light dusting of DE. This method is especially useful in humid environments where moisture control is a challenge. For those with limited space, vacuum sealing individual garlic bulbs or cloves can be an excellent solution. This method removes air and creates an oxygen-free environment, significantly slowing down the aging process. However, it's crucial to ensure the garlic is completely dry before sealing to prevent any moisture-related issues. Lastly, consider preserving your garlic through methods like dehydration or making garlic-infused oils. Dehydrated garlic can be ground into powder or stored as dried cloves, offering a convenient option for long-term storage. When making garlic-infused oils, it's essential to follow proper food safety guidelines to prevent the risk of botulism. By employing these long-term storage methods, you can ensure that your indoor-grown garlic remains fresh and flavorful for months. Experiment with different techniques to find the one that works best for your specific growing conditions and storage capabilities. With proper care and attention to storage, you'll be able to enjoy the fruits of your indoor garlic-growing efforts well beyond the harvest season.