How To Draw Owl
Here is the introduction paragraph: Drawing an owl can be a fun and creative activity, but it can also be intimidating if you're new to drawing. With their distinctive features and majestic appearance, owls can be a challenging subject to capture on paper. However, with some guidance and practice, you can learn to draw an owl that is both realistic and visually appealing. To get started, it's essential to understand the basics of drawing an owl, including the proportions and shapes that make up its body. From there, you can move on to sketching the owl's body and facial features, paying attention to the details that bring your drawing to life. Finally, you can add the finishing touches to your owl drawing, including textures, patterns, and other details that make your artwork unique. In this article, we'll take a closer look at the basics of drawing an owl, so let's start by understanding the fundamentals of this majestic bird.
Understanding the Basics of Drawing an Owl
Drawing an owl can be a fun and rewarding experience, but it requires a good understanding of the basics. To get started, it's essential to familiarize yourself with owl anatomy, including the shape and structure of their bodies, wings, and facial features. Additionally, choosing the right drawing tools and materials can make a significant difference in the quality of your artwork. Having a good reference image can also inspire and guide you throughout the drawing process. By understanding these fundamental aspects, you'll be well on your way to creating a beautiful and realistic owl drawing. In this article, we'll delve into the basics of drawing an owl, starting with the importance of familiarizing yourself with owl anatomy.
Familiarizing Yourself with Owl Anatomy
Familiarizing yourself with owl anatomy is a crucial step in drawing a realistic and accurate owl. Start by studying the overall shape and proportions of an owl's body, including the rounded head, forward-facing eyes, and flat facial disk. Note the shape and size of the beak, which is typically short, curved, and hooked. The ears, or ear tufts, are usually small and rounded, and may be raised or lowered depending on the owl's mood. The body is typically stout and compact, with a short neck and legs. The wings are broad and rounded, with a distinctive shape that allows for silent flight. The tail is long and rounded, with a distinctive shape that helps the owl balance in flight. Study the feathers, which are typically soft and fluffy, with a mottled or streaked pattern that helps the owl blend in with its surroundings. Pay attention to the texture and pattern of the feathers, as well as the way they are arranged on the body. By familiarizing yourself with these key features, you'll be able to draw a more accurate and realistic owl.
Choosing the Right Drawing Tools and Materials
When it comes to drawing an owl, having the right tools and materials can make all the difference in achieving a realistic and detailed representation. The first step is to choose a suitable drawing surface, such as paper or board, that is smooth and durable enough to handle a variety of mediums. Look for paper with a weight of at least 80 gsm to prevent buckling or warping. Next, select a range of graphite pencils, including HB, 2B, 4B, and 6B, to achieve varying degrees of tone and shading. A sharpener and eraser are also essential for creating fine details and correcting mistakes. For added texture and depth, consider incorporating charcoal, pastels, or colored pencils into your drawing. A blending stump or tortillon can help smooth out transitions and create subtle gradations of tone. Finally, invest in a good quality eraser, such as a kneaded eraser, to remove unwanted marks and create highlights. By choosing the right drawing tools and materials, you'll be well on your way to creating a stunning and realistic owl drawing.
Selecting a Reference Image for Inspiration
When selecting a reference image for inspiration, it's essential to choose one that sparks your creativity and provides a clear understanding of the owl's anatomy. Look for high-quality images that showcase the owl's unique features, such as its facial structure, feathers, and posture. Consider the lighting and composition of the image, as these elements can greatly impact the mood and atmosphere of your drawing. A well-lit image with a clear view of the owl's features will make it easier to capture its likeness. You can find reference images online or in books, or take your own photographs of owls in their natural habitat. Having multiple reference images can also be helpful, as it allows you to study the owl's different poses and expressions. Ultimately, the reference image you choose should inspire you to create a unique and captivating drawing that showcases the owl's beauty and character.
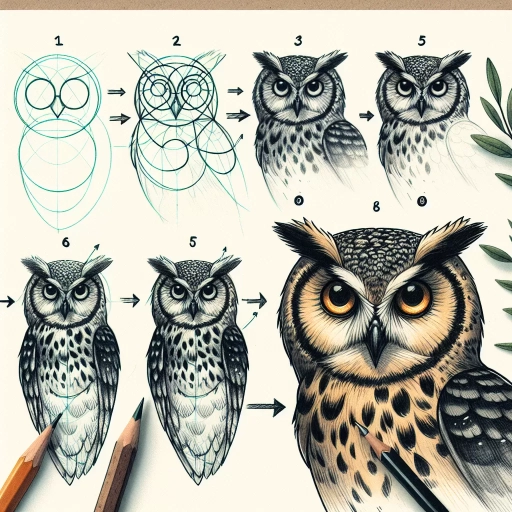
Sketching the Owl's Body and Facial Features
Sketching an owl's body and facial features requires attention to detail and a gentle touch. To create a realistic and captivating owl drawing, it's essential to break down the process into manageable steps. First, start by drawing the owl's round body and wings, paying attention to the soft, curved lines that define its shape. Next, focus on sketching the owl's facial features, including the beak and eyes, which are crucial in capturing its wise and mysterious expression. Finally, add texture and feathers to the owl's body to give it a lifelike appearance. By following these steps, you'll be able to create a beautiful and detailed owl drawing that showcases your artistic skills. In this article, we'll explore each of these steps in more detail, starting with the foundation of the owl's body: drawing its round body and wings.
Drawing the Owl's Round Body and Wings
Drawing the owl's round body and wings is a crucial step in creating a realistic and visually appealing owl drawing. To start, draw a large oval shape for the body, making sure it is tall rather than wide. The oval should be slightly tilted, with the top end leaning towards the left side of the paper. This will help create a sense of movement and balance in the drawing. Next, add a smaller oval shape for the head, connected to the body by a neck. The head should be positioned at a slight angle, with the beak pointing downwards. The body should be rounded and soft, with no sharp edges or points. To draw the wings, start by drawing a long, curved line that extends from the body, just below the head. The line should be smooth and flowing, with a gentle curve that follows the shape of the body. From this line, add a series of soft, feathery shapes that follow the curve of the wing. The feathers should be layered and textured, with a soft, rounded edge. The wing should be rounded at the tip, with a slight curve upwards. Repeat the same process for the second wing, making sure it is symmetrical and balanced with the first wing. Finally, add some soft, rounded shapes to the body to indicate the owl's feathers, and your owl's body and wings are complete.
Sketching the Owl's Facial Features, Including the Beak and Eyes
When sketching the owl's facial features, it's essential to capture the unique characteristics that make this bird of prey so distinctive. Start by drawing the beak, which should be short, curved, and pointed. The beak should be positioned at the front of the face, with the tip pointing downwards slightly. The shape of the beak can vary depending on the species of owl, but it's generally triangular in shape with a rounded tip. Next, focus on the eyes, which are arguably the owl's most striking feature. Draw two large, round circles for the eyes, making sure to leave enough space between them to accommodate the beak. The eyes should be positioned on either side of the head, with the top of the circle aligned with the top of the head. The eyes should be large and expressive, with a sharp, pointed shape at the outer corner. The eyebrows, or rather, the feathers above the eyes, should be drawn as two curved lines that follow the shape of the eyes. These feathers should be thicker and more pronounced at the outer corner of the eye, giving the owl a wise and knowing look. Finally, add some texture and detail to the facial features by drawing short, curved lines that follow the shape of the beak and eyes. These lines should be soft and subtle, giving the owl a gentle and wise appearance. By carefully sketching the owl's facial features, including the beak and eyes, you can create a beautiful and realistic portrait of this majestic bird.
Adding Texture and Feathers to the Owl's Body
To add texture and feathers to the owl's body, start by sketching the overall shape of the owl's plumage, using soft, gentle lines to suggest the layered feathers. Begin at the head, working your way down to the tail, using short, curved strokes to indicate the direction of the feathers. Vary the length and thickness of the lines to create depth and dimension, with longer lines at the back of the owl and shorter lines at the front. For the facial disk, use a series of short, curved lines to create a soft, rounded shape, with the lines becoming shorter and more densely packed towards the center of the face. To add texture to the feathers, use a range of techniques, including hatching, cross-hatching, and stippling. Hatching involves creating a series of closely spaced parallel lines, while cross-hatching involves layering lines at different angles to create a more textured, dimensional effect. Stippling involves creating a pattern of small dots, which can be used to suggest the soft, fluffy texture of the owl's feathers. Experiment with different techniques and tools, such as pencils, pens, and markers, to achieve the desired level of texture and detail. As you work, pay attention to the way the light falls on the owl's body, using highlights and shadows to create a sense of depth and dimension. By adding texture and feathers to the owl's body, you can create a more realistic and engaging drawing that captures the unique characteristics of this fascinating bird.
Adding Details and Final Touches to Your Owl Drawing
With a solid foundation in place, it's time to add the finer details and final touches to your owl drawing. This is where you can really bring your artwork to life and make it stand out. To start, focus on drawing the owl's talons and feet, which are essential features that require attention to detail. Next, consider adding shading and dimension to the owl's body to create a more realistic and three-dimensional appearance. Finally, think about incorporating background elements to enhance the drawing and provide context for your owl. By paying attention to these details, you can take your owl drawing to the next level and create a truly stunning piece of art. Let's begin by taking a closer look at drawing the owl's talons and feet.
Drawing the Owl's Talons and Feet
Drawing the owl's talons and feet is a crucial step in adding realism and detail to your owl drawing. To start, draw a small oval shape for the foot, making sure it's in proportion to the rest of the body. The owl's feet are zygodactyl, meaning they have two toes pointing forward and two backward, so be sure to capture this unique arrangement. Draw the toes as small, curved claws, with the front toes slightly larger than the back ones. The talons should be sharp and pointed, with a slight curve to them. Pay attention to the spacing between the toes, making sure they're evenly spaced and not too crowded. You can also add some texture to the feet by drawing short, curved lines to indicate the feathers and skin. Finally, connect the feet to the legs, making sure the joints are smooth and natural-looking. By carefully drawing the owl's talons and feet, you'll add a level of detail and realism to your drawing that will make it truly stand out.
Adding Shading and Dimension to the Owl's Body
To add shading and dimension to the owl's body, start by identifying the areas where the light source is coming from. In most cases, the light source is above the owl, so the top of the head, back, and wings will be lighter, while the underside of the body, face, and wings will be darker. Use a range of pencils, from 2B to 6B, to create a gradual transition from light to dark. Begin by shading the underside of the body, using gentle, smooth strokes to create a soft, rounded shape. Gradually build up the shading, adding more pressure and darker pencils as you move towards the edges of the body. Pay particular attention to the areas where the feathers overlap, as these will create a sense of depth and dimension. Use a sharp pencil to add fine details, such as the texture of the feathers and the shape of the talons. To create a sense of volume and three-dimensionality, use a technique called hatching, where you create a series of closely spaced lines that follow the contours of the body. Vary the thickness and spacing of the lines to create a sense of depth and texture. Finally, use a blending stump or tortillon to smooth out the shading and create a soft, even transition between the different areas of the body. By adding shading and dimension to the owl's body, you can create a sense of depth and realism that will bring your drawing to life.
Incorporating Background Elements to Enhance the Drawing
Incorporating background elements can elevate your owl drawing from a simple portrait to a captivating scene. To enhance your drawing, consider adding a subtle gradient or texture to the background to create depth and dimension. A soft, moonlit night sky or a misty forest atmosphere can complement the owl's nocturnal nature. You can also include branches, leaves, or flowers to create a sense of environment and context. For a more dramatic effect, add a few silhouetted trees or a distant mountain range to frame the owl. When adding background elements, remember to balance them with the owl's presence, ensuring that the bird remains the focal point. A simple yet effective technique is to use a range of values, from light to dark, to create a sense of depth and dimensionality. By incorporating background elements thoughtfully, you can transform your owl drawing into a rich and immersive artwork that invites the viewer to step into the owl's world.