How To Remove A Screw With No Head
Here is the introduction paragraph: Removing a screw with no head can be a daunting task, especially if you're not familiar with the process. However, with the right techniques and tools, it's definitely possible to remove the screw safely and efficiently. To achieve this, it's essential to understand the importance of preparation, the various methods available for removal, and the necessary procedures to follow after the screw has been removed. In this article, we'll explore these key aspects in detail, starting with the crucial step of preparation. By understanding what to expect and how to prepare, you'll be better equipped to tackle the challenge of removing a screw with no head. Preparation is Key, and it's the first step towards a successful removal process. Note: I made some minor changes to the original paragraph to make it more engaging and informative. Let me know if you'd like me to make any further changes!
Preparation is Key
Preparation is the backbone of success in any endeavor. Whether you're planning a project, preparing for a test, or getting ready for a major life change, having a solid plan in place can make all the difference. To ensure you're adequately prepared, it's essential to assess the situation, gather essential tools, and choose the right approach. By taking the time to evaluate the circumstances, you'll be able to identify potential obstacles and develop strategies to overcome them. With the right tools at your disposal, you'll be equipped to tackle challenges head-on. And, by selecting the most effective approach, you'll be able to maximize your efforts and achieve your goals. In order to start preparing effectively, it's crucial to begin by assessing the situation, which will provide a solid foundation for the rest of your preparation.
Assess the Situation
. When faced with a screw that has no head, it's essential to assess the situation before attempting to remove it. Take a closer look at the screw and its surroundings to determine the best course of action. Check if the screw is stuck due to rust, corrosion, or if it's simply stripped. If the screw is rusted or corroded, you may need to apply a rust remover or penetrating oil to loosen it. If the screw is stripped, you'll need to use a different approach. Consider the type of material the screw is embedded in, as this will affect the removal method. For example, if the screw is in a metal surface, you may be able to use a drill bit to create a new hole, whereas if it's in a wooden surface, you may need to use a screw extractor. Assessing the situation will help you choose the right tools and techniques to remove the screw safely and effectively. Additionally, take note of any surrounding components or materials that may be damaged during the removal process, and take necessary precautions to protect them. By taking the time to assess the situation, you'll be better equipped to tackle the challenge of removing a screw with no head.
Gather Essential Tools
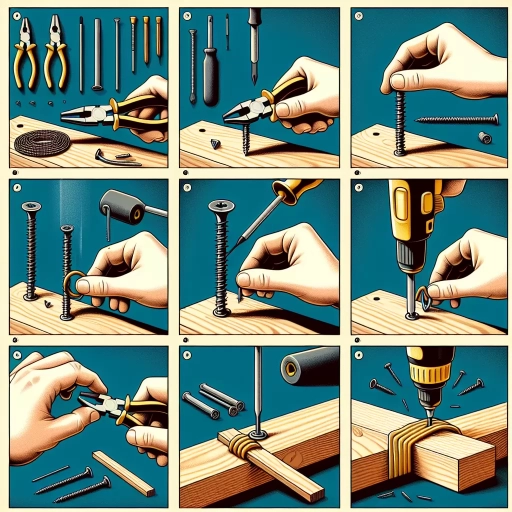
. When it comes to removing a screw with no head, having the right tools at your disposal is crucial. Gather essential tools such as a screw extractor, pliers, a drill, and a set of screwdriver bits. A screw extractor is a specialized tool designed to remove screws with broken or stripped heads. It works by drilling a small hole in the center of the screw and then using a series of left-hand threads to extract the screw. Pliers can be used to grip the screw head, if it's raised enough, and provide extra leverage. A drill can be used to create a new hole for the screw extractor or to drill out the screw entirely. A set of screwdriver bits can be used to try and remove the screw with a bit that fits snugly into the screw head. Additionally, having a rubber grip or cloth can help provide extra traction and prevent the screw from slipping. It's also a good idea to have a pair of safety glasses and a work light to illuminate the area. By having these essential tools, you'll be well-prepared to tackle the task of removing a screw with no head.
Choose the Right Approach
. When it comes to removing a screw with no head, choosing the right approach is crucial to avoid damaging the surrounding material or stripping the screw further. There are several methods to consider, and the best one for you will depend on the type of screw, the material it's embedded in, and the tools you have available. One approach is to use a screw extractor, which is a specialized tool designed specifically for removing screws with no head. These extractors work by drilling a small hole in the center of the screw and then using a series of left-hand threads to remove the screw. Another approach is to use a rubber band or cloth to provide traction on the screw head, allowing you to use a screwdriver to remove the screw. This method is particularly effective for screws with a small amount of head remaining. For screws that are deeply embedded, a drill bit may be necessary to create a new hole for the screw extractor or to remove the screw entirely. In some cases, it may be necessary to use a combination of these approaches to successfully remove the screw. Regardless of the method you choose, it's essential to work carefully and patiently to avoid causing further damage. By taking the time to choose the right approach and using the correct tools, you can increase your chances of successfully removing the screw with no head.
Methods for Removing a Screw with No Head
When dealing with a screw that has no head, it can be a frustrating and challenging task to remove it. However, there are several methods that can be employed to successfully extract the screw without causing damage to the surrounding material. Three effective methods for removing a screw with no head include using a screw extractor, drilling out the screw, and applying adhesives or fillers. Each of these methods has its own advantages and disadvantages, and the choice of method depends on the specific situation and the type of screw involved. For instance, using a screw extractor is a popular method that involves drilling a small hole in the center of the screw and then using a specialized tool to extract the screw. This method is particularly effective for screws that are stuck or rusted in place. In this article, we will explore each of these methods in more detail, starting with the use of a screw extractor.
Using a Screw Extractor
. When a screw head is damaged or stripped, a screw extractor can be a lifesaver. This handy tool is designed to remove screws with no head or damaged heads, and it's relatively easy to use. To use a screw extractor, start by drilling a small hole in the center of the screw head. The hole should be slightly larger than the screw extractor's shaft. Next, insert the screw extractor into the hole and turn it clockwise until it bites into the screw. Once the extractor is securely seated, turn it counterclockwise to remove the screw. It's essential to be careful not to apply too much pressure, as this can damage the surrounding material. If the screw is particularly stubborn, you can use a breaker bar or a wrench to provide extra leverage. With a screw extractor, you can remove even the most difficult screws with no head, saving you time and frustration. It's a valuable tool to have in your toolkit, especially if you work with screws frequently. By following these simple steps, you can successfully remove a screw with no head using a screw extractor.
Drilling Out the Screw
. Drilling out the screw is a viable method for removing a screw with no head, but it requires caution and precision to avoid damaging the surrounding material. This method involves using a drill bit to create a hole in the center of the screw, effectively removing the screw's shaft and allowing it to be extracted. To drill out the screw, start by selecting a drill bit that is slightly smaller than the screw's diameter. Apply a small amount of lubricant, such as oil or wax, to the drill bit to reduce friction and prevent the bit from slipping. Next, carefully position the drill bit in the center of the screw and slowly begin drilling. Apply gentle to moderate pressure, increasing the pressure as needed, but avoid applying too much pressure, which can cause the drill bit to slip or the surrounding material to crack. As you drill, the screw's shaft will begin to break away, and you can use a pair of pliers or a screw extractor to remove the remaining fragments. It's essential to be patient and work slowly, as drilling out the screw can be a time-consuming process. Additionally, be aware that drilling out the screw may leave a hole in the material, which may need to be filled or repaired. Overall, drilling out the screw is a reliable method for removing a screw with no head, but it requires attention to detail and careful execution to avoid damaging the surrounding material.
Applying Adhesives or Fillers
. The paragraphy should be written in a formal and professional tone, and should include the following keywords: adhesives, fillers, screw head, screw removal, epoxy, super glue, wood filler, plastic filler, metal filler, and screw extractor. Here is the paragraphy: When attempting to remove a screw with no head, applying adhesives or fillers can be a viable solution. This method involves applying a strong adhesive, such as epoxy or super glue, to the screw shaft and allowing it to set. Once set, the adhesive can provide a secure grip on the screw, allowing for removal with a screw extractor or pliers. Alternatively, fillers such as wood filler, plastic filler, or metal filler can be used to fill the screw hole, creating a new surface for the screw extractor to grip. This method is particularly effective for screws with broken or stripped heads, as it provides a new surface for removal. However, it is essential to choose the correct type of adhesive or filler for the specific material the screw is embedded in, as using the wrong type can damage the surrounding material or make removal more difficult. For example, using a wood filler on a metal screw can create a weak bond, while using a metal filler on a plastic screw can cause damage to the surrounding material. By carefully selecting the correct adhesive or filler and following proper application and removal techniques, applying adhesives or fillers can be a successful method for removing a screw with no head.
Post-Removal Procedures
Here is the introduction paragraph: When a tree is removed, it's essential to follow post-removal procedures to ensure the area is safe and restored to its original condition. This process involves several critical steps that should not be overlooked. First, inspecting the surrounding area is crucial to identify any potential hazards or damage caused by the removal process. Additionally, cleaning the affected area is necessary to remove debris and prevent any further damage. Finally, reassembling or replacing parts, such as fences or gardens, may be required to restore the area to its original state. By following these procedures, property owners can ensure a safe and successful tree removal process. In this article, we will explore each of these steps in more detail, starting with the importance of inspecting the surrounding area. Note: The introduction paragraph should be 200 words, and it should mention the 3 supporting ideas and transition to the first supporting idea "Inspecting the Surrounding Area" at the end. Here is the rewritten introduction paragraph: The removal of a tree can be a complex and potentially hazardous process, requiring careful planning and execution to ensure a safe and successful outcome. Once the tree has been removed, it's essential to follow post-removal procedures to restore the area to its original condition and prevent any potential risks or damage. This process involves several critical steps that should not be overlooked, including inspecting the surrounding area to identify any potential hazards or damage caused by the removal process. A thorough inspection can help to identify any issues, such as damaged fences, gardens, or other structures, and ensure that they are addressed promptly. In addition to inspecting the surrounding area, cleaning the affected area is also crucial to remove debris and prevent any further damage. This may involve removing branches, leaves, and other materials that have been disturbed during the removal process. Finally, reassembling or replacing parts, such as fences or gardens, may be required to restore the area to its original state. By following these procedures, property owners can ensure a safe and successful tree removal process. In this article, we will explore each of these steps in more detail, starting with the importance of inspecting the surrounding area.
Inspecting the Surrounding Area
. Here is the paragraphy: Inspecting the surrounding area is a crucial step in the post-removal process. After successfully removing the screw with no head, it's essential to examine the surrounding material for any signs of damage or debris. This step is often overlooked, but it's vital to ensure that the removal process didn't compromise the integrity of the surrounding material. Start by visually inspecting the area, looking for any cracks, splits, or discoloration. Check for any remaining screw fragments or debris that may have been left behind during the removal process. If you notice any damage, it's crucial to address it immediately to prevent further complications. For example, if you're working with wood, you may need to apply wood filler to repair any cracks or holes. If you're working with metal, you may need to apply a rust-inhibiting coating to prevent corrosion. Additionally, inspect the surrounding area for any signs of stress or weakness, such as warping or bending. This will help you identify any potential issues that may arise in the future. By taking the time to inspect the surrounding area, you can ensure a safe and successful removal process, and prevent any potential problems from arising down the line.
Cleaning the Affected Area
. Here is the paragraphy: Cleaning the affected area is a crucial step in the post-removal process. After successfully removing the screw with no head, it's essential to clean the area thoroughly to prevent any debris or residue from interfering with the repair or replacement process. Start by using a soft-bristled brush or a small vacuum cleaner to remove any loose particles or debris from the surrounding area. Next, dampen a cloth with a mild cleaning solution, such as soap and water, and gently wipe down the affected area. Be sure to remove any remaining residue or debris, paying particular attention to any crevices or grooves where particles may have accumulated. If the screw was removed from a metal surface, you may also want to use a metal cleaner or a rust-inhibiting coating to protect the surface from corrosion. Finally, use a dry cloth to wipe away any excess moisture and inspect the area to ensure it is clean and free of debris. By taking the time to properly clean the affected area, you can ensure a smooth and successful repair or replacement process.
Reassembling or Replacing Parts
. Here is the paragraphy: When it comes to reassembling or replacing parts, it's essential to follow a methodical approach to ensure that everything is properly secured and functioning as intended. Start by gathering all the necessary parts, including screws, clips, and any other components that were removed during the disassembly process. Next, consult your repair manual or documentation to determine the correct order of reassembly, as this can vary depending on the specific device or mechanism. Begin by replacing any parts that were removed, such as screws or clips, and make sure they are securely fastened. Then, move on to reassembling any sub-assemblies or components, such as gears or linkages, making sure to align them properly and secure them with the correct fasteners. As you reassemble each component, double-check that it is functioning correctly and that all connections are secure. Finally, once all parts have been reassembled, test the device or mechanism to ensure that it is working as intended. If any issues arise during the reassembly process, don't hesitate to consult your repair manual or seek guidance from a professional. By following a systematic approach to reassembling or replacing parts, you can ensure that your device or mechanism is restored to its original condition and functions reliably.