How To Make A Bow With Wired Ribbon
Here is the introduction paragraph: Making a bow with wired ribbon is a simple yet elegant way to add a touch of sophistication to any gift, decoration, or accessory. With a few basic materials and some easy-to-follow steps, you can create beautiful bows that add a professional finish to your projects. But before you start making your bow, it's essential to understand the basics of wired ribbon, including its unique characteristics and how to work with it. In this article, we'll take you through a step-by-step guide on how to make a bow with wired ribbon, as well as provide tips and variations for creating unique and beautiful bows. By the end of this article, you'll be able to create stunning bows that elevate your projects to the next level. So, let's start by understanding the basics of wired ribbon, which is the foundation of making a beautiful bow. Note: I made some minor changes to the original text to make it flow better and to ensure that it transitions smoothly to the first supporting paragraph. Let me know if you'd like me to make any further changes!
Understanding the Basics of Wired Ribbon
Here is the introduction paragraph: Wired ribbon is a versatile and popular crafting material used to create beautiful bows, decorations, and embellishments for various occasions. With its unique characteristics and wide range of styles, wired ribbon can add a touch of elegance and sophistication to any project. However, working with wired ribbon can be intimidating, especially for beginners. To get started, it's essential to understand the basics of wired ribbon, including its characteristics, the right type to choose for your project, and the basic tools and materials needed to create a stunning bow. In this article, we will delve into the world of wired ribbon, exploring what it is and its characteristics, choosing the right type of wired ribbon for your bow, and the basic tools and materials needed to get started. By understanding the basics of wired ribbon, you'll be well on your way to creating beautiful and professional-looking bows and decorations.
What is Wired Ribbon and Its Characteristics
. Wired ribbon, also known as wire-edged ribbon, is a type of ribbon that features a thin wire running along its edges. This wire, usually made of a flexible metal material, provides the ribbon with a unique set of characteristics that make it ideal for crafting and decorating. One of the primary advantages of wired ribbon is its ability to hold its shape, allowing it to be molded and formed into various shapes and designs. This makes it perfect for creating bows, flowers, and other decorative elements that require a high level of structure and stability. Additionally, the wire edge of the ribbon provides a crisp, clean finish that adds a professional touch to any project. Wired ribbon is also incredibly versatile, coming in a wide range of colors, patterns, and widths, making it suitable for a variety of applications, from gift wrapping and card making to scrapbooking and home decor. Furthermore, the wire edge of the ribbon allows it to be easily shaped and reshaped, making it a great choice for projects that require a high level of flexibility and adaptability. Overall, wired ribbon is a must-have material for any crafter or DIY enthusiast looking to add a touch of elegance and sophistication to their projects.
Choosing the Right Type of Wired Ribbon for Your Bow
. When it comes to choosing the right type of wired ribbon for your bow, there are several factors to consider. The type of ribbon you choose will depend on the look and feel you want to achieve, as well as the occasion and the materials you are working with. For example, if you are making a bow for a wedding or a formal event, you may want to choose a ribbon with a more elegant and sophisticated look, such as a satin or grosgrain ribbon. On the other hand, if you are making a bow for a more casual occasion, such as a birthday party or a craft project, you may want to choose a ribbon with a more playful and whimsical look, such as a polka dot or striped ribbon. Additionally, you will also want to consider the width of the ribbon, as well as the color and texture. A wider ribbon will create a fuller and more dramatic bow, while a narrower ribbon will create a more delicate and subtle bow. The color and texture of the ribbon will also play a big role in the overall look and feel of the bow, so be sure to choose a ribbon that complements the occasion and the materials you are working with. By considering these factors and choosing the right type of wired ribbon, you can create a beautiful and professional-looking bow that will add a touch of elegance and sophistication to any occasion.
Basic Tools and Materials Needed for Making a Bow
. To create a beautiful bow with wired ribbon, you'll need some basic tools and materials. First and foremost, you'll need a high-quality wired ribbon that is sturdy enough to hold its shape. The width of the ribbon will depend on the size of the bow you want to create, but a good starting point is a 2.5-inch wide ribbon. You'll also need a pair of sharp scissors or a craft knife to cut the ribbon to the desired length. A hot glue gun can come in handy for securing the bow to a surface or attaching embellishments. A wire cutter or pliers can be useful for trimming excess wire and shaping the bow. Additionally, you may want to have some floral tape or a bow maker tool on hand to help shape and secure the bow. It's also a good idea to have a work surface, such as a table or countertop, where you can lay out your materials and work on your bow. Optional materials include decorative items like bows, flowers, or greenery to add a personal touch to your bow. With these basic tools and materials, you'll be well on your way to creating a beautiful and professional-looking bow with wired ribbon.
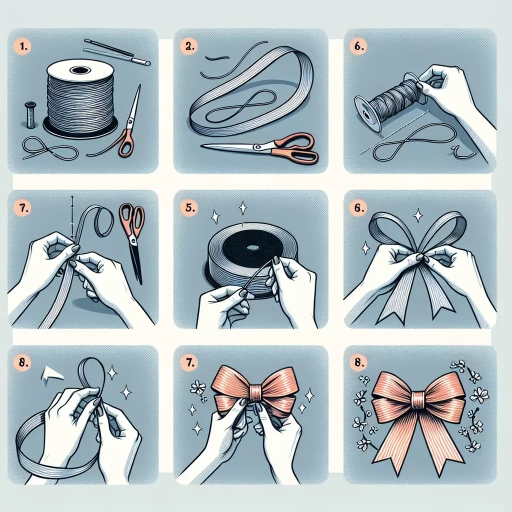
Step-by-Step Guide to Making a Bow with Wired Ribbon
Here is the introduction paragraph: Creating a beautiful bow with wired ribbon is a skill that can elevate your gift-giving, decorating, and crafting to the next level. With a few simple steps and some practice, you can create stunning bows that add a professional touch to any project. In this article, we will take you through a step-by-step guide on how to make a bow with wired ribbon, covering the essential steps of preparing the ribbon and creating the center loop, forming the bow loops and shaping the bow, and securing the bow with floral wire or hot glue. By mastering these techniques, you'll be able to create bows that are perfect for gifts, wreaths, garlands, and other decorative projects. Understanding the basics of wired ribbon is key to creating beautiful bows, so let's get started and explore the world of wired ribbon crafting.
Preparing the Ribbon and Creating the Center Loop
. To prepare the ribbon and create the center loop, start by holding the wired ribbon in one hand, with the wired edge facing up. Locate the center of the ribbon and pinch it between your thumb and index finger to create a small fold. This fold will serve as the foundation for your bow's center loop. Next, use your other hand to wrap the ribbon around the center fold, forming a loop. The size of the loop will depend on the desired size of your bow, so adjust it accordingly. Make sure the edges of the ribbon are even and the loop is symmetrical. To secure the loop in place, use a small pinch or a dot of hot glue. This will prevent the loop from coming undone as you work on the rest of the bow. With the center loop in place, you can now begin to create the bow's signature loops and twists. By following these simple steps, you'll be well on your way to crafting a beautiful, professional-looking bow with wired ribbon.
Forming the Bow Loops and Shaping the Bow
. To form the bow loops and shape the bow, start by holding the wired ribbon vertically in front of you, with the ends facing away from your body. Cross the right end of the ribbon over the left end, forming an "X" shape. This will create the foundation of your bow. Next, take the right end of the ribbon and fold it under the center of the bow, then bring it up and over the top of the bow, forming a loop. You should see the beginnings of a bow shape starting to form. Repeat this process with the left end of the ribbon, folding it under the center and bringing it up and over the top to form another loop. Continue to alternate sides, forming loops and adjusting the size and shape of the bow as you go. As you work, gently pull the loops outwards to create a fuller, more dimensional bow. To finish the bow, fluff out the loops and adjust the center to create a neat and tidy knot. You can also use a little bit of floral tape or a hot glue gun to secure the bow in place, if needed. With a little practice, you'll be creating beautiful, professional-looking bows in no time!
Securing the Bow with Floral Wire or Hot Glue
. To secure the bow in place, you can use either floral wire or hot glue, depending on the desired level of permanence and the type of project you're working on. Floral wire is a great option if you want to be able to easily remove and reposition the bow, as it can be gently twisted and untwisted without damaging the ribbon. Simply wrap the wire around the center of the bow, making sure to cover the entire stem, and twist it tightly to secure. This method is ideal for decorating wreaths, garlands, or other items that may need to be rearranged or reused. On the other hand, hot glue provides a more permanent hold and is perfect for projects that won't be handled or moved around much, such as gift wrapping or decorating a hair clip. Apply a small amount of hot glue to the center of the bow and attach it to the desired surface, holding it in place for a few seconds until the glue sets. Regardless of the method you choose, make sure to handle the bow gently to avoid creasing or damaging the ribbon. With a secure bow in place, your project is now complete and ready to be admired!
Tips and Variations for Creating Unique and Beautiful Bows
Here is the introduction paragraph: Creating unique and beautiful bows is an art form that can elevate any gift, decoration, or accessory. With a few simple tips and variations, you can take your bow-making skills to the next level and create stunning, one-of-a-kind designs. One way to add visual interest to your bows is by experimenting with different ribbon colors and patterns, allowing you to match your bow to any theme or occasion. You can also add embellishments and decorations, such as rhinestones, flowers, or berries, to give your bow an extra touch of elegance. Additionally, by using wired ribbon, you can create different bow styles and shapes, from classic loops to intricate, 3D designs. By mastering these techniques, you'll be able to create bows that are truly show-stopping. But before you can start experimenting with these advanced techniques, it's essential to understand the basics of wired ribbon.
Experimenting with Different Ribbon Colors and Patterns
. Experimenting with different ribbon colors and patterns is a great way to add some personality to your bows. You can choose ribbons that match your personal style, the occasion, or the theme of your project. For example, if you're making a bow for a wedding, you might choose a elegant white or ivory ribbon with a subtle sheen. If you're making a bow for a child's birthday party, you might choose a bright and playful ribbon with a fun pattern like polka dots or stripes. You can also experiment with different textures, such as satin, grosgrain, or velvet, to add depth and interest to your bows. Another idea is to mix and match different ribbons to create a unique and eye-catching look. For example, you could pair a bold and bright ribbon with a more subtle and neutral one, or combine a smooth ribbon with a more textured one. The possibilities are endless, and experimenting with different ribbon colors and patterns is a great way to make your bows truly one-of-a-kind. By trying out different combinations, you can create bows that are not only beautiful but also reflect your personal style and creativity. So don't be afraid to get creative and have fun with it!
Adding Embellishments and Decorations to Your Bow
. Here is the paragraphy: Adding embellishments and decorations to your bow can elevate it from a simple, yet elegant, accessory to a truly show-stopping piece. One of the most popular ways to add some extra flair to your bow is with the use of rhinestones or other types of decorative stones. These can be applied individually or in clusters to create a sparkling, eye-catching effect. Another option is to use bows or flowers made from smaller pieces of ribbon or fabric, which can be attached to the center of the bow or used to create a cascading effect. For a more rustic or homespun look, consider adding some natural elements like pinecones, twigs, or dried flowers. You could also experiment with using different textures, such as velvet or lace, to add depth and interest to your bow. If you're feeling really adventurous, you could even try adding some non-traditional materials like buttons, keys, or other small objects to create a truly one-of-a-kind piece. Whatever embellishments you choose, be sure to balance them with the rest of the bow and the overall aesthetic you're trying to achieve. Too many embellishments can make the bow look cluttered and overwhelming, while too few may make it look plain and uninteresting. By striking the right balance, you can create a bow that's both beautiful and unique.
Creating Different Bow Styles and Shapes with Wired Ribbon
. When it comes to creating different bow styles and shapes with wired ribbon, the possibilities are endless. One of the most popular bow styles is the classic bow, which can be created by simply tying a knot in the center of the ribbon and adjusting the loops to the desired size. For a more elegant look, try creating a teardrop bow by folding the ribbon in half and tying a knot at the top, then adjusting the loops to create a teardrop shape. Another popular style is the pom-pom bow, which can be created by tying multiple knots in the center of the ribbon and fluffing out the loops to create a full, rounded shape. For a more whimsical look, try creating a curly bow by twisting the ribbon into curls and securing with a knot. You can also experiment with different shapes, such as a heart-shaped bow or a bow with a pointed center. To add some extra flair to your bows, try using different textures and colors of wired ribbon, or adding embellishments such as rhinestones or flowers. With a little practice and patience, you can create a wide range of beautiful and unique bows to add a personal touch to your gifts, decorations, and accessories.