How To Draw Skull
Drawing a skull can be a fascinating and creative activity, allowing artists to explore the intricate details and symbolism associated with this iconic symbol. Whether you're a seasoned artist or a beginner, learning how to draw a skull can be a rewarding experience that challenges your skills and sparks your imagination. To get started, it's essential to understand the basics of drawing a skull, including its overall shape, proportions, and key features. From there, you can move on to sketching the details of a skull, such as the eye sockets, nasal cavity, and teeth. Finally, refining and enhancing your skull drawing can help bring your artwork to life, adding texture, shading, and depth to create a truly striking piece. In this article, we'll take you through each of these steps, starting with the fundamentals of drawing a skull. Understanding the Basics of Drawing a Skull is the first crucial step in creating a realistic and captivating skull drawing.
Understanding the Basics of Drawing a Skull
Drawing a skull can seem like a daunting task, especially for those who are new to drawing. However, with a solid understanding of the basics, anyone can learn to draw a skull with confidence. To get started, it's essential to familiarize yourself with the overall shape and structure of a skull, including its proportions and measurements. This will help you understand how the different parts of the skull relate to each other and how to accurately depict them. Additionally, learning the different views of a skull, such as the front, side, and back, will allow you to draw a skull from any angle. By mastering these fundamental concepts, you'll be well on your way to creating realistic and detailed drawings of skulls. In this article, we'll explore these concepts in more depth, starting with the basics of the overall shape and structure of a skull.
Familiarizing Yourself with the Overall Shape and Structure
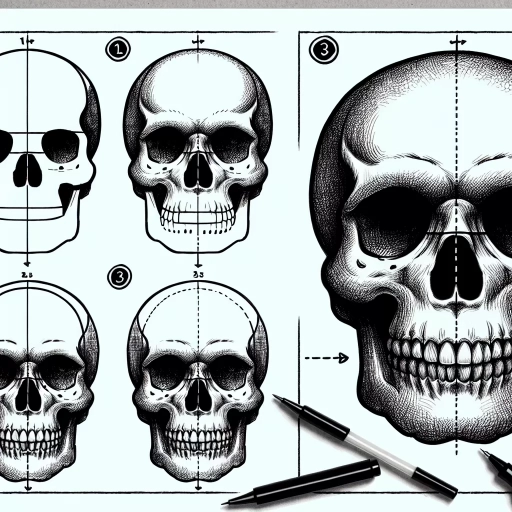
When drawing a skull, it's essential to familiarize yourself with its overall shape and structure. The skull is a complex form, but it can be broken down into simpler shapes to help you understand its proportions and anatomy. Start by observing the overall shape of the skull, noting its rounded cranium, the flat forehead, and the curved jawline. The skull can be divided into three main sections: the cranium, the face, and the mandible (jawbone). The cranium is the largest section, making up about two-thirds of the skull's total height. It's rounded and slightly flattened at the top, with a subtle curvature that follows the shape of the brain. The face is the middle section, comprising the forehead, nose, and mouth. It's slightly narrower than the cranium and has a more angular shape. The mandible is the lower section, forming the jawline and chin. It's a curved, U-shaped bone that connects to the cranium at the temporomandibular joint. By understanding the overall shape and structure of the skull, you'll be able to accurately proportion and draw its various features, creating a more realistic and detailed representation.
Learning the Proportions and Measurements of a Skull
Learning the proportions and measurements of a skull is a crucial step in drawing a realistic and accurate skull. To start, it's essential to understand that the skull is made up of several distinct parts, including the cranium, face, and jaw. The cranium is the upper part of the skull, which houses the brain, and is typically divided into three main sections: the frontal bone, parietal bone, and occipital bone. The face is the front part of the skull, which includes the eyes, nose, mouth, and jaw. The jaw, also known as the mandible, is the lower part of the skull that forms the lower jawline. When drawing a skull, it's vital to get the proportions and measurements of these parts correct to achieve a realistic and balanced representation. A general rule of thumb is to divide the skull into thirds, both horizontally and vertically, to help guide the placement of the features. The eyes, for example, are typically one-third of the way down from the top of the skull, while the nose is usually one-third of the way up from the bottom of the skull. The mouth and jawline are also proportionally related, with the mouth typically being one-third of the way up from the bottom of the jaw. By understanding and applying these proportions and measurements, artists can create a more accurate and realistic representation of the skull, which is essential for creating a convincing and engaging drawing.
Understanding the Different Views of a Skull
Understanding the different views of a skull is crucial in accurately drawing its various aspects. A skull can be viewed from multiple angles, including the front, side, back, top, and bottom. The front view, also known as the anterior view, showcases the skull's facial features, including the eye sockets, nose, and mouth. The side view, or lateral view, highlights the skull's profile, including the shape of the cranium and the jawline. The back view, or posterior view, displays the skull's occipital bone and the base of the skull. The top view, or superior view, shows the skull's cranial shape and the placement of the eye sockets. The bottom view, or inferior view, reveals the skull's lower jaw and the base of the skull. Each view provides unique information about the skull's structure and is essential in creating a comprehensive and accurate drawing. By understanding and drawing each view, artists can develop a deeper understanding of the skull's anatomy and improve their overall drawing skills.
Sketching the Details of a Skull
Sketching the details of a skull can be a fascinating and rewarding experience, especially for artists and anatomy enthusiasts. To create a realistic and detailed sketch of a skull, it's essential to focus on the key features that define its structure. In this article, we'll explore the process of sketching a skull, highlighting the importance of drawing the eye sockets and nasal cavity, sketching the jawline and teeth, and adding the details of the cranium and facial bones. By mastering these elements, you'll be able to create a highly detailed and accurate sketch of a skull. Let's start by examining the first crucial step: drawing the eye sockets and nasal cavity, which form the foundation of the skull's facial structure.
Drawing the Eye Sockets and Nasal Cavity
When drawing the eye sockets and nasal cavity, it's essential to capture their unique shapes and proportions. The eye sockets, also known as the orbits, are the bony cavities that contain the eyeballs. They are roughly oval in shape, with the top of the orbit being slightly wider than the bottom. The nasal cavity, on the other hand, is the air-filled space behind the nose that connects to the sinuses. It's a complex shape, with a curved roof and a flat floor. To draw the eye sockets, start by sketching the overall shape of the orbit, making sure to capture its oval shape and the slight tilt of the top. Then, add the details of the eye socket, including the lacrimal bone, the zygomatic bone, and the maxilla bone. The lacrimal bone forms the inner corner of the eye socket, while the zygomatic bone forms the outer corner. The maxilla bone forms the floor of the orbit. When drawing the nasal cavity, start by sketching the overall shape of the nasal opening, making sure to capture its curved shape. Then, add the details of the nasal cavity, including the nasal conchae, the nasal septum, and the sphenoid bone. The nasal conchae are the curved bones that project into the nasal cavity, while the nasal septum is the thin wall of bone that separates the two sides of the nasal cavity. The sphenoid bone forms the roof of the nasal cavity. By carefully drawing the eye sockets and nasal cavity, you can add depth and detail to your skull drawing, creating a more realistic and engaging piece of art.
Sketching the Jawline and Teeth
Sketching the jawline and teeth is a crucial step in drawing a realistic skull. To begin, start by sketching the overall shape of the jawline, using gentle, flowing lines to capture its contours. Pay attention to the way the jawline curves and tapers, particularly at the chin and the point where it meets the skull. Next, focus on the teeth, which should be sketched in a slightly curved line that follows the natural shape of the jaw. The teeth themselves can be represented by small, rectangular shapes, with the front teeth slightly larger than the back ones. Be sure to leave a small gap between each tooth to create a sense of depth and dimension. As you sketch the teeth, pay attention to the way they fit together, with the upper teeth overlapping the lower ones slightly. Finally, add some subtle shading and texture to the jawline and teeth to give them a more realistic appearance. This can be achieved by using a range of pencils, from 2H to 6B, to create a range of values and textures. By carefully sketching the jawline and teeth, you can add a level of detail and realism to your skull drawing that will make it truly stand out.
Adding the Details of the Cranium and Facial Bones
The cranium and facial bones are the most distinctive features of a skull, and adding their details can make your drawing more realistic and detailed. To start, focus on the cranium, which is the upper part of the skull that encloses the brain. Draw the parietal bones, which are the two large bones that form the sides and roof of the cranium. These bones are slightly curved and have a smooth surface. Next, draw the frontal bone, which is the bone that forms the forehead and upper part of the eye sockets. This bone is flat and has a slight curve. The occipital bone, which is located at the back of the skull, is also an important feature to include. This bone has a distinctive curve and forms the base of the skull. Moving on to the facial bones, start by drawing the maxilla bones, which are the two bones that form the upper jaw and palate. These bones are flat and have a slight curve. The zygoma bones, which are the cheekbones, are also important to include. These bones are triangular in shape and have a smooth surface. The nasal bones, which are the two small bones that form the bridge of the nose, are also a key feature to include. Finally, draw the mandible, which is the lower jawbone. This bone is curved and has a distinctive shape. By adding these details, you can create a more realistic and detailed drawing of a skull.
Refining and Enhancing Your Skull Drawing
Refining and enhancing your skull drawing requires attention to detail, patience, and practice. To take your skull drawing to the next level, consider adding shading and texture to create depth and dimension, using reference images to ensure accuracy and realism, and experimenting with different mediums and techniques. By incorporating these elements, you can add complexity and visual interest to your drawing, making it more engaging and lifelike. One of the most effective ways to add depth and dimension to your skull drawing is by incorporating shading and texture, which can help to create a sense of volume and structure. By carefully observing the way light interacts with the skull's surface, you can create a range of values and textures that bring your drawing to life. In the next section, we'll explore the techniques and strategies for adding shading and texture to create depth and dimension in your skull drawing.
Adding Shading and Texture to Create Depth and Dimension
Adding shading and texture to your skull drawing is a crucial step in creating depth and dimension. Shading helps to create the illusion of three-dimensionality by suggesting the way light interacts with the skull's surface. To add shading, start by identifying the areas of the skull that would naturally be in shadow, such as the eye sockets, nasal cavity, and the areas around the teeth. Use a range of values, from light to dark, to create a sense of volume and depth. You can use hatching, cross-hatching, and stippling techniques to achieve different textures and shading effects. For example, hatching can be used to create smooth, curved surfaces, while cross-hatching can be used to create more textured, rough surfaces. Stippling can be used to create detailed, high-contrast textures, such as the intricate patterns found on the surface of the skull. By carefully observing the way light interacts with the skull's surface, you can create a highly realistic and detailed drawing that appears to have depth and dimension. Additionally, adding texture to your drawing can help to create a sense of tactility and visual interest. You can use a range of techniques, such as hatching, cross-hatching, and stippling, to create different textures, from smooth and curved to rough and bumpy. By combining shading and texture, you can create a highly detailed and realistic drawing that appears to have depth, dimension, and visual interest.
Using Reference Images to Ensure Accuracy and Realism
Using reference images is a crucial step in ensuring accuracy and realism in your skull drawing. By studying the shape, structure, and details of a real skull, you can gain a deeper understanding of its anatomy and translate that knowledge onto paper. Reference images can be found online or in books, and it's essential to choose high-quality images that showcase the skull from various angles. This will allow you to observe the subtle curves and contours of the skull, as well as the intricate details of the teeth, eye sockets, and nasal cavity. By incorporating reference images into your drawing process, you can avoid common mistakes and ensure that your skull drawing is both accurate and visually striking. Additionally, using reference images can help you to develop your observation skills, which are essential for creating realistic and detailed drawings. By studying the reference images and comparing them to your drawing, you can identify areas that need improvement and make adjustments accordingly. This process of observation and refinement will help you to create a skull drawing that is not only accurate but also visually stunning.
Experimenting with Different Mediums and Techniques
Experimenting with different mediums and techniques can elevate your skull drawing to the next level. Try using charcoal or pastels to create a softer, more expressive look, or switch to ink or markers for bold, graphic lines. You can also experiment with mixed media, combining different materials to achieve unique textures and effects. For example, you can layer paint or ink over a charcoal or pencil base to add depth and dimension. Don't be afraid to try new things and make mistakes – they can often lead to unexpected and exciting results. Additionally, consider experimenting with different techniques, such as hatching, cross-hatching, or stippling, to create intricate patterns and shading. By pushing the boundaries of your medium and technique, you can add complexity and interest to your skull drawing, making it truly stand out.