How To Remove Shower Drain
A clogged shower drain can be frustrating and unsanitary, causing water to accumulate and potentially leading to mold and mildew growth. Removing a shower drain is a relatively simple process that can be done with the right tools and a bit of patience. To successfully remove a shower drain, it's essential to approach the task in a methodical manner. Preparation is crucial, as it allows you to gather the necessary tools and materials, ensuring a smooth and efficient process. Once you're prepared, you can move on to removing the shower drain cover, which may require some effort, but is a necessary step. Finally, clearing the clog and cleaning the drain is the final step in restoring your shower to its former functionality. By following these steps, you'll be able to remove your shower drain with ease. So, let's start with the first step: Preparation is Key.
Preparation is Key
Preparation is key to a successful project, and this is especially true when it comes to DIY home repairs. Before starting any project, it's essential to take the necessary steps to ensure a smooth and safe process. This includes turning off the water supply, clearing the surrounding area, and gathering the necessary tools. By doing so, you'll be able to work efficiently and effectively, minimizing the risk of accidents and errors. In this article, we'll explore the importance of preparation in DIY home repairs, starting with the crucial step of turning off the water supply.
Turn Off the Water Supply
To prevent water from flowing into the shower drain while you work on it, turn off the water supply to the shower. Locate the shut-off valves for the hot and cold water lines and turn them clockwise to shut off the water supply. Open the shower faucet to drain the water from the pipes. You may also need to turn off the main water supply to the house if you can't find the shut-off valves for the shower. Once the water supply is turned off, you can proceed with removing the shower drain. It's essential to turn off the water supply to avoid water flowing into the drain and making the removal process more complicated. Additionally, turning off the water supply will also prevent any accidental flooding or water damage to the surrounding area. By taking this simple step, you can ensure a safe and successful shower drain removal process.
Clear the Surrounding Area
Clear the surrounding area around the shower drain to ensure a safe and efficient removal process. Start by removing any visible debris, such as hair and soap scum, from the drain cover and surrounding area. Next, use a gentle cleanser and a soft-bristled brush to scrub away any stubborn stains or mineral deposits. Rinse the area thoroughly with warm water to remove any soap residue. If you have a shower mat or non-slip stickers, remove them to prevent any obstruction during the removal process. Additionally, clear any nearby items, such as towels, toiletries, or cleaning supplies, to give you a clear workspace. By clearing the surrounding area, you'll be able to access the drain more easily and avoid any potential hazards or messes. This will also help you to identify any potential issues, such as mineral buildup or corrosion, that may affect the removal process. Overall, taking the time to clear the surrounding area will make the removal process smoother, safer, and more efficient.
Gather the Necessary Tools
To effectively remove a shower drain, it is crucial to gather the necessary tools beforehand. This will not only save time but also prevent frustration and potential damage to the surrounding area. The essential tools required for this task include a drain wrench, also known as a drain key, which is specifically designed to fit into the drain's cross-shaped slots. A basin wrench or adjustable wrench can also be used as an alternative. Additionally, a screwdriver, preferably a flathead screwdriver, is necessary for removing any visible screws that hold the drain cover in place. A pair of needle-nose pliers may come in handy for gripping small parts or removing any debris that may be obstructing the drain. Furthermore, a drain snake or plumber's auger can be useful in breaking up any clogs that may be causing the drain to malfunction. It is also recommended to have a bucket or container ready to catch any water that may spill out during the removal process. Lastly, having a pair of gloves and safety goggles can provide protection from any sharp edges or potential splashes. By having all these tools at your disposal, you will be well-prepared to tackle the task of removing your shower drain efficiently and safely.
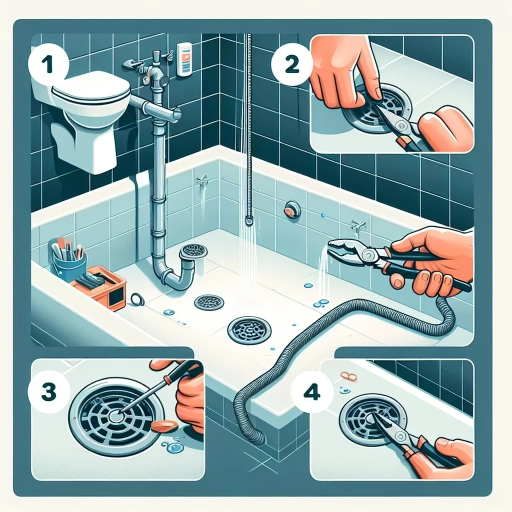
Removing the Shower Drain Cover
Removing a shower drain cover can be a daunting task, especially if you're not familiar with the process. However, with the right approach, it can be done efficiently and effectively. To start, it's essential to identify the type of drain cover you have, as this will determine the best removal method. You'll also need to use the correct tool for the job, as using the wrong one can lead to damage or injury. Additionally, it's crucial to be gentle when removing the cover to avoid damaging the surrounding area. By following these steps, you can successfully remove your shower drain cover and access the drain for cleaning or maintenance. In this article, we'll explore each of these steps in more detail, starting with identifying the type of drain cover you have.
Identify the Type of Drain Cover
To identify the type of drain cover, start by examining the shower drain closely. There are several common types of drain covers, including screw-in, snap-in, and lift-and-turn. Screw-in drain covers have visible screws that hold them in place, while snap-in covers have a slight lip around the edge that snaps into the drain. Lift-and-turn covers have a small handle or knob that you turn to remove the cover. Another type of drain cover is the pop-up drain, which has a small lever or button that you press to open the drain. Some drain covers may also have a decorative cap or grille that needs to be removed before accessing the drain. By identifying the type of drain cover, you can determine the best approach for removing it.
Use the Correct Tool for Removal
When it comes to removing the shower drain cover, using the correct tool is essential to avoid damaging the drain or surrounding surfaces. A flathead screwdriver or a drain removal tool is typically the best option for this task. The flathead screwdriver can be used to pry the cover off, while the drain removal tool is specifically designed for this purpose and can provide more leverage and control. It's also important to note that some shower drain covers may be held in place by screws or clips, in which case a screwdriver or pliers may be necessary. Using the correct tool will help to ensure a safe and successful removal process.
Be Gentle to Avoid Damage
Be Gentle to Avoid Damage. When removing the shower drain cover, it's essential to be gentle to avoid damaging the surrounding area. The shower drain cover is usually attached to the shower floor with screws or clips, and using excessive force can cause the screws to strip or the clips to break. This can lead to costly repairs and even water damage. To avoid this, use a screwdriver or wrench that fits the screw head or clip, and turn it slowly and carefully. If the screw or clip is stuck, don't force it. Instead, apply some penetrating oil or silicone spray to loosen it. Be patient and gentle, and the screw or clip should come loose without causing any damage. Additionally, be careful not to scratch the shower floor or surrounding area with your tools. Use a soft cloth or rubber gasket to protect the surface, and avoid using abrasive materials that can damage the finish. By being gentle and careful, you can remove the shower drain cover without causing any damage, making the process much easier and less stressful.
Clearing the Clog and Cleaning the Drain
Here is the introduction paragraph: Clogged drains can be a frustrating and messy problem, but fortunately, there are several effective methods for clearing the clog and cleaning the drain. In this article, we will explore three simple and non-invasive techniques for unclogging your drain: using a plunger or plumbing snake, applying baking soda and vinegar, and flushing the drain with hot water. By following these steps, you can quickly and easily restore your drain to its normal functioning state. To start, let's take a closer look at the first method: using a plunger or plumbing snake.
Use a Plunger or Plumbing Snake
When dealing with a clogged shower drain, using a plunger or plumbing snake can be an effective way to clear the blockage. A plunger creates suction to loosen and remove the clog, while a plumbing snake, also known as an auger, is a long, flexible rod that can be inserted into the drain to break up or retrieve the clog. To use a plunger, start by removing any visible debris from the drain cover and applying a small amount of petroleum jelly to the rim of the plunger to create a better seal. Then, place the plunger over the drain and push down slowly and steadily until you feel resistance. Hold for a few seconds, then lift up. Repeat this process several times until the clog is cleared. If the plunger doesn't work, it's time to try a plumbing snake. Feed the snake into the drain and rotate it as you push it further into the pipe. This will help break up any blockages. If you feel resistance, pull the snake back out and remove any debris that has been retrieved. Repeat the process until the clog is cleared. It's essential to be gentle when using a plumbing snake, as it can damage the pipes if inserted too forcefully. By using a plunger or plumbing snake, you can effectively clear the clog and have your shower drain flowing freely again.
Apply Baking Soda and Vinegar
The combination of baking soda and vinegar is a powerful and eco-friendly solution for clearing clogs and cleaning the shower drain. To apply this method, start by pouring 1 cup of baking soda down the drain, followed by 1 cup of vinegar. The mixture will fizz and foam, helping to break down any blockages and debris. Let the mixture sit for 2-3 hours or overnight, allowing it to penetrate and dissolve any tough clogs. After the sitting time has passed, pour hot water down the drain to rinse away the mixture and any remaining debris. For tougher clogs, you can repeat the process as needed. This method is not only effective but also gentle on pipes and the environment, making it a great alternative to harsh chemical drain cleaners. Additionally, the baking soda and vinegar mixture can help to eliminate any unpleasant odors and leave your shower drain smelling fresh and clean.
Flush the Drain with Hot Water
When it comes to clearing a clogged shower drain, one of the simplest and most effective methods is to flush the drain with hot water. This technique is often overlooked, but it can be incredibly effective in removing minor blockages and debris that may be causing the clog. To try this method, start by pouring a kettle of hot water down the drain, making sure to pour it slowly and carefully to avoid splashing. The hot water will help to loosen and dissolve any grease, soap scum, or other substances that may be contributing to the clog. As the hot water flows through the drain, it will help to break down and flush out any blockages, allowing water to flow freely once again. It's essential to note that this method is most effective for minor clogs, and if the clog is more severe, you may need to use a combination of methods or seek professional help. However, for many people, flushing the drain with hot water is a quick and easy solution that can save time and effort in the long run. Additionally, this method is also a great way to maintain your shower drain and prevent future clogs, as it helps to keep the drain clear and free-flowing. By incorporating this simple technique into your regular cleaning routine, you can help to keep your shower drain running smoothly and avoid the hassle of dealing with clogs in the future.