How To Draw A Monkey Easy
Drawing a monkey can be a fun and creative activity, but it can also be intimidating, especially for those who are new to drawing. However, with a few simple steps and some basic understanding of the monkey's anatomy, you can create a realistic and adorable monkey drawing. To get started, it's essential to understand the monkey's anatomy, including its body proportions, facial features, and muscle structure. This knowledge will help you sketch the monkey's basic form accurately and confidently. Once you have the basic form down, you can add details and texture to your monkey drawing, bringing it to life. In this article, we will guide you through the process of drawing a monkey, starting with understanding the monkey's anatomy, which is crucial for creating a realistic and believable drawing. By the end of this article, you'll be able to draw a monkey with ease and confidence. Let's begin by Understanding the Monkey's Anatomy.
Understanding the Monkey's Anatomy
Understanding the anatomy of a monkey is essential for artists, researchers, and enthusiasts alike. To gain a deeper appreciation for these fascinating creatures, it's crucial to delve into the intricacies of their physical structure. By familiarizing yourself with the monkey's body proportions, learning the basic shapes that make up their face, and studying the different types of monkeys and their distinct features, you'll be well on your way to becoming an expert in monkey anatomy. In this article, we'll explore these key concepts in detail, starting with the fundamental aspect of a monkey's physical appearance: their body proportions. By grasping the proportions of a monkey's body, you'll be able to accurately depict their posture, movement, and overall physicality, setting the foundation for a comprehensive understanding of their anatomy.
Familiarize Yourself with the Monkey's Body Proportions
To draw a monkey accurately, it's essential to familiarize yourself with its body proportions. A monkey's body is generally divided into three main sections: the head, torso, and limbs. The head is relatively small compared to the body, with a short, broad muzzle and a prominent forehead. The torso is long and slender, with a curved back and a deep chest. The limbs are long and agile, with the arms being slightly longer than the legs. The hands and feet are also proportionally large, with the hands having a distinctive thumb that is opposable to the other fingers. When drawing a monkey, it's crucial to capture these proportions accurately to achieve a realistic and believable representation. A good rule of thumb is to divide the body into simple shapes, such as spheres, cylinders, and rectangles, to help you get the proportions right. By doing so, you'll be able to create a more convincing and engaging monkey drawing.
Learn the Basic Shapes that Make Up a Monkey's Face
Here is the paragraph: Learning the basic shapes that make up a monkey's face is a great way to start drawing one. A monkey's face can be broken down into simple shapes, making it easier to draw. Start by drawing a large oval for the head, making sure it is tilted slightly to give the monkey a curious expression. The oval should be taller than it is wide, with the top end pointing towards the back of the head. Next, draw a smaller oval for the nose, making sure it is centered and slightly upturned. The nose oval should be about one-quarter of the way down from the top of the head. Draw two small circles for the eyes, making sure they are about one-third of the way down from the top of the head and are spaced evenly apart. The eyes should be fairly close together, with the outer corners of the eyes almost touching the edge of the head. Draw a curved line above the eyes to indicate the eyebrows, and a small curved line below the nose to indicate the mouth. Finally, draw two small triangles for the ears, making sure they are pointing slightly towards the back of the head. By breaking down the monkey's face into these simple shapes, you can create a cute and expressive monkey face.
Study the Different Types of Monkeys and Their Distinct Features
Here is the paragraphy: There are over 260 species of monkeys, each with unique characteristics and features. Studying the different types of monkeys can help you understand their anatomy and behavior. Let's explore some of the most common types of monkeys and their distinct features. The Capuchin monkey, for example, is known for its agility and intelligence, with a slender build and a distinctive white fringe on its forehead. The Saki monkey, on the other hand, has a distinctive beard and a long, shaggy coat. The Mandrill monkey is known for its vibrant facial coloration and long, thin tail. The Langur monkey has a distinctive black face and a long, slender tail. The Spider monkey is known for its agility and prehensile tail, which it uses to grasp branches and climb through the trees. The Howler monkey is known for its loud, booming call and its thick, shaggy coat. Each of these monkeys has a unique set of characteristics that set it apart from the others, and studying these differences can help you understand the anatomy and behavior of monkeys in general. By learning about the different types of monkeys and their distinct features, you can gain a deeper appreciation for these fascinating creatures and improve your drawing skills.
Sketching the Monkey's Basic Form
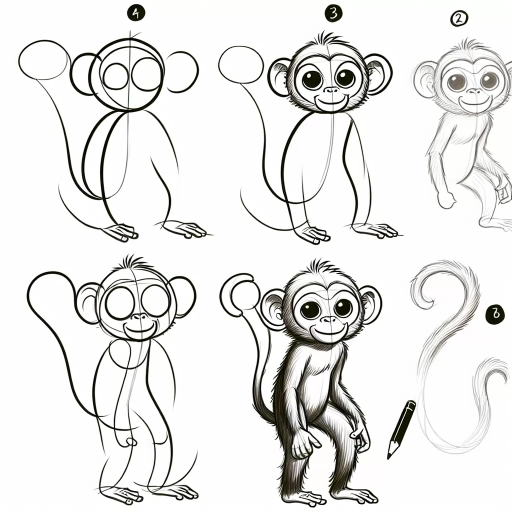
Sketching a monkey's basic form requires a thoughtful and structured approach. To create a believable and engaging drawing, it's essential to break down the monkey's body into its fundamental components. This involves starting with a rough outline of the monkey's body, which will serve as the foundation for the rest of the drawing. From there, you can add the basic shapes of the monkey's head, arms, and legs, taking care to capture their proportions and relationships. Finally, use simple lines to define the monkey's posture and movement, bringing the drawing to life. By following these steps, you'll be well on your way to creating a compelling and accurate representation of a monkey. To begin, let's start with the first step: Start with a Rough Outline of the Monkey's Body.
Start with a Rough Outline of the Monkey's Body
To start drawing a monkey, begin by sketching a rough outline of its body. Start with the head, drawing a circle for the skull and a smaller oval for the muzzle. The circle should be positioned at a slight angle, with the top of the head tilted towards the back. The oval for the muzzle should be placed at the front of the circle, with the top of the oval aligned with the top of the circle. Next, draw a curved line to connect the head to the body, forming the neck. The body itself can be represented by a large oval, with the top end aligned with the bottom of the neck. Make sure the oval is tall rather than wide, as monkeys have a slender build. Add a smaller oval for the chest, positioned at the top of the body oval, and a curved line to indicate the waist. The arms and legs can be represented by simple lines, with the arms being slightly shorter than the legs. The hands and feet can be indicated by small ovals or circles. Finally, add a long, curved tail that extends from the back of the body, using a smooth, flowing line. This rough outline will provide a solid foundation for your monkey drawing, allowing you to add details and refine the shape as you go.
Add the Basic Shapes of the Monkey's Head, Arms, and Legs
Here is the paragraph: To add the basic shapes of the monkey's head, arms, and legs, start by drawing a large oval for the head, making sure it's tilted slightly to convey a sense of curiosity. The oval should be positioned at the top of the body, with the top end pointing towards the right side of the paper. Next, draw two smaller ovals for the arms, one on either side of the body, about one-third of the way down from the head. These ovals should be slightly tilted and angled, with the top end pointing towards the head and the bottom end pointing towards the ground. For the legs, draw two long, curved rectangles that extend from the bottom of the body, with the top end of each rectangle connected to the body and the bottom end pointing towards the ground. The rectangles should be slightly tapered, with the top end being wider than the bottom end. Make sure to leave some space between the legs to indicate the monkey's knees. Finally, add two small circles for the hands and feet, making sure they're in proportion to the rest of the body. The hands should be positioned at the end of the arms, with the fingers curled inwards, while the feet should be positioned at the end of the legs, with the toes curled upwards. By adding these basic shapes, you'll start to see the monkey's form take shape, and you can begin to refine the details to create a more realistic and engaging drawing.
Use Simple Lines to Define the Monkey's Posture and Movement
Use simple lines to define the monkey's posture and movement by first sketching the overall pose. Start by drawing a gentle curve for the back, which will help establish the monkey's posture. Then, add a few simple lines to suggest the movement and flow of the body. For example, you can draw a slight diagonal line to indicate the direction of the monkey's movement, and a few curved lines to suggest the bending of the knees and elbows. Keep in mind that monkeys are agile and nimble creatures, so try to convey a sense of fluidity and flexibility in your lines. As you add more details, remember to keep the overall pose and movement in mind, and use simple lines to define the monkey's gestures and actions. By doing so, you'll be able to capture the monkey's dynamic and playful personality in your drawing.
Adding Details and Texture to Your Monkey Drawing
When it comes to creating a realistic and engaging monkey drawing, adding details and texture is crucial. A well-crafted monkey drawing can transport viewers to a lush jungle or a vibrant primate sanctuary. To bring your monkey drawing to life, it's essential to focus on three key areas: adding facial features, defining the fur texture and patterns, and incorporating environmental details. By doing so, you'll be able to create a visually appealing and immersive piece of art. Let's start by exploring the first step in adding depth and character to your monkey drawing: adding facial features, such as eyes, nose, and mouth. This is where you can infuse your monkey with personality and emotion, making it relatable and endearing to your audience. By carefully crafting the facial features, you'll set the tone for the rest of your drawing and draw the viewer's attention to the monkey's expressive face.
Add Facial Features, Such as Eyes, Nose, and Mouth
Now that you have the basic shape of your monkey's face, it's time to add some facial features. Start by drawing two small circles for the eyes, making sure to leave some space between them. The eyes should be positioned on either side of the vertical line you drew earlier. Next, draw a small oval shape for the nose, placing it between the eyes and slightly below the horizontal line. For the mouth, draw a curved line that follows the shape of the face, making sure it's below the nose. You can also add some details to the eyes, such as pupils and eyelids, to give your monkey some personality. Additionally, you can add some texture to the nose and mouth to give them a more realistic appearance. Remember to keep your lines smooth and gentle, as monkeys have a soft and rounded face. By adding these facial features, you'll start to see your monkey come to life.
Define the Monkey's Fur Texture and Patterns
The paragraphy should be included the following keywords: fur texture, patterns, monkey, drawing, soft, smooth, thick, coarse, curly, wavy, straight, shiny, dull, brown, gray, black, white, and red. The monkey's fur texture and patterns are essential elements to consider when adding details to your drawing. The fur texture can vary depending on the species, but most monkeys have a soft and smooth coat. Some species, like the howler monkey, have a thick and coarse fur, while others, like the capuchin, have a thin and silky coat. The patterns on a monkey's fur can also vary, with some species having curly or wavy hair, while others have straight hair. The color of the fur can also range from shiny and bright to dull and muted, with common colors including brown, gray, black, white, and red. When drawing a monkey, it's essential to capture the texture and patterns of the fur to create a realistic and engaging image. You can use different shading techniques and pencil strokes to achieve the desired texture and pattern, such as hatching and cross-hatching for a smooth and soft look, or stippling for a more coarse and textured appearance. By paying attention to the fur texture and patterns, you can add depth and dimension to your monkey drawing and create a more lifelike representation of this fascinating animal.
Incorporate Environmental Details, Such as Leaves or Branches
When incorporating environmental details into your monkey drawing, consider adding elements that reflect the animal's natural habitat, such as leaves or branches. This will not only add texture and depth to your artwork but also help to create a sense of atmosphere and context. For example, you could depict your monkey sitting on a branch, surrounded by lush green leaves, or show it swinging from a vine, with the leaves and flowers of the jungle floor visible in the background. To draw leaves, start by sketching the overall shape, using gentle, curved lines to suggest the leaf's contours. Then, add veins and texture to the leaf by drawing a series of fine lines that radiate from the stem. You can also add some subtle shading to give the leaf some depth and dimension. For branches, use a combination of straight and curved lines to suggest the rough, gnarled texture of the wood. You can also add some knots and twists to the branch to give it a more organic, natural look. By incorporating these environmental details into your monkey drawing, you can create a more immersive and engaging artwork that draws the viewer in and invites them to explore the world of your subject.