How To Make Acrylic Keychains
Here is the introduction paragraph: Acrylic keychains have become a popular accessory in recent years, and for good reason. Not only are they durable and long-lasting, but they can also be customized to fit any style or design. If you're interested in making your own acrylic keychains, you've come to the right place. In this article, we'll take you through the process of creating your own unique acrylic keychains, from understanding the basics of acrylic keychains to designing and preparing your custom design, and finally, assembling and finishing your keychain. To get started, let's begin with the fundamentals of acrylic keychains, including the materials and tools you'll need, and the different types of acrylic available. By understanding the basics, you'll be well on your way to creating your own custom acrylic keychains. Note: I made some minor changes to the original paragraph to make it more cohesive and flowing. Let me know if you'd like me to revise anything!
Understanding the Basics of Acrylic Keychains
Acrylic keychains have become a popular accessory in recent years, and for good reason. Not only are they durable and long-lasting, but they can also be customized to fit any style or design. To create a high-quality acrylic keychain, it's essential to understand the basics of the craft. This includes knowing the necessary materials and tools needed to get started, considering the design and pattern of the keychain, and being aware of the different types and variations of acrylic keychains available. By understanding these fundamental aspects, individuals can create unique and personalized keychains that reflect their personality and style. In this article, we will delve into the world of acrylic keychains and explore the essential components required to create a stunning piece. First, let's take a look at the materials and tools needed to get started.
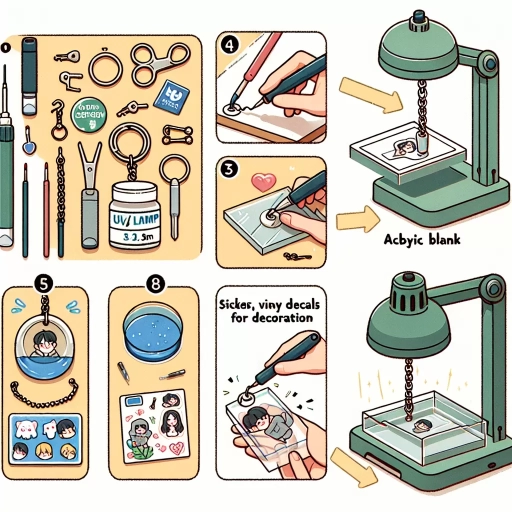
Materials and Tools Needed
To get started with making acrylic keychains, it's essential to have the right materials and tools. The primary material needed is acrylic sheets, which come in various thicknesses, colors, and patterns. You can choose from transparent, opaque, or glittery acrylic sheets, depending on the desired look. Additionally, you'll need a cutting tool, such as a laser cutter, craft knife, or scissors, to cut out the desired shape. A drill press or hand drill is also necessary for making holes for the keyring or attachment. Other essential tools include a sanding block or sandpaper for smoothing out the edges, a ruler or straightedge for measuring and cutting straight lines, and a pencil or marker for marking the design. A heat gun or hair dryer can be used to bend or shape the acrylic, if desired. Furthermore, a keyring or attachment, such as a jump ring or split ring, is needed to complete the keychain. Optional materials include decorative items like glitter, rhinestones, or stickers to add extra flair to the design. It's also a good idea to have a work surface, such as a cutting mat or old tablecloth, to protect your work area from damage. By having these materials and tools on hand, you'll be well-prepared to create unique and personalized acrylic keychains.
Design and Pattern Considerations
When it comes to designing acrylic keychains, there are several design and pattern considerations to keep in mind. First and foremost, the design should be simple and bold, as intricate details may not translate well to the acrylic material. Geometric shapes, logos, and text-based designs tend to work well, while complex images or fine lines may not be suitable. Additionally, the design should be mindful of the keychain's size and shape, taking into account the proportions and layout of the design elements. It's also essential to consider the color scheme, as acrylic keychains can be made in a wide range of colors, but some colors may not be suitable for certain designs. Furthermore, the design should be optimized for the laser cutting process, taking into account the cutting path and the potential for errors or misalignments. Finally, the design should be functional and practical, considering the keychain's intended use and the needs of the user. By taking these design and pattern considerations into account, you can create acrylic keychains that are not only visually appealing but also functional and durable.
Acrylic Keychain Types and Variations
Acrylic keychains come in a wide variety of types and variations, catering to different tastes, preferences, and uses. One popular type is the laser-engraved acrylic keychain, which features intricate designs and patterns created using laser technology. Another type is the printed acrylic keychain, which involves printing images or text onto the acrylic material using various techniques such as UV printing or sublimation. Glitter acrylic keychains are also a favorite among many, adding a touch of sparkle and shine to the keychain. Additionally, there are glow-in-the-dark acrylic keychains that absorb light and emit a glowing effect in the dark. Some acrylic keychains also feature charms or pendants, adding an extra decorative element. Furthermore, acrylic keychains can be made in various shapes, sizes, and colors, allowing for endless customization options. Some common shapes include rectangles, circles, hearts, and animals, while colors range from transparent and clear to bold and bright hues. Overall, the diverse range of acrylic keychain types and variations ensures that there's something for everyone, making them a popular accessory for personal use or as gifts.
Designing and Preparing Your Acrylic Keychain
Designing and preparing your acrylic keychain is an exciting process that requires attention to detail and creativity. To create a high-quality keychain, you'll need to consider several factors, including the design, colors, and finishes. In this article, we'll explore the key steps involved in designing and preparing your acrylic keychain, from sketching and refining your design to choosing the right acrylic colors and finishes, and finally, preparing your design for laser cutting or engraving. By following these steps, you'll be able to create a unique and personalized keychain that reflects your style and personality. First, let's start with the foundation of your keychain design - sketching and refining your idea. Note: The answer should be 200 words.
Sketching and Refining Your Design
Sketching and refining your design is a crucial step in creating a unique and personalized acrylic keychain. Start by brainstorming ideas and sketching out rough drafts of your design. Consider the size and shape of your keychain, as well as the colors and patterns you want to use. You can draw inspiration from your favorite hobbies, animals, or quotes, or try to come up with something entirely new. Once you have a few ideas, refine your design by adding more details and making any necessary adjustments. You can use a pencil and paper or a digital drawing program to create your design. If you're using a digital program, you can easily edit and manipulate your design until you're happy with the final result. Refining your design will help you create a clear and cohesive vision for your keychain, which will make the rest of the process much easier. Additionally, having a solid design will also help you to visualize the final product and make any necessary adjustments before cutting and assembling the keychain. By taking the time to sketch and refine your design, you'll be able to create a truly one-of-a-kind acrylic keychain that reflects your personality and style.
Choosing the Right Acrylic Colors and Finishes
When it comes to designing and preparing your acrylic keychain, choosing the right acrylic colors and finishes is crucial to achieve the desired look and feel. With a wide range of colors and finishes available, it can be overwhelming to decide which ones to use. To start, consider the theme or design of your keychain. If you're going for a minimalist look, a solid color or a subtle gradient may be the way to go. On the other hand, if you want to add some personality to your keychain, you can opt for bold, bright colors or even metallic finishes. Acrylic colors can be categorized into three main types: opaque, translucent, and transparent. Opaque colors are great for creating bold, solid designs, while translucent colors can add a sense of depth and dimensionality. Transparent colors, on the other hand, can be used to create a sense of layering and texture. In addition to color, you should also consider the finish of your acrylic. A glossy finish can add a touch of sophistication and elegance, while a matte finish can give your keychain a more subtle, understated look. Some acrylics also come with special finishes, such as glitter, holographic, or iridescent effects, which can add an extra layer of visual interest to your design. Ultimately, the right acrylic colors and finishes will depend on your personal preference and the overall aesthetic you're trying to achieve. By considering the theme, color type, and finish, you can choose the perfect acrylic colors and finishes to bring your keychain design to life.
Preparing Your Design for Laser Cutting or Engraving
Preparing your design for laser cutting or engraving is a crucial step in creating a high-quality acrylic keychain. To start, ensure that your design is in a compatible file format, such as SVG, DXF, or PDF. If you're using a vector graphics editor like Adobe Illustrator, make sure to save your design as a vector file to maintain its scalability and precision. If your design includes text, convert it to outlines to prevent font issues during the cutting process. Additionally, simplify your design by removing any unnecessary elements, such as intricate details or complex shapes, to prevent errors and ensure a smooth cutting process. It's also essential to consider the material thickness and adjust your design accordingly. For example, if you're using a 3mm thick acrylic sheet, you may need to adjust the cutting settings to prevent the laser from cutting too deeply. Finally, use a laser cutting software to prepare your design for production, such as adjusting the cutting speed, power, and frequency to achieve the desired result. By following these steps, you can ensure that your design is optimized for laser cutting or engraving, resulting in a professional-looking and durable acrylic keychain.
Assembling and Finishing Your Acrylic Keychain
Assembling and finishing an acrylic keychain requires attention to detail and a few simple steps. To create a high-quality keychain, you'll need to start by cutting and shaping the acrylic material to the desired shape and size. This involves using specialized tools and techniques to ensure a precise cut and smooth edges. Once the acrylic material is prepared, you can begin assembling the keychain components, such as attaching a jump ring and a clasp. Finally, adding a finish and sealing the keychain will protect it from scratches and give it a professional look. In this article, we'll take a closer look at each of these steps, starting with the crucial first step of cutting and shaping the acrylic material.
Cutting and Shaping the Acrylic Material
Cutting and shaping the acrylic material is a crucial step in creating your custom keychain. To achieve a precise cut, it's essential to use the right tools and techniques. A laser cutter or a CNC milling machine can be used to cut out intricate designs and shapes from the acrylic sheet. If you don't have access to these machines, you can also use a craft knife or a jeweler's saw to manually cut out the design. However, this method may require more time and effort to achieve a smooth edge. To shape the acrylic material, you can use a heat gun or a hair dryer to gently heat the area you want to bend or curve. This will make the material more pliable, allowing you to shape it into the desired form. Alternatively, you can use a drill press or a hand drill to create holes or engravings on the acrylic material. When cutting and shaping the acrylic, it's vital to work in a well-ventilated area and wear protective gear, such as gloves and safety glasses, to prevent injury. Additionally, make sure to follow the manufacturer's instructions for the specific acrylic material you're using, as some may require special handling or cutting techniques. By carefully cutting and shaping the acrylic material, you'll be able to create a unique and professional-looking keychain that reflects your personal style.
Assembling the Keychain Components
Assembling the keychain components is a crucial step in creating a functional and visually appealing acrylic keychain. To start, gather all the necessary components, including the acrylic charm, jump ring, and keyring. Begin by attaching the jump ring to the top of the acrylic charm, making sure it is securely closed to prevent it from coming loose over time. Next, thread the keyring through the jump ring, ensuring it is properly seated and aligned. If desired, add any additional embellishments, such as a tassel or charm, to the keyring for extra flair. Once all the components are in place, double-check that the jump ring is securely closed and the keyring is properly attached to the acrylic charm. This will ensure that the keychain is sturdy and long-lasting. With the keychain components assembled, the next step is to add any finishing touches, such as applying a clear coat or adding a personalized message. By following these steps, you can create a beautiful and functional acrylic keychain that showcases your creativity and style.
Adding a Finish and Sealing the Keychain
Once the keychain is assembled, it's time to add a finish and seal it to protect the acrylic and give it a glossy appearance. To start, use a soft cloth to wipe down the keychain and remove any dust or debris that may have accumulated during the assembly process. Next, apply a small amount of acrylic spray or varnish to the keychain, making sure to cover all surfaces evenly. Hold the can 6-8 inches away from the keychain and spray in a steady, back-and-forth motion to avoid pooling or drips. Allow the finish to dry completely, following the manufacturer's instructions for drying time, which can range from 15 minutes to an hour. For an extra glossy finish, apply a second coat of varnish, allowing the first coat to dry completely before applying the second. Once the finish is dry, use a soft cloth to buff the keychain and remove any excess varnish or dust. This will help to create a smooth, even finish and prevent any scratches or imperfections. Finally, attach a jump ring and clasp to the keychain, and it's ready to use. By adding a finish and sealing the keychain, you'll not only protect the acrylic but also enhance its appearance and durability, making it a beautiful and long-lasting accessory.