How To Draw A Landscape
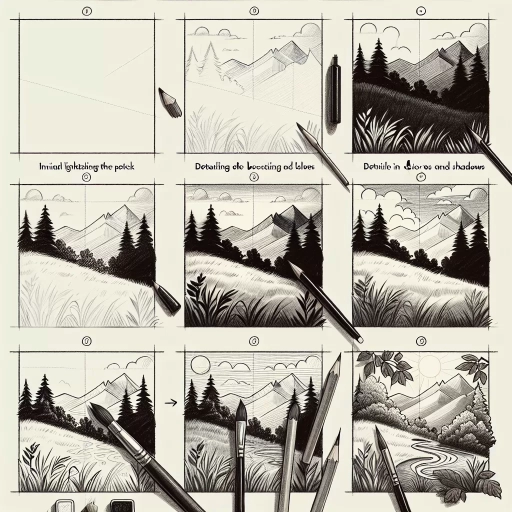
Drawing a landscape can be a daunting task, especially for beginners. However, with the right techniques and a little practice, anyone can create a beautiful and realistic landscape. To get started, it's essential to understand the basics of landscape drawing, including perspective, proportion, and composition. Once you have a solid foundation, you can begin sketching and planning your landscape, considering the placement of elements such as mountains, trees, and water. Finally, adding details and finishing touches can bring your landscape to life, from the texture of tree bark to the sparkle of sunlight on water. In this article, we'll explore these three key aspects of landscape drawing, starting with the fundamentals. Understanding the basics of landscape drawing is crucial to creating a realistic and visually appealing landscape, and it's where we'll begin our journey.
Understanding the Basics of Landscape Drawing
Landscape drawing is a fascinating art form that requires a combination of technical skills and creative vision. To create a beautiful and realistic landscape drawing, it's essential to understand the basics of the craft. This involves familiarizing yourself with different landscape elements, such as mountains, trees, and water, and learning how to accurately depict them on paper. Additionally, mastering basic drawing techniques and tools, such as perspective, proportion, and shading, is crucial for creating a convincing and engaging landscape drawing. Furthermore, understanding perspective and proportion is vital for creating a sense of depth and distance in your drawing. By grasping these fundamental concepts, you'll be well on your way to creating stunning landscape drawings that capture the beauty of the natural world. So, let's start by exploring the different landscape elements that you can include in your drawings.
Familiarizing Yourself with Different Landscape Elements
When it comes to drawing a landscape, it's essential to familiarize yourself with the different elements that make up a scene. This includes understanding the various types of terrain, such as hills, mountains, valleys, and plains. You should also be aware of the different types of vegetation, including trees, bushes, and flowers, as well as the various types of water features, such as rivers, lakes, and oceans. Additionally, you should consider the different types of man-made structures, such as buildings, roads, and bridges, that can be included in a landscape. By understanding these different elements, you can create a more detailed and realistic landscape drawing. It's also important to consider the time of day and the lighting, as this can greatly impact the mood and atmosphere of your drawing. For example, a landscape drawn during the golden hour, just before sunset, can create a warm and peaceful atmosphere, while a landscape drawn during the middle of the day can create a bright and vibrant atmosphere. By considering these different elements and factors, you can create a landscape drawing that is not only visually appealing but also tells a story and evokes a sense of place.
Learning Basic Drawing Techniques and Tools
Learning basic drawing techniques and tools is essential for creating a beautiful landscape drawing. To start, it's crucial to understand the different types of lines, including hatching, cross-hatching, stippling, and gesture drawing. Hatching involves creating parallel lines that follow the contours of the subject, while cross-hatching involves layering hatching lines at different angles to create depth and texture. Stippling involves creating an image using small dots, and gesture drawing involves quickly sketching the overall pose and movement of the subject. In addition to understanding different line techniques, it's also important to familiarize yourself with various drawing tools, such as pencils, charcoal, and pastels. Graphite pencils, for example, are great for creating detailed, realistic drawings, while charcoal is better suited for expressive, gestural drawings. Pastels, on the other hand, are ideal for creating soft, delicate washes of color. By mastering these basic techniques and tools, you'll be well on your way to creating stunning landscape drawings that capture the beauty of the natural world.
Understanding Perspective and Proportion
Understanding perspective and proportion is crucial in creating a realistic and visually appealing landscape drawing. Perspective refers to the way objects appear to shrink and converge as they recede into the distance, while proportion refers to the relationship between the size and scale of different elements in the drawing. To achieve a sense of depth and distance, artists use various techniques such as linear perspective, atmospheric perspective, and overlapping. Linear perspective involves creating a horizon line and vanishing points to create a sense of depth, while atmospheric perspective involves using color and contrast to create a sense of distance. Overlapping involves placing objects in front of each other to create a sense of layering and depth. By mastering these techniques, artists can create a sense of space and distance in their landscape drawings, drawing the viewer's eye into the scene. Additionally, understanding proportion is essential in creating a believable and balanced composition. Artists must consider the scale and size of different elements, such as trees, buildings, and mountains, to create a harmonious and visually appealing drawing. By paying attention to perspective and proportion, artists can create a landscape drawing that is not only visually stunning but also realistic and engaging.
Sketching and Planning Your Landscape
Sketching and planning your landscape is a crucial step in creating a beautiful and harmonious outdoor space. Before breaking ground, it's essential to visualize your composition, plan the layout and balance of your landscape, and choose a reference image or real-life observation to guide your design. By taking the time to sketch and plan, you can ensure that your landscape turns out exactly as you envision it. One of the first steps in this process is creating a thumbnail sketch to visualize your composition. This involves quickly sketching out a small, rough outline of your landscape design, considering the placement of key elements such as plants, hardscapes, and water features. By doing so, you can get a sense of the overall flow and balance of your landscape, and make any necessary adjustments before moving forward with your design. Note: The answer should be 200 words.
Creating a Thumbnail Sketch to Visualize Your Composition
When creating a thumbnail sketch to visualize your composition, start by using a small piece of paper, typically around 2-3 inches square. This will help you to focus on the overall structure and balance of your landscape, rather than getting bogged down in details. Begin by lightly sketching the horizon line, which will serve as the foundation of your composition. Next, block in the largest elements of your landscape, such as mountains, trees, or buildings, using simple shapes and lines. Don't worry too much about proportions or accuracy at this stage – the goal is to get a sense of the overall layout and balance of your composition. As you continue to sketch, pay attention to the negative space around and between your elements, as this will help to create a sense of depth and atmosphere in your landscape. You may also want to experiment with different arrangements of your elements, or try out different horizon lines to see how they affect the overall mood and feel of your composition. By creating a thumbnail sketch, you'll be able to quickly and easily visualize your composition, make any necessary adjustments, and ensure that your final piece is well-balanced and visually appealing.
Planning the Layout and Balance of Your Landscape
When planning the layout and balance of your landscape, it's essential to consider the overall aesthetic you want to achieve. Start by thinking about the style and theme of your landscape, whether it's modern, traditional, or a mix of both. Consider the colors, textures, and shapes you want to incorporate, as well as the scale and proportion of the different elements. A well-balanced landscape should have a mix of visual weights, such as large trees, small shrubs, and decorative features like ponds or statues. Balance can be achieved through symmetry, asymmetry, or a combination of both. Symmetry involves creating a mirror image on either side of a central axis, while asymmetry involves creating a sense of balance through the use of different elements. Consider the rule of thirds, where you divide your landscape into thirds both horizontally and vertically, and place important elements along those lines. This will help create a sense of balance and harmony. Additionally, think about the flow of your landscape, how you want people to move through it, and what you want to draw their attention to. Consider the use of paths, walkways, and other hardscaping elements to create a sense of movement and flow. Finally, don't forget to consider the maintenance and upkeep of your landscape, and plan accordingly. By taking the time to plan the layout and balance of your landscape, you can create a beautiful and functional outdoor space that you'll enjoy for years to come.
Choosing a Reference Image or Real-Life Observation
When choosing a reference image or real-life observation for your landscape drawing, it's essential to consider several factors to ensure you capture the essence of the scene. First, look for a reference that inspires you, whether it's a photograph, a real-life view, or a combination of both. Consider the time of day, weather conditions, and season, as these elements can greatly impact the mood and atmosphere of your drawing. If using a photograph, choose one with good lighting and clear details, avoiding images with harsh shadows or overly complex compositions. If observing real-life, take note of the colors, textures, and patterns of the natural world, and try to capture the fleeting effects of light and atmosphere. Additionally, consider the scale and composition of your reference, ensuring it will translate well to your drawing surface. A well-chosen reference image or real-life observation will serve as a solid foundation for your landscape drawing, allowing you to create a piece that is both visually appealing and true to the natural world.
Adding Details and Finishing Touches
When it comes to adding details and finishing touches to your landscape drawing, there are several key elements to consider. One of the most important aspects is incorporating texture and pattern into your landscape, which can add depth and visual interest to your drawing. Additionally, adding atmospheric effects and lighting can help to create a sense of mood and atmosphere, drawing the viewer's eye into the scene. Finally, refining your drawing with shading and highlights can help to create a sense of volume and dimensionality, making your landscape feel more realistic and immersive. By incorporating these elements, you can take your landscape drawing to the next level and create a truly stunning piece of art. So, let's start by exploring how to incorporate texture and pattern into your landscape.
Incorporating Texture and Pattern into Your Landscape
Incorporating texture and pattern into your landscape drawing can add depth, visual interest, and a sense of realism. To achieve this, start by observing the natural world and taking note of the different textures and patterns that occur in various landscapes. For example, the rough bark of trees, the smoothness of rocks, and the intricate patterns of leaves and flowers. You can then use a range of techniques to capture these textures and patterns in your drawing, such as hatching, cross-hatching, stippling, and scraffito. Hatching involves creating a series of closely spaced parallel lines that follow the contours of the subject, while cross-hatching involves layering hatching lines at different angles to create a more textured appearance. Stippling involves creating an image using small dots, which can be used to create detailed, high-contrast textures. Scraffito, on the other hand, involves scratching lines into a surface to create a rough, tactile texture. By incorporating these techniques into your landscape drawing, you can create a more engaging and immersive experience for the viewer. Additionally, you can also use different materials and tools, such as charcoal, pastels, and colored pencils, to add texture and pattern to your drawing. For example, using a rough charcoal pencil can create a textured, expressive line, while using a smooth pastel can create a soft, blended appearance. By experimenting with different techniques and materials, you can add a new level of depth and visual interest to your landscape drawing.
Adding Atmospheric Effects and Lighting
Adding atmospheric effects and lighting can elevate your landscape drawing to the next level. To create a sense of depth and dimension, consider adding mist, fog, or haze to the background of your drawing. This can be achieved by using soft, gentle strokes with a pencil or charcoal, gradually fading the lines into the distance. You can also use a blending stump or tortillon to smooth out the edges and create a soft, ethereal effect. To add lighting to your drawing, consider the time of day and the direction of the sun. Warm colors such as orange and yellow can be used to create a sense of sunlight, while cool colors such as blue and purple can be used to create a sense of shade. You can also use highlights and shadows to create a sense of volume and texture, adding depth and interest to your drawing. Additionally, consider adding atmospheric effects such as sunbeams, clouds, or stars to add a sense of drama and atmosphere to your landscape. By carefully balancing light and dark, warm and cool, you can create a sense of mood and atmosphere in your drawing, drawing the viewer in and inviting them to explore the world you have created.
Refining Your Drawing with Shading and Highlights
Refining your drawing with shading and highlights is a crucial step in adding depth and dimension to your landscape artwork. Shading involves creating areas of darkness and lightness to give the illusion of three-dimensionality, while highlights are used to accentuate the brightest areas of the drawing. To refine your drawing with shading and highlights, start by identifying the light source in your landscape. This will help you determine where the shadows and highlights should fall. Use a range of shading techniques, such as hatching, cross-hatching, and stippling, to create a sense of volume and texture in your drawing. Pay attention to the edges of your shapes, as soft edges can create a sense of atmosphere and distance, while hard edges can define the contours of your forms. When adding highlights, use a small brush or a sharp pencil to create small, delicate marks that suggest the brightest areas of the drawing. Be careful not to overdo it, as too many highlights can make your drawing look overly dramatic or even cartoonish. Instead, use highlights sparingly to draw the viewer's eye to the most important areas of the composition. By refining your drawing with shading and highlights, you can create a sense of depth and dimension that draws the viewer in and invites them to explore the world of your landscape.