How To Play F Chord On Guitar
 Fear not the dreaded F chord any longer! This highly informative and engaging piece will have you navigating your guitar neck with ease, and mastering an essential tool in your musical arsenal - the F chord. We will take an enlightening journey through three constructive stages. Initially, we will delve into 'Understanding the F Chord Basics', offering a solid foundation of knowledge about the chord's structure and use. Following this, we will progress into 'Mastering the F Chord Technique', providing actionable strategies to help you execute this chord fluently. Finally, we will tackle 'Overcoming Common Challenges with the F Chord', filtering through typical difficulties faced by learners and discussing effective solutions. By the end of this article, the F chord will be a breeze. So without further ado, let's first get our fingers familiar with the fundamentals by understanding the basics of the F chord.
Understanding the F Chord Basics
Music, irrespective of its genre, has a very profound impact on our lives. It can provoke emotions, memories and even ignite inspiration. The ability to play an instrument, like the guitar, offers an individual the power to create this type of art. One such crucial component when it comes to mastering the guitar is understanding the nuts and bolts of various chords, such as the notable F Chord. The F Chord is considered to be one of the harder ones for beginners to grasp due to its unique form and fretting style. To get a grip on it, one must navigate through three primary stages: Familiarizing with the F Chord Shape, Knowing the F Chord Formula, and finally, expanding your knowledge to Understanding the F Chord Variations. Initially, it's all about getting comfortable with the F Chord shape. This specific chord shape requires a certain hand position and correct finger placement which, with continuous practice, can eventually flow effortlessly under your fingertips. Dive with us into the intriguing world of the F Chord to put the first piece of this vast musical puzzle into place.
1. Familiarizing with the F Chord Shape
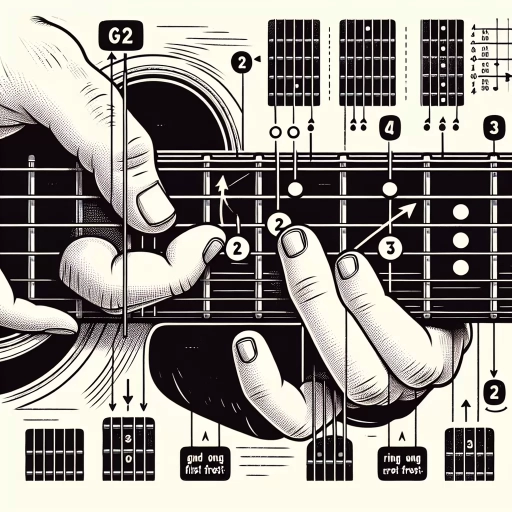
One of the most critical steps in mastering how to play the F chord on a guitar is understanding and becoming familiar with the F chord shape. This chord, often considered one of the most challenging for beginners, has a unique pattern that distinguishes it from others. Unlike the more straightforward chord shapes, which usually include open playing, the F Chord, also known as the "barre" chord, requires pressing down more than one string with a single finger. This intricate and rather unusual shape is what gives the F chord its rich, powerful sound but also what contributes to its difficulty. Diagramming the F chord consists of six vertical lines, each representing the six strings of the guitar from left to right. The thickest string, the sixth, is denoted by the line on the far left, while the thinnest, the first, is the line on the extreme right. Each horizontal line corresponds with the fret on the guitar. A finger position is indicated by a number on these lines, with “1” representing the index finger, “2” the middle, “3” the ring, and “4” the pinky. In classical position, the F chord features the index finger pressing down on all of the strings at the first fret, forming a "barre." By doing so, the index finger serves as a movable nut that can slide up and down the neck, changing the chord pitch in a way a capo does. The middle finger presses down on the third string at the second fret, the ring finger on the fifth string at the third fret, and the pinky finger on the fourth string also at the third fret. When understood well, the shape of the F chord can assist in creating a firm foundation for advancing to different chord shapes and musical styles. It becomes a powerful and versatile tool in your guitar playing repertoire. Furthermore, the F chord is the gateway to something even greater: full barre chord mastery. Exploring the F chord shape is more than just a technical process. It's an invitation to understand a significant aspect of music theory, chord progression, and ultimately guitar mastery. Engagement and persistence in familiarizing with this shape can have a significant long-term payoff for any aspiring guitar player. Despite being challenging, with regular practice, patience, and determination, you will find your fingers naturally falling into place, and the once daunting F chord shape will become second nature. Remember that every chord has its unique shape and sound, and all are interconnected. Your ability to play the F chord opens a wealth of other chords and scales in your repertoire as a guitarist. The more you familiarize yourself with its form and functions, the more you will realize its vital role in making your music more vibrant and harmonically rich. So, grab your guitar, practice those finger positions, and let your musical journey reach new heights with the F chord shape.
2. Knowing the F Chord Formula
The F chord is an integral part of many songs, and knowing its formula becomes incredibly essential for playing guitar. As a supporting piece to the 'Understanding the F Chord Basics', it's crucial to understand the underlying structure of the chord. The F chord formula involves three principal notes: F (the root), A (the major third), and C (the perfect fifth), coming together to create its unique sound. The F chord, like other major chords in music theory, follows a specific pattern. It starts with the root note (F), followed by the major third (A), which is four semitones above F, and finally, the perfect fifth (C), which is seven semitones above F. This 4:3 ratio in musical intervals creates that distinctive major chord ‘happiness’ that complements numerous tunes. Notably, the F chord is considered a bar chord. In simple terms, a barre or bar chord involves using a single finger to press down multiple strings simultaneously. For the F chord, this typically involves barring all the strings on the first fret with the index finger and using the other fingers to play the remaining notes on the E, A, D, G, B, and e strings. This layout may initially bring a few difficulties, especially for beginners, due to the strength and precision demanded by barring. But, with consistent practice, the transitions become smoother and faster. Grasping the formula is a stepping stone to mastering the F chord and is a necessary element for moving towards more complex fingerings and chord progressions. By consistently practicing this chord by adhering to its formula, you’ll soon be able to add every variation of the F chord to your repertoire, whether open, barred, or as power chords. Moreover, understanding this theory can give you insight into the construction of other major chords as well. This foundational knowledge can make you a versatile guitarist, able to interpret and adapt various chords. If you can master the F chord formula, you can readily apply the same principles to other chords, thereby enhancing your proficiency. In conclusion, knowing the F chord formula is more than merely learning how to position your fingers on the fretboard. It's about understanding the reason behind the layout, developing the muscle memory, and growing as a musician. Similarly, the more you familiarize yourself with its intricacies, the more comfortable you will be in manipulating the F chord, creating unique renditions of songs, and eventually composing your own tunes.
3. Understanding the F Chord Variations
Understanding the F Chord Variations is an integral part of mastering the F chord on the guitar. After you've become adept at playing the basic F chord, you can proceed to explore its variations. Three important variations worth mentioning are the F Major 7, F7, and F minor. The F Major 7 chord portrays a jazzy sound and offers a rich harmonic tone. To play this chord, position your index finger across the B and high E strings at the first fret. Ensure your second finger is on the second fret of the G string and your third finger on the third fret of the D string. Then strum the bottom four strings. The F7 chord, implying an F dominant 7, adds a soulful bluesy vibe to music. To play this, position your index finger as you would when playing a basic F chord. However, the second finger should be on the second fret of the G string, the third on the third fret of the A string, and your pinky on the third fret of the G string to get that seventh note in there. Now you can strum all the strings except the low E. The last important variant is the F minor chord, which carries an emotive and somber tone. To play an F minor, bar the first fret with your index finger covering all the strings. Your ring and pinky fingers should be on the third fret of the A and D strings respectively. Strum all the strings to make this chord. In conclusion, understanding the F chord variations not only broadens your chord knowledge but also expands your creative capabilities on the guitar. It allows you to provide a richer tonal variety and depth to your musical pieces. It is worth noting that the efficiency and ease of transition among these chords increase with practice, so keep strumming and experimenting with these variations.
Mastering the F Chord Technique
of a proficient guitarist's abilities is a thorough understanding of chord structures, and few are as challenging yet important as the F chord. Mastering the F chord technique can be a pivotal point in an aspiring guitarist's journey, characterized by three foundational components: accurate finger placement, adept strumming and picking techniques, and rigorous practice of barre chords and finger independence. By taking the time to truly comprehend and perfect these elements, you lay the groundwork for more advanced musical endeavors while honing your skills and boosting your musical confidence. In the first component, the precise finger placement may seem like a daunting task, but it assures that each string is rightly pressed, avoiding muffled sounds and achieving clear notes. This sets the stage for the second part: the strumming and picking techniques, the vital fulcrum that balances rhythm and harmony. Finally, a deep dive into practicing barre chords and developing finger independence is the cornerstone of playing the F chord smoothly and efficiently. With these crucial strategies in hand, we can now explore the first one - placing your fingers correctly on the fretboard to form the F chord.
1. Placing Your Fingers Correctly
Placing Your Fingers Correctly Mastering the F Chord Technique starts from understanding how to place your fingers correctly on the guitar. Accurate finger placement is the first step to playing the F chord successfully and avoiding unnecessary hand and finger strain. First, focus on your index finger, which needs to lay flat across the 1st fret to create a bar. Subsequently, only the tip of your index finger should be touching the bottom E string. Following this, the second finger must be place on the 2nd fret of the 3rd string (G string). The ring finger should be on the 3rd fret of the 5th string (A string), and finally, the pinky finger must be placed on the 3rd fret of the 4th string (D string). This positioning might feel unnatural or stiff at first. It’s important to remember that muscular flexibility and strength come with time and practice. If you're facing difficulties barring all the strings with your index finger, a simple trick might help. Try rolling your finger a bit towards the headstock of your guitar - this way, you will be barring the strings with the side of your index finger, which is generally harder and flatter than the soft underbelly. Consider using a mirror to observe at your chord positioning to help ensure that your fingers are in the right place and that your index finger is straight, applying even pressure to all the strings. In cases where any of the strings are muted or buzzing, try encouraging more pressure into the strings with your left-hand thumb (for right-handed players). Remember, producing a clean and clear sound on every string can take some time to achieve. Maintaining proper finger placement also includes ensuring that your fingers are as close to the fret as possible, without being on top of it. This optimizes the sound produced by your guitar. Veering too far from the fret results in a buzzing sound, while being on top can mute the sound entirely. To further strengthen your fingers and improve flexibility, finger exercises can provide significant assistance. These could involve finger gymnastics on the fretboard or practicing different chord shifts. Ultimately, the key lies in consistently refining your technique through practice. This, coupled with patience and determination, will make mastering the F chord on the guitar an achievable feat.
2. Strumming and Picking Techniques
Strumming and picking techniques are instrumental in mastering the F chord on the guitar. The F chord, often considered a hurdle for beginners, becomes manageable when you become proficient in your picking and strumming. The first step towards gaining this proficiency is mastering the art of holding your guitar pick seamlessly. A loose hold will result in a flimsy sound, while an overly tight grip can strangle the notes. Find a comfortableHold in between and always try to hit the strings with the flat side of the pick. It's important to note that strumming is not just about moving your hand up and down across all strings simultaneously. It's about rhythm, control, and emphasis on certain strings or notes. When we talk about playing the F chord, a smooth strumming technique lets you glide seamlessly across all the strings, lending your music an uninterrupted flow. Picking, on the other hand, plays a massive role in bringing out the uniqueness of the F chord. To truly master picking techniques, you need to learn how to alternate between strings and pick more than one string at a time. The F chord spans six strings, and playing each string with the same intensity may not always result in the most pleasing sound. By using the appropriate picking technique, you can emphasize the root note (which is F) or create a lovely melody by choosing other notes within the chord. Another vital aspect to remember is to always keep time religiously. Use a metronome if you are beginning. Harmonizing your strumming and picking with the required beat of the music can turn your F chord from flat to fabulous. Practice plays an inevitable part in mastering strumming and picking techniques. Dedicate time to playing the F chord slowly, focusing on each strum and pick. Take note of the sound it produces. Notice the differences when you add more pressure or when you change the speed. Over time, you’ll develop an understanding and eventually master these techniques making your F chord performance satisfying and praiseworthy. With the right strumming and picking techniques, you can turn the tricky task of playing the F chord into an effortless and enjoyable experience.
3. Practicing Barre Chords and Finger Independence
an essential aspect of mastering the F chord technique on the guitar is cultivating proficiency with barre chords while enhancing finger independence. This interplay is crucial because the F chord itself is a barre chord that demands simultaneous use of all fingers, hence, finger independence. To accurately execute and achieve a clean sound with the F chord, you need to apply steady pressure across all six strings with your index finger making it a barre - while your other fingers execute the E shape, hence exemplifying finger independence. The barre chord mastery begins with building strength in your index finger due to its core role in making a barre. Start by simply barring all six strings using your index finger, and gradually strive for a clean sound from each. Do this by adjusting your finger's position until you locate the sweet spot. Remember, it's crucial to keep the thumb at the back of the guitar neck as it enhances finger pressure and overall balance during barre chord execution. Additionally, ensure you employ the side of your index finger and not flat, as it aids in the distribution of pressure across strings. Once your fingers begin to accrue strength, the next phase involves an effective coordination of all your fingers – establishing finger independence. The F chord recipe requires your other three fingers to form the E shape on the fretboard while your index finger maintains the barre. Finger independence technique focuses on the ability of your fingers to move autonomously while playing the barre chord. One effective way to enhance finger independence is through performing "spider exercises" – drills which involve independently moving your fingers up and down the fretboard. Also, implementing hammer-on and pull-off exercises can be monumental in promoting finger independence. It's important to note like most techniques in music, it takes time and consistent practice to attain proficiency in barre chords and finger independence. Practicing regularly will generate muscle memory and build endurance in your fretting hand, vital attributes in playing complex chords like F without discomfort or fatigue. Barre chords and finger independence are, therefore, indispensable when learning how to play the F chord. They broaden your chord vocabulary, boost your overall guitar technique, and set a strong foundation for exploring advanced guitar styles and genres. Your journey to mastering the F chord, thus, will significantly rely on your commitment to rigorous, focused, and consistent practice of barre chords and finger independence techniques.
Overcoming Common Challenges with the F Chord
For many beginning guitarists, learning to play the F Chord can be a significant hurdle given its intricacies and high demand for finger dexterity. Overcoming this challenge requires a solid strategy that includes managing finger pain and fatigue, rectifying common mistakes, and bolstering finger strength and endurance. Initially, beginners might experience finger pain and fatigue from the constant pressure and positioning required to play this barre chord. However, this shouldn't discourage you from mastering the F Chord. Cultivate patience and perseverance as these discomforts will subside slightly with consistent practice and proper techniques. Ensuring you're accurately positioned and pressing down on the strings is vital, as common mistakes can affect the chord's sound quality. Implementing functional exercises as part of your practice routine can also help in building finger strength and endurance. Practicing barre chords will ultimately become less challenging as your fingers start to gain the much-needed power and resistance. Now, let's dive deeper into managing one of the immediate concerns: dealing with finger pain and fatigue when playing the F Chord.
1. Dealing with Finger Pain and Fatigue
Profound issues that can arise in one's journey of mastering the F chord on the guitar include finger pain and fatigue. Often, these issues stem from the physical demands of fretting this chord, especially for beginners. Finger pain may arise from the pressure exerted on the fingertips as they hold down the strings on the fretboard, with the ring finger and little finger often bearing the greatest brunt due to the F chord's barre formation. Fatigue, on the other hand, can accrue from the recurring use of the same set of muscles without adequate rest, particularly in the forearm flexors that control finger movement. Firstly, to deal with finger pain, you must ensure that your guitar is set up properly. The action, or the distance between the strings and the fretboard, should be easy to press yet functionally high enough to prevent buzzing noises. String gauges can also influence finger comfort, lighter gauge strings are more gentle on the fingers than their heavier counterparts. Also, consider using a guitar with a smaller neck if you have smaller hands or fingers. Staying attentive to your limit is important - if the pain arises, take breaks. Over time, the fingertips will develop calluses that provide a natural cushion against the strings’ pressure. On the fatigue topic, it's eminent to implement good practicing habits. Overusing finger muscles leads to soreness and fatigue, your body needs time to adapt to the new physical demand of fretting. To prevent fatigue, keep your practice sessions short but regular, gradually lengthening them as your strength improves. Squeezing stress balls can also assist in strengthening your hand and forearm muscles suitable for those chords. In conjunction with these strategies, it's crucial to maintain a proper hand position, ensuring your thumb supports your fingers from the back of the guitar neck. Also, ensure to press only as hard as necessary on the strings to achieve a clear sound. Applying excessive pressure is strenuous and may lead to finger strain and fatigue. In summary, dealing with finger pain and fatigue when playing the F chord entails a mix of selecting appropriate guitar settings, building physical resilience, gradually increasing practice duration, learning to recognize your limits, and maintaining proper technique. The keyword is patience. With persistence and conscious effort in implementing these strategies, mastering the F chord while maintaining finger health will be well within reach.
2. Troubleshooting Common F Chord Mistakes
Many budding guitarists have faced the tricky practice of getting comfortable with the F chord. This chord can feel quite daunting for beginners, owing to its unfamiliar form and the need to press down on multiple strings at once. Yet, by knowing and troubleshooting common F chord mistakes, the journey to mastering it can be smoother. The first common mistake that beginners make is incorrect finger placement. Unlike most chords that occupy only a particular fret, the F chord requires an entire fret to be covered by the index finger, called a barre. However, it's primarily the tip and the edge of the index finger that needs to press down on the strings. Incorrect positioning of this finger can mute the strings, creating a muffled sound. The solution lies in carefully positioning the barring finger straight across the fret, just behind the fret wire, and applying uniform pressure to all the strings to allow each one to ring out clearly. The second mistake is insufficient pressure on the strings. It might feel strenuous in the beginning due to the lack of finger strength and endurance. Therefore, a beginner's F chord might sound muted or buzzing. The remedy here is regular practice sessions incorporating finger strengthening exercises and gradually increasing the duration of practice. It’s also crucial to ensure the hands are relaxed and fingers arched perfectly to neatly press down the strings, so it leads not to further strain on the hand muscles. Sometimes, the issue lies not in the strength or position, but in the guitar itself. It's easy to assume that you're making mistakes while in reality, the guitar setup might be the problem. This usually occurs when the strings are too high off the fretboard - a common issue with cheaply made guitars. Therefore, beginners should also make sure to have their guitar checked or professionally set up to make the F chord more accessible. Further, the placement of the thumb is another overlooked issue. Generally, the thumb should be positioned halfway down the neck, pressing against it as a form of leverage to help barre the chord. If the thumb is placed too low or too high, it can produce too much tension in your hand—making playing difficult. Lastly, some beginners rush the process of mastering the F chord. Remember, Rome was not built in a day. Be patient in your practice. Migrated slowly after mastering the open chords and follow it up with half barre chords before jumping to full barres like the F chord. By troubleshooting these common mistakes, a learner can efficiently address these issues and bring themselves one step closer to dancing fingers on the fretboard. As no two guitarists are alike, figuring out what works best for you personally is essential, making for a more engaging and delightful learning experience.
3. Building Finger Strength and Endurance
Building finger strength and endurance is a critical aspect of overcoming common challenges associated with the F chord in the guitar. This journey is not an overnight endeavor but a constant and gradual progression that depends on one’s consistency, determination, and patience. Essentially, playing the guitar involves a lot of fretting, which requires both finger strength and endurance. Without these two, manipulating the F chord can be an uphill task. Mastering the F chord involves pressing multiple strings down at the same time. It can be quite daunting, especially for beginners who have not developed sufficient finger strength. This is because the F chord is a barre chord and, as such, necessitates the secure pressing of all six strings with one finger, often leading to muffled sounds if not done correctly. Employing exercises can aid in strengthening your fingers and subsequently enhancing their endurance. Starting with finger stretching exercises can significantly improve dexterity. You can practice the "spider walk," where you walk your fingers up and down the fretboard, helping them become limber and paving the way for easier manipulation of chords. Then, you can advance to grip-strengthening exercises aimed at building the required strength to press the strings properly. You can make use of grip strengtheners or even simple household items like stress balls. In addition to these, consider practicing individual finger lifts on the fretboard to develop muscle memory and increase endurance. Regular practice sessions, whether short or long, are instrumental in achieving this. It's all about building endurance in short amounts over time, then increasing your practice intervals gradually. A break between practice sessions is also necessary to prevent muscle fatigue and injury. Finally, incorporate chord changing drills into your practice routine. Among the most crucial aspects to master in guitar playing is the ability to switch smoothly and quickly from one chord to another. With the F chord, this is particularly crucial as this transition can be challenging, given its barre nature. Transitioning from simpler, open chords to an F chord can help in this case. For instance, transitioning between C and F chords repeatedly or between F and G chords can develop both strength and fluidity over time. Remember, however, that building finger strength and endurance should not be a painful process. Experiencing pain can indicate overexertion and the potential for injury. Take such signs as a signal to rest and recover. Always maintain proper form, take ample breaks during practice, and gradually increase your practice duration to ensure optimal results. This way, with time, patience, and perseverance, mastering the F chord can become a greatly achievable feat.