How To Draw Smoke
Understanding the Basics of Drawing Smoke
The Anatomy of Smoke
Before we delve into how to draw smoke accurately, it's vital to comprehend the smoke's very nature first. By definition, smoke is a collection of airborne solid and liquid particulates and gases emitted when a material undergoes combustion. However, in art, it is translated as an intricate dance of light and shadow, reminiscent of both fluidity and chaos. Smoke is not static, it moves, roils, and reacts to its environment, and it is these mysterious, ever-changing characteristics that we strive to capture in our drawings. Here, an understanding of light and shadow, along with the subtleties of value changes, will take you a long way.
Observation Is Key
Train your eyes to analyse real smoke, closely observing how light plays along the smoke, how its shape shifts, and how it interacts with the elements around it. Scrutinising reference images of smoke and attempting to replicate them will aid in your understanding of its malleable form. Whether it's the smoke spiralling from an extinguished candle wick or the plume of it billowing from a roaring bonfire, the nuances lie in observation.
Experimentation Leads To Artistic Growth
Try sketching smoke with different mediums. Each medium, whether it's a graphite pencil, charcoal, pastels, or digital tools, gives a unique texture and feel to your smoke drawings. Smoke is flexible, just like your artistic interpretations of it. So, use this opportunity to step out of your comfort zone, test and challenge yourself with a new medium; you might be surprised at the results!
Mastering the Art of Drawing Smoke
Layering with Pencils
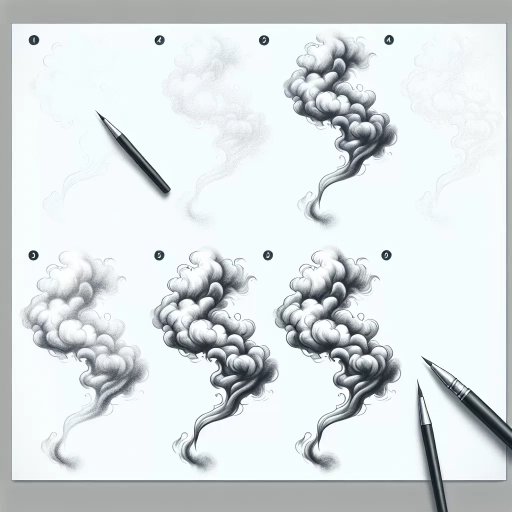
To create a realistic smoke effect using pencils, you need to master the art of layering. Begin with a light sketch, gradually building up the shades to achieve depth and density. Make sure to leave areas of the paper blank to represent the highlights in the smoke. Remember, the key lies in the subtlety of transitions from dark to light, so take your time and build your layers gently.
Creating Smoke with Charcoal
Charcoal is a wonderful medium to depict smoke, thanks to its rich, dark tones and easy smudgeability. Start by outlining the general shape of the smoke. Then, pack in the darker tones, leaving enough white space for the smoke's lighter portions. You can then seamlessly blend the charcoal using your fingers or a blending stick, creating the ethereal, billowy effect characteristic of smoke.
Smoke and Digital Art
Digital platforms like Adobe Photoshop and Procreate have opened up infinite possibilities for creating smoke effects. With a multitude of brushes, layering options, gradient colours, and transparency settings at your disposal, you can play around and create hyper-realistic smoke. A soft airbrush tool can form the wispy, swirling patterns of smoke, while the smudge and eraser tools can effectively create and control the smoke's transparency.
Final Touches and Enhancements
Adding Colours
While smoke is traditionally depicted grey or white, there are no hard and fast rules in art. Do not hesitate to add colours to your smoke drawings for an added layer of depth and interest. The colour could be a reflection of a light source or the smoke's heat, or it could purely be your imaginative take on it! The key is to keep the transitions soft and airy for a realistic effect.
Experimenting with Texture
Adding texture to your smoke can make it look more realistic and interesting. By varying your stroke pressure and direction, using hatching or cross-hatching techniques, or dabbing a tissue paper for a mottled effect, you can introduce an exciting array of textures to your smoke art.
Incorporating Background Elements
Smoke doesn't exist in isolation, it interacts with its surroundings. Incorporating background elements can lend depth and context to your smoke drawing. The play of light on around the smoke, objects obscured by it, or the source of the smoke, all these can make your smoke drawing feel grounded and complete.