How To Make A Shield In Minecraft
In the world of Minecraft, a shield is an essential tool for any player looking to protect themselves from harm. Not only does it provide a defensive barrier against hostile mobs, but it also allows players to block incoming attacks and protect their health. But have you ever wondered how to make a shield in Minecraft? The process is quite straightforward, and with the right materials and a bit of crafting know-how, you can create your very own shield. To get started, you'll need to gather the necessary materials, which we'll cover in the next section. From there, you'll learn how to craft your shield and even customize and upgrade it to suit your needs. So, let's dive in and explore the world of Minecraft shield-making, starting with the first step: gathering materials.
Gathering Materials
Gathering materials is a crucial step in crafting and building in various games and real-life scenarios. To start, one must collect the necessary resources, which can include planks, leather, and iron ingots. Collecting planks, for instance, can be done by chopping down trees or purchasing them from a supplier. Gathering leather or wooden planks, on the other hand, may require hunting animals or scavenging for materials. Smelting iron ingots, meanwhile, involves heating iron ore to extremely high temperatures. By understanding these processes, individuals can efficiently gather the materials they need to bring their projects to life. In this article, we will delve into the specifics of each of these processes, starting with the basics of collecting planks.
Collecting Planks
Collecting planks is a crucial step in crafting a shield in Minecraft. To start, you'll need to gather wood from trees, which can be found in various biomes throughout the game. You can use any type of wood, including oak, spruce, birch, jungle, acacia, or dark oak. Once you've found a tree, simply punch it to break the wood blocks, or use an axe to harvest them more efficiently. You'll receive wood logs, which can then be converted into planks by opening your crafting table and arranging the logs in a square pattern. Each log will yield four planks, so be sure to collect enough wood to meet your crafting needs. As you collect planks, keep in mind that you'll need six of them to craft a shield, so aim to gather at least that many. With your planks in hand, you'll be one step closer to crafting a sturdy shield to protect yourself from harm.
Gathering Leather or Wooden Planks
Gathering leather or wooden planks is a crucial step in crafting a shield in Minecraft. To obtain leather, players can kill cows, which can be found in plains biomes. Cows drop 0-2 pieces of leather upon death, and players can also obtain leather by trading with villagers. On the other hand, wooden planks can be obtained by punching or breaking trees, which can be found in various biomes. Players can also craft wooden planks from logs, which can be obtained by chopping down trees. The type of wood used to craft the planks will determine the appearance of the shield. For example, using oak logs will result in an oak shield, while using spruce logs will result in a spruce shield. It's worth noting that players can also use other types of wood, such as birch, jungle, or dark oak, to craft different types of shields. Overall, gathering leather and wooden planks is a straightforward process that requires minimal resources and effort, making it an accessible step in crafting a shield in Minecraft.
Smelting Iron Ingots
Smelting iron ingots is a crucial step in crafting a shield in Minecraft. To smelt iron ingots, you will need to gather iron ore, which can be found in caves, ravines, and underground tunnels. Once you have collected the iron ore, you will need to smelt it in a furnace using coal or charcoal as fuel. The smelting process will transform the iron ore into iron ingots, which can then be used to craft a shield. It's essential to note that you will need at least six iron ingots to craft a shield, so be sure to smelt enough iron ore to meet this requirement. Additionally, you can also use a blast furnace to smelt iron ore, which is a more efficient way of smelting large quantities of iron ore. However, a blast furnace requires more resources to build and can be more challenging to craft. Overall, smelting iron ingots is a straightforward process that requires some basic materials and a furnace, making it an accessible step in crafting a shield in Minecraft.
Crafting the Shield
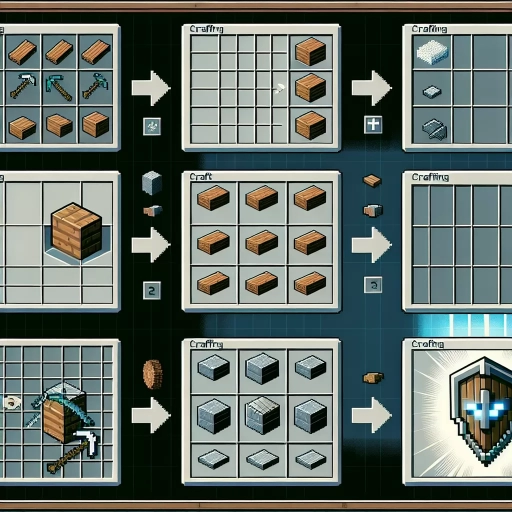
Crafting the Shield is a crucial step in Minecraft that requires attention to detail and a clear understanding of the game's mechanics. To craft a shield, players must first open the crafting table, which provides a 3x3 grid to arrange the necessary materials. Once the table is open, players must carefully arrange the materials, including wood planks and iron ingots, in a specific pattern to create the shield's frame and handle. Finally, adding the final touches, such as a banner or other decorative elements, can enhance the shield's appearance and functionality. By following these steps, players can create a high-quality shield that will serve them well in their Minecraft adventures. To begin, let's start by opening the crafting table.
Opening the Crafting Table
Opening the crafting table is the first step to crafting a shield in Minecraft. To open the crafting table, you need to have one in your inventory. If you don't have a crafting table, you can craft one by opening your inventory and arranging three wooden planks in a square shape. Once you have a crafting table, you can place it on the ground and right-click on it to open it. Alternatively, you can also open the crafting table by pressing the 'E' key on your keyboard if you have it in your hotbar. When you open the crafting table, you will see a 3x3 grid where you can arrange items to craft new items. To craft a shield, you will need to arrange six wooden planks in a specific pattern, which will be discussed in the next step. Make sure you have enough wooden planks in your inventory before opening the crafting table, as you will need them to craft the shield.
Arranging the Materials
To arrange the materials for crafting a shield in Minecraft, start by gathering the necessary items. You will need six planks of any type of wood, such as oak, spruce, or birch, and one iron ingot. Place the planks in a square shape, leaving the center square empty, in the crafting grid. The iron ingot should be placed in the center square. This arrangement is crucial, as it will determine the shape and functionality of the shield. Make sure to double-check the placement of the materials before proceeding to the next step. If the materials are not arranged correctly, the shield will not craft properly, and you will have to start over. By carefully arranging the materials, you can ensure that your shield is crafted correctly and is ready for use in the game.
Adding the Final Touches
Adding the final touches to your Minecraft shield is a crucial step in making it both functional and visually appealing. To start, you can add a banner to your shield, which will display a unique design or pattern. To do this, simply place the banner in the top-center square of the crafting grid, and the shield in the center square. This will apply the banner's design to the shield, giving it a personalized touch. Additionally, you can enchant your shield with various abilities, such as Unbreaking, which increases the shield's durability, or Mending, which allows the shield to repair itself when you're near an experience point source. To enchant your shield, simply place it in the enchanting table and select the desired enchantment. Finally, you can also name your shield using an anvil, which will give it a unique name that appears when you hover over it in your inventory. By adding these final touches, you can make your shield truly one-of-a-kind and ready for battle.
Customizing and Upgrading
Customizing and upgrading your gear is an essential part of any adventurer's journey. Whether you're a seasoned pro or just starting out, having the right equipment can make all the difference in your success. In this article, we'll explore three key ways to take your gear to the next level: applying patterns and designs, enchanting your shield, and repairing and maintaining your equipment. By applying patterns and designs, you can add unique touches to your gear that reflect your personality and style. Enchanting your shield can give you an extra layer of protection in battle, while repairing and maintaining your equipment can help extend its lifespan and keep it in top condition. In this article, we'll dive deeper into each of these topics, starting with the art of applying patterns and designs to your gear.
Applying Patterns and Designs
Applying patterns and designs to your Minecraft shield can give it a unique and personalized touch. To apply a pattern, you'll need to use a banner, which can be created by combining six wool blocks with a stick in a crafting table. Once you have a banner, you can use it to apply a pattern to your shield by combining the two items in a crafting table. You can choose from a variety of pre-made patterns, or create your own custom design using a combination of colored wool blocks and other materials. Additionally, you can also use a loom to create more complex and intricate designs, allowing you to add even more detail and personality to your shield. By applying patterns and designs, you can make your shield stand out and reflect your individual style, making it a truly one-of-a-kind piece of armor.
Enchanting the Shield
Enchanting the Shield is a crucial step in making it a formidable defensive tool in Minecraft. To enchant the shield, players need to have an enchanting table, which can be crafted using four obsidian blocks, two diamonds, and one book. Once the enchanting table is set up, players can place their shield in the first slot and select the desired enchantment from the list. There are several enchantments available for shields, including Unbreaking, which increases the shield's durability, and Mending, which allows the shield to repair itself when the player is holding it. Another useful enchantment is Blast Protection, which reduces the damage taken from explosions. Players can also enchant their shield with Fire Protection, which reduces the damage taken from fire and lava. To enchant the shield, players need to have the required experience points and lapis lazuli, which can be obtained by mining or trading with villagers. The enchanting process can be repeated multiple times to add multiple enchantments to the shield, making it an even more effective defensive tool. By enchanting the shield, players can significantly improve their chances of survival in Minecraft's hostile world.
Repairing and Maintaining
Repairing and maintaining your Minecraft shield is crucial to ensure its longevity and effectiveness in combat. To repair a shield, you'll need to combine it with another shield of the same material in a crafting table. This will restore the shield's durability, allowing you to continue using it without worrying about it breaking. Additionally, you can also use an anvil to repair your shield, which will also allow you to rename it. Regular maintenance is also essential to keep your shield in top condition. You can do this by storing it in a safe place when not in use, avoiding unnecessary damage, and keeping it away from water and lava. By following these simple steps, you can extend the life of your shield and ensure it remains a reliable companion in your Minecraft adventures.