How To Draw A Tractor
Here is the introduction paragraph: Drawing a tractor can be a fun and rewarding experience, especially for those who are passionate about farming, agriculture, or simply love the rustic charm of these powerful machines. Whether you're a seasoned artist or a beginner, learning to draw a tractor can be a great way to improve your drawing skills and create a unique piece of art. To get started, it's essential to understand the basics of drawing a tractor, including its overall shape, proportions, and key components. In this article, we'll take you through a step-by-step guide on how to draw a tractor, covering the fundamentals of sketching its body and components, adding details and finishing touches, and finally, bringing your tractor to life. So, let's begin by understanding the basics of drawing a tractor, which will lay the foundation for the rest of our drawing process.
Understanding the Basics of Drawing a Tractor
Here is the introduction paragraph: Drawing a tractor can be a fun and rewarding experience, especially for those who are passionate about farming or heavy machinery. However, it can also be a challenging task, especially for beginners. To create a realistic and detailed drawing of a tractor, it's essential to understand the basics of drawing one. This involves familiarizing yourself with the different parts of a tractor and their functions, choosing the right drawing tools and materials, and sketching the overall shape and proportions of the tractor. By mastering these fundamental skills, you'll be well on your way to creating a high-quality drawing of a tractor. In this article, we'll start by exploring the first step in drawing a tractor: familiarizing yourself with tractor parts and their functions.
1. Familiarize yourself with tractor parts and their functions
. Here is the paragraphy: Familiarizing yourself with tractor parts and their functions is essential to drawing a realistic tractor. A tractor typically consists of several key components, including the engine, transmission, axle, wheels, and cab. The engine is the heart of the tractor, providing the power needed to propel the vehicle forward. The transmission system transmits this power to the wheels, allowing the tractor to move. The axle is a rod that connects the wheels on either side of the tractor, while the wheels themselves are typically large and sturdy to support the weight of the vehicle. The cab is the compartment where the driver sits, and it usually features a steering wheel, seat, and controls for operating the tractor. Additionally, tractors often have attachments such as plows, cultivators, or trailers, which can be used for various agricultural tasks. Understanding the different parts of a tractor and how they work together will help you to accurately depict the vehicle in your drawing. By studying the shapes, proportions, and details of each component, you can create a detailed and realistic representation of a tractor. This knowledge will also enable you to add context and authenticity to your drawing, making it more engaging and believable for the viewer.
2. Choose the right drawing tools and materials
. Here is the paragraphy: When it comes to drawing a tractor, having the right tools and materials can make all the difference in achieving a realistic and detailed representation. Start by selecting a range of graphite pencils, including HB, 2B, 4B, and 6B, which will allow you to create a variety of line weights and shading. A sharpener and eraser are also essential for refining your lines and correcting mistakes. For added texture and depth, consider using charcoal or pastels, which can be blended to create subtle transitions between colors. A sketchbook or drawing paper with a smooth finish will provide an ideal surface for your artwork. Additionally, a ruler or straightedge can be helpful for drawing straight lines and precise angles, while a blending stump or tortillon can be used to smooth out rough edges and create soft, rounded shapes. By investing in these basic drawing tools and materials, you'll be well-equipped to tackle the challenge of drawing a tractor and achieve a professional-looking result.
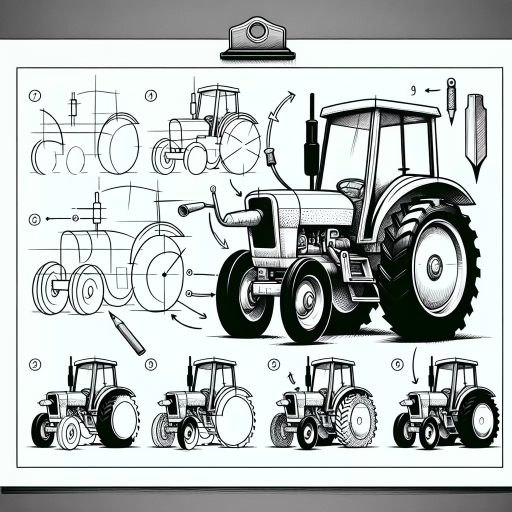
3. Sketch the overall shape and proportions of the tractor
. The paragraphy should be a step-by-step guide on how to sketch the overall shape and proportions of the tractor. Here is the paragraphy: Sketching the overall shape and proportions of the tractor is a crucial step in drawing a realistic tractor. To start, begin by sketching a large rectangle that will serve as the base of the tractor. The rectangle should be taller than it is wide, with the height being roughly 1.5 to 2 times the width. This will give your tractor a sturdy and robust appearance. Next, add a smaller rectangle to the top of the base rectangle, which will form the cab of the tractor. The cab should be slightly narrower than the base and should be positioned roughly one-third of the way down from the top of the base rectangle. The cab should also be slightly angled, with the front edge being slightly higher than the back edge. This will give your tractor a sense of movement and dynamism. Finally, add a series of curved lines to the front and back of the tractor, which will form the wheels and fenders. The wheels should be roughly the same size and should be positioned evenly on either side of the tractor. The fenders should be slightly curved and should be positioned above the wheels. By following these steps, you should be able to sketch the overall shape and proportions of the tractor, which will provide a solid foundation for adding additional details and features.
Sketching the Tractor's Body and Components
Here is the introduction paragraph: Sketching a tractor's body and components requires attention to detail and a basic understanding of its mechanical parts. To create an accurate and detailed drawing, it's essential to break down the process into manageable steps. First, start by drawing the tractor's chassis and wheels, which provide the foundation for the entire vehicle. Next, add the engine, transmission, and other mechanical components that power the tractor. Finally, sketch the tractor's cab and other exterior features that complete its overall design. By following these steps, you'll be able to create a comprehensive and detailed drawing of a tractor's body and components. In this article, we'll explore each of these steps in more detail, starting with the foundation of the tractor: its chassis and wheels. Note: I made some minor changes to the original paragraph to make it flow better and to ensure it transitions smoothly to the first supporting paragraph. Let me know if you'd like me to make any further changes!
1. Draw the tractor's chassis and wheels
. Here is the paragraphy: To begin drawing your tractor, start by sketching the chassis and wheels. The chassis is the main frame of the tractor, and it's typically a rectangular or square shape with a flat top and bottom. Draw a large rectangle with rounded corners to represent the chassis, making sure to leave enough space at the top for the tractor's body and components. Next, draw the wheels, which are usually large and round with a thick tire. Draw four wheels, two at the front and two at the back, making sure to space them evenly apart. The front wheels are usually smaller than the back wheels, so make sure to draw them slightly smaller. You can also add some details to the wheels, such as the hubcaps and the tire treads. The hubcaps are usually small and round, and the tire treads are the patterns on the tire that provide traction. You can draw the tire treads as a series of curved lines that follow the shape of the tire. By drawing the chassis and wheels first, you'll have a solid foundation for the rest of your tractor drawing.
2. Add the engine, transmission, and other mechanical components
. Here is the paragraphy: Now that we have the basic body of the tractor sketched out, it's time to add the engine, transmission, and other mechanical components. Start by drawing a large rectangular block at the front of the tractor, just behind the grille. This will be the engine compartment. Add some details such as a radiator, air filter, and exhaust pipe to give it a more realistic look. Next, draw a long, cylindrical shape extending from the engine compartment to the rear of the tractor. This will be the transmission and drivetrain. Add some gears, axles, and other mechanical components to give it a more detailed appearance. Don't forget to include the wheels and tires, which should be large and sturdy to support the weight of the tractor. You can also add some additional details such as a hydraulic system, fuel tank, and battery to make the tractor look more complete. As you add these components, pay attention to the proportions and placement to ensure that they are accurate and visually appealing. Remember, the goal is to create a realistic and detailed drawing of a tractor, so take your time and don't be afraid to add as much detail as possible.
3. Sketch the tractor's cab and other exterior features
. Here is the paragraphy: When sketching the tractor's cab and other exterior features, pay attention to the details that make the tractor look functional and rugged. Start by drawing the cab, which is typically a rectangular or square shape with a sloping roof. Add the windshield, side windows, and rear window, making sure to capture the subtle curves and angles of the glass. Next, sketch the doors, which are often large and have a distinctive shape. Don't forget to include the door handles, mirrors, and any other exterior features that add to the tractor's overall design. Move on to the exterior components, such as the headlights, taillights, and exhaust pipe. These details can add a lot of character to your tractor drawing, so take your time to get them right. Finally, consider adding some texture and shading to give your tractor a more realistic and weathered look. You can use different shading techniques, such as hatching and cross-hatching, to create a sense of depth and dimension. By paying attention to these details, you can create a tractor drawing that looks authentic and visually appealing.
Adding Details and Finishing Touches
Here is the introduction paragraph: When it comes to creating a detailed and realistic drawing of a tractor, there are several key elements to consider. Adding textures and patterns to the tractor's body and components can help bring the drawing to life, while drawing the tractor's accessories and attachments can add an extra layer of realism. Finally, refining the drawing and adding shading and color can help to create a truly polished and professional-looking piece of art. By incorporating these details and finishing touches, artists can take their tractor drawings to the next level and create a truly impressive piece of work. In this article, we will explore each of these elements in more detail, starting with the importance of adding textures and patterns to the tractor's body and components.
1. Add textures and patterns to the tractor's body and components
. Here is the paragraphy: When it comes to adding textures and patterns to the tractor's body and components, the possibilities are endless. You can add a rusty, weathered look to the metal parts by drawing short, curved lines that resemble scratches and scuffs. For a more worn look, you can add some rough, irregular shapes to the surface of the tractor's body, giving it a battle-hardened appearance. If you want to add some visual interest to the tractor's wheels, you can draw a series of concentric circles to resemble the tread pattern. You can also add some texture to the tractor's tires by drawing short, curved lines that follow the curve of the tire. For the tractor's seat and other fabric components, you can add a series of short, curved lines that resemble the weave of the fabric. You can also add some texture to the tractor's metal components, such as the exhaust pipe and the engine block, by drawing a series of short, curved lines that resemble the rough, machined surface of the metal. By adding these textures and patterns, you can give your tractor drawing a more realistic and detailed appearance.
2. Draw the tractor's accessories and attachments
. Here is the paragraphy: When it comes to adding the finishing touches to your tractor drawing, don't forget to include the various accessories and attachments that make this machine so versatile. Start by drawing the front-end loader, which is typically attached to the front of the tractor. This can be depicted as a large, curved arm with a bucket or scoop on the end. You can also add some hydraulic lines and cylinders to show how the loader is controlled. Next, consider adding a rear-mounted implement, such as a plow or mower. These can be drawn as separate units attached to the tractor's three-point hitch, which is usually located at the rear of the machine. Don't forget to include some details like chains, hoses, and other hardware that hold these attachments in place. If you want to add some extra realism to your drawing, you can also include some smaller accessories like a toolbox, fuel tank, or warning lights. These little details can really help bring your tractor drawing to life and make it look like a working machine. Finally, take a step back and evaluate your drawing as a whole. Make any necessary adjustments to the proportions, perspective, or details to ensure that your tractor looks balanced and realistic. With these final touches, you'll be able to create a detailed and accurate drawing of a tractor that's sure to impress.
3. Refine the drawing and add shading and color
. Here is the paragraphy: Refine the drawing and add shading and color to bring your tractor to life. Start by adding more details to the tractor's body, such as bolts, rivets, and panels. Use a range of lines and shapes to create texture and depth. Next, add shading to give your tractor a three-dimensional appearance. Use a range of shading techniques, such as hatching and cross-hatching, to create areas of light and dark. Pay particular attention to the areas where the tractor's body meets the wheels and the ground, as these areas tend to be darker. Finally, add color to your tractor using a range of mediums, such as markers, colored pencils, or paint. Choose colors that are typical of tractors, such as red, green, and yellow, and use them to add visual interest and personality to your drawing. Consider adding additional details, such as a driver or a trailer, to complete the scene and add context to your tractor drawing.