How To Remove Esim From Iphone
 As technology advances and our dependence on smartphones intensifies, understanding how to modify certain settings like removing an eSIM from an iPhone becomes increasingly essential. In the upcoming paragraphs, the article will delve into the fascinating world of eSIM cards. A perfect blend of preparation, technical knowledge, and collaboration with your phone carrier is required if you wish to successfully remove the eSIM. Initially, it's crucial to plan ahead and be ready for the process that follows - a stage we refer to as 'Preparation is Key.' We will then guide you through the various steps related to the iPhone settings for eSIM removal. Geared with this knowledge, you'll find the task at hand to be quite achievable. However, in some scenarios, professional help from your carrier may be the best bet - an alternative we explore in our third segment. Buckle up as we transition to the first step, 'Preparation is Key,' to ensure all your bases are covered before embarking on the process of eSIM removal.
Preparation is Key
of successful accomplishment in any field of life is effective preparation. The saying, 'Preparation is Key,' is not just a cliché but a guiding principle that directs the path of success. This article aims to delve into this essential principle, highlighting three critical aspects that underline its importance. First, we will explore 'Understanding the Process', an important step in preparation as it provides insight into what is ahead and enables one to map out an effective plan. Secondly, we will discuss 'Backup Your Data', a fundamental aspect in the digital world that helps prevent any loss of important information during device updates or technical snags. Lastly, we will inspect 'Checking Your iPhone's Compatibility', a simple yet critical step in preparing your device for a new application or software update. The essence of these supporting ideas revolves around the principle that preparation is the underlying bedrock of success in all endeavors. With the understanding that an overview has been provided, our transition into the first phrase is fitting: Understanding the Process.
Understanding the Process
Preparation is indeed indispensable when it comes to the process of removing an eSIM from your iPhone's bedrock. In order to understand the process properly, one should take a closer look at the groundwork. An eSIM or embedded SIM is a digital SIM that lets you activate a cellular plan without having to use a physical nano-SIM. eSIMs are simple to use and can be switched or removed with just a few steps. Nonetheless, failure to prepare adequately may result to unwanted complications, hence the necessity for thorough groundwork. First things first, ensuring that you have the latest iOS update on your phone is a critical starting point. An update ensures compatibility of the software with the task you intend to undertake. It might solve issues you could encounter in the process, thus saving time. Next, back up all the necessary data to avoid unexpected losses. Something as fundamental as establishing a steady internet connection is crucial too. Non-stable or weak connections might interrupt the process leading to undesirable outcomes, such as a half-removed eSIM which could create system problems. You should also be familiar with your iPhone’s settings. This will significantly guide your smooth navigation through the process. A useful step is to find and jot down the SM-DP+ Address and Activation Code of your eSIM before the removal. This will come in handy in case you decide to reinstall the eSIM in the future. Another crucial point is to remember to turn off your iPhone before removing your eSIM. Failure to do this could distort the system causing irrevocable damage to your iPhone. Do not forget to investigate and understand the implication of removing the eSIM. Whether it's a carrier switch or repair purposes, weigh the benefits and potential drawbacks. For instance, some cellular plans might not work if you eradicate the eSIM, or you might lose the services linked to the specific eSIM. Hence, assess the potential outcomes beforehand. Moreover, familiarize yourself with troubleshooting tips. Removing an eSIM is generally a straightforward task, but it might throw some curveballs. Be ready to tackle common issues like an eSIM that won't delete or a phone that can't connect to the internet post-removal. Lastly, by contacting your carrier, you can access valuable information related to your eSIM removal process. Whether it's about potential charges, impact on your account, or help with the process itself, this call might prove very helpful. Preparation act as a buffer, enhancing the successful completion of the process and ensures a stress-free eSIM removal. Therefore, take time to prepare, remember each step counts. Since your iPhone is a valuable device, understanding and observing each stage is a crucial part of the eSIM removal process. Lack of preparation may lead to loss of vital information, destruction of the phone system, or unanticipated consequences with your carrier. Preparation is, therefore, key for efficient and effective eSIM removal.
Backup Your Data
Preparation certainly holds the key in the process of removing an eSIM from your iPhone, and backing up your data is an integral part of this preparation. All your valuable information, including contacts, messages, pictures, videos, and other data types, are stored on your iPhone and associated with your eSIM. As you decide to remove the eSIM, these data might be at risk. Therefore, it's best to create a backup, ensuring that your valuable information is secure and can be restored on your device after the removal of the eSIM. There are multiple ways to back up your iPhone's data, and choosing the right method depends on your preferred ease and convenience. You can use iCloud, a cloud-based backup system provided by Apple, where your data is safely stored in the cloud and can be accessed anytime from anywhere. All you need to do is go to your iPhone’s settings, select your name, then iCloud, and finally, Backup. Make sure that iCloud Backup is turned on. Now, you can tap 'Back Up Now.' This process might take a moment, depending on the size of the data and your internet connection speed. Alternatively, you can use iTunes to back up your data directly to your computer. Connect your iPhone to your computer, open iTunes, select your iPhone, and then click on 'Back Up Now.' The backup process might take a few moments, once again depending on the size of the data. If you decide to use iTunes, make sure your computer has enough storage space to accommodate all your data. No matter which method you choose, creating a backup will safeguard your data from any potential loss or corruption that might occur while removing the eSIM. Having a backup not only ensures data security but also allows you to easily move your data to a new eSIM if needed. This preparation step provides you the freedom to remove or change your eSIM without the fear of losing any critical information stored in it. This way, whether you're doing it for troubleshooting, switching to another network, or any other reason, this effective preparation translates into a seamless, stress-free process of removing an eSIM from your iPhone. Remember, data is priceless and irreplaceable; hence, a solemn prep is key! While these backup methods are focused on an iPhone within the context of eSIM removal, they are applicable to any circumstance where data protection is needed. Regularly backing up your data ensures not just the safety of your information, but also your peace of mind knowing that your data is always safe, accessible, and ready to be restored whenever required. Thus, the adage proves true: "Preparation is Key." The backup process solidifies your defense against any unexpected data loss, making it a crucial part of the plan to remove an eSIM from your iPhone.
Check Your iPhone's Compatibility
In an effort to ensure a smooth and trouble-free process while attempting to remove an eSIM from your iPhone, an essential step is to check your device's compatibility. This is a critical phase under the major subtitle 'Preparation is Key', because not all iPhone models support the eSIM feature. The eSIM or Embedded SIM was first introduced to the iPhone line-up with the launch of iPhone XS, XS Max, and XR. Then, the scope was widened with later models, including the iPhone 11 series, SE (2020), and the iPhone 12 series. If your iPhone model falls under these specific versions, that indicates your device is eligible for an eSIM. However, it’s not merely about the iPhone hardware; it also pertains to the software. The iOS version also plays a significant role in supporting this functionality, with iOS 12.1 and later being the prerequisite. Therefore, it’s always recommended to update your iPhone’s software to the latest version. Another aspect to consider is your carrier service. Not all carriers support eSIM functionality and some may require you to change to a special plan to use the eSIM. It's beneficial to do some research or consultation with your carrier to ascertain its compatibility. It’s also noteworthy to mention that while eSIMs allow you to have multiple cellular plans on your iPhone, one can only use one data plan at a time, a restriction implemented by Apple. Therefore, understanding your iPhone's compatibility is a foundational step in ensuring a seamless removal of the eSIM. Good preparation will spare you from unexpected issues and allow you to navigate the process with confidence and ease.
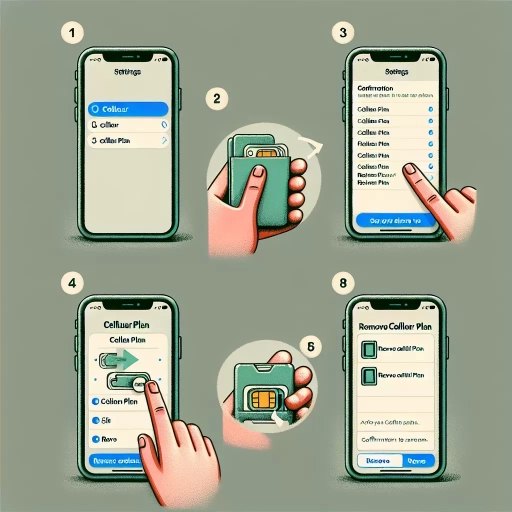
Method 1: Remove eSIM from iPhone Settings
Getting rid of your eSIM from your iPhone settings may appear challenging, but in reality, it is quite straightforward when the process is segmented into clear, manageable steps. These steps are broken down into three main methods: Accessing the Settings App, Removing the eSIM Profile, and Confirming the Removal. Initially, you'll have to make your way to your iPhone settings, an all-important control hub for all your device's operations. Navigating it can be technical, but there are solid directions to guide you. The second step is to remove the eSIM profile, a crucial segment that brings in the novel perspective of eSIM technology. Getting rid of it requires caution, but with succinct directions, removing the profile will be a breeze. Lastly, confirming the removal reassures the user of successful eSIM profile disposal, a final vital step that ensures your eSIM has been totally discarded from your device. Each phase is distinct, yet they collectively lead to one purpose: simplifying the process of removing an eSIM from your iPhone settings. Now, let's dive into the process, starting with accessing the settings app.
Accessing the Settings App
The Settings app on an iPhone holds enormous power, as it provides users control over most aspects of device functionality. Whether you need to customize the display, configure your network connections, update system software, manage apps, or modify privacy options, the path leads to this nerve center. Accessing it is very straightforward. Simply find the app symbol, characterized by a set of gears on your iPhone’s homepage and tap to open. It is usually nestled among your core apps unless you've taken the liberty to move it. The main page of the Settings app is a scrollable list that harbors all available settings. Each item on the list, when tapped, expands into a page detailing the options within. Now, how does one access the eSIM settings specifically? To navigate to eSIM settings, first, open the Settings app and scroll down till you spot the 'Cellular' option. By tapping 'Cellular', a new page opens containing the list of all the cellular plans your phone has. iPhone models XR, XS, XS Max and later have dual SIM support, meaning they can harbour both a physical (nano-SIM) and an eSIM. If you have an eSIM installed, its plan will be listed there. From this point onwards, removing the eSIM is as simple as tapping onto its corresponding cellular plan and selecting 'Remove Cellular Plan'. Access to the Settings app in itself is a gateway to a personalized iPhone experience. It's where your comfort metaphorically meets its technology. The proper use of the app can help maximize the efficiency and effectiveness of your iPhone operations. The steps outlined above will not only guide users to handle and remove eSIMs effectively but also familiarise them with their Settings app, equipping them to better handle their device's operations. The app is so constructed that it provides quick and easy access to comprehensive settings, making it simpler for users to find solutions and maximize their iPhone experience.
Removing the eSIM Profile
The removal of an eSIM profile from your iPhone is not as difficult as it might seem at first glance. Users who have purchased data plans, switched carriers, or simply do not require the use of an eSIM anymore, may find themselves needing to remove the eSIM profile from their iPhone settings. First, ensure that your device supports the use of eSIMs. Only iPhone XS, XS Max, XR, 11 series, or later models support eSIM functionality. Additionally, your device should be running on iOS 12.1.1 or later versions. To remove the eSIM profile, start by navigating to the Settings menu on your iPhone, then tap on 'Cellular' or 'Mobile Data' based on your region-specific settings. Here, you will find a list of all the active and inactive cellular plans on your device. Tap on the plan that you wish to remove. You’ll see a piece of information about your plan, including the name of the carrier, the plan’s label name, phone number, and a host of other relevant information. At the bottom of the screen, you will find an option to 'Remove Cellular Plan'. Tap on this button to remove the eSIM profile from your iPhone. A pop-up window will appear, asking for your confirmation to remove the eSIM profile. Tap on 'Remove' to confirm the removal of the eSIM. Please note that this action is irreversible and once the eSIM profile is removed, it is gone forever. However, before you remove the eSIM profile, it’s important to take note of a few things. Removing the eSIM profile will permanently erase your eSIM card and all the data associated with it. This includes your contacts, cellular plans, messages and more. Therefore, it is essential that you backup any important data before you proceed to delete the eSIM profile. Moreover, you cannot retrieve the eSIM card once you've removed it, so you'll need to contact your carrier and request a new physical SIM card if you wish to use their services again. The overall process of removing the eSIM from your iPhone settings is quick and straightforward. The advantage of using an eSIM is that it enables the flexibility of easily switching between carriers and data plans. However, it's always essential to thoroughly understand and follow the correct steps when removing the eSIM profile to avoid losing crucial data or unintentionally locking yourself out from your carrier's services.
Confirming the Removal
After successfully removing the eSIM from your iPhone via the settings feature, confirming the eSIM removal is of significant importance. You can easily do this by returning to the "Cellular" section under "Settings." This time, you won't see any eSIM profile that you previously removed, signaling successful deletion. However, in some instances, the eSIM profile might still be visible, even if you executed the removal process correctly. If such a situation occurs, the most probable reason might be because your iPhone does not update the changes instantly. To resolve this issue, consider restarting your device. This step often reinitialize the system and updates the changes made accordingly. After restarting, go back to the 'Cellular' section. By this time, the deleted eSIM profile should have disappeared from the list. If the profile is still visible, deleting the eSIM profile directly from your cellular network provider may be necessary. To do so, you might need to call your network provider or follow online instructions provided by the said network provider. Furthermore, if your eSIM profile is contributing to any software conflicts that might emerge, you can check it in the general 'Settings' section as well. If your phone's performance improves notably after eSIM removal, it indicates that the problematic eSIM has been successfully removed. On the other hand, if the problems persist, the issues are then probably independent of the eSIM, and you might need a well-rounded diagnostic to identify the problems precisely. Take note that removing the eSIM does not necessarily mean terminating your eSIM plan. If you plan to stop using your eSIM's services completely, remember to get in touch with your network provider to cancel the plan associated with the eSIM profile. Otherwise, you may continue to get billed for the plan. Lastly, if you wish to reinstall your eSIM profile later on, most of the time, it's as simple as scanning or manually entering your eSIM details again. In conclusion, confirming the removal is not a complex process but a crucial one to ensure that the eSIM has been successfully removed from your iPhone. Understanding each part of this process helps you conveniently and confidently utilize the innovative eSIM technology on your iPhone.
Method 2: Contact Your Carrier
of your troubleshooting efforts to resolve phone-related issues should be Method 2: Contact Your Carrier. This method, being an effective path to purposeful solutions, involves three steps - Reaching out to customer support, Providing identification and details, and Following carrier instructions. First, you want to get in touch with your carrier’s customer support, a move that places you directly in contact with the problem solvers. This team is professionally trained to handle various technical glitches, and they offer proven solutions for your phone-related challenges. Next, you'll need to provide the necessary identification and details. This step is crucial as it aids the quick identification of your account and the issue at hand. Last but not least, you need to follow the instructions given by the carrier. Every solution proposed is designed to resolve a specific problem, hence, the need for careful compliance. Now, the first move in this problem-solving formula is to reach out to customer support.
Reaching Out to Customer Support
Even with the advent of high-technology solutions such as esims, glitches and complications can still occur. Having a clear plan on how to tackle these challenges is beneficial and often involves reaching out to customer support. The second method – contacting your carrier – is sometimes the most effective way to remove an esim from your iPhone. This is because network carriers are specifically trained to handle matters related to your mobile subscription. Customer support teams of your carrier are familiar with the technicalities and operational procedures related to esims. Most carriers have established a mature process in dealing with esim related inquiries, including canceling or removing an esim from your iPhone. They have access to specific carrier tools and network systems that can execute commands to deactivate or eliminate your esim profile from your device. Dealing with customer support directly can save you time and reduce the risk of data loss or device damage. Before contacting the support team, ensure your device details are at your fingertips: Know your iPhone’s IMEI number, your carrier details, and your esim plans. These details will be needed during your communication with the customer support. Document any issues you are experiencing in detail to expedite the resolution process. Additionally, you must be patient; resolving technical challenges may take more time than expected due to possible complexities. In reaching out to customer support, explore all available channels. This can be through a toll-free phone number, online chat assistance, or email support. Some carriers even offer app-based customer support. Choose the most convenient and accessible method for you. During your conversation, take note of critical information such as reference numbers, the name of the person assisting, and the suggested step-by-step solution. In cases where reaching out to customer support of your carrier doesn't yield a satisfactory solution, escalating your issue could be necessary. The escalation process may lead to the involvement of higher-tier tech support that has more advanced problem-solving capabilities. Overall, contacting your network provider's customer support team is a practical way to remove an esim from your iPhone. It taps into their expertise and resources in dealing with carrier-specific issues. Proper communication and patience often result in a successful resolution that keeps your iPhone functional while ensuring your esim concerns are well resolved. Remember to keep an open line of communication with your carrier's customer support. This not only helps in resolving your current issues but also builds a good rapport for future assistance. Customer service is there to help, and with their assistance, removing an esim from your iPhone can be hassle-free.
Providing Identification and Details
After deciding to remove your eSIM from your iPhone, the next important step is contacting your carrier. It is indispensable because they are solely authorized to perform the necessary changes on their network and crucially, within their systems. In achieving this, one of the critical requirements is a valid identification coupled with details about your eSIM and your device generally. Before initiating contact with your carrier, ensure you have all necessary identification documents at your disposal. This may include a government-issued ID, your social security number, or any other form of identification unique to you and acceptable by your carrier. This is important as carriers are obligated to verify your identity before making any changes to your account – a mandatory step in preventing unauthorized changes or access to your sensitive information. Moreover, having the essential details about your eSIM and your device in general can expedite the process of removing the eSIM from your iPhone. These details do not merely serve as additional means of identification but provide the specific information the carrier needs to locate your eSIM in their system. You may need to provide details such as your eSIM's EID (Embedded SIM's Identifier), which is unique for every eSIM, hence a sure way for your carrier to single out your eSIM. Other important details include your device's IMEI number (a globally unique identifier for your device) and the ICCID number (a unique identifier for your eSIM). These safety measures ensure that the correct eSIM is removed, averting potential errors on the network. Notably, these details aren't just numbers; they narrate a detailed story about your device and eSIM. They form an impregnable line of defense against potential errors and unauthorized changes. In summary, providing accurate identification and precise details about your eSIM and your device forms a critical strata of the process of removing your eSIM from your iPhone. Without these, the chances of a successful removal are nearly nonexistent. In essence, remember to arm yourself with the necessary identification documents and equip the carrier with precise details about your device and eSIM, and this seemingly complex process becomes a walk in the park.
Following Carrier Instructions
Following carrier instructions is an imperative step when it comes to the removal of an eSIM from your iPhone. The process varies based on the specific carrier you have subscribed to, but generally, it will involve you reaching out to the respective customer service department. This can be done via multiple platforms, such as phone calls, emails, online chat services, or direct physical visits to your carrier's local outlets. In your communication with these representatives, directly express your desire to remove your eSIM profile from your iPhone. Provide them with your account details and the necessary verification to prove your identity. This is vital to protect your privacy and prevent unauthorized users from making changes to your account without your consent. The carrier representative will then guide you through the necessary steps to accomplish your objective. Part of these instructions usually includes steps to make the change right on your device. An eSIM, unlike the traditional physical SIM card, is embedded digitally inside your iPhone and is directly managed in the phone’s settings. Thus, part of the process requires you to go to your iPhone's settings, select the “Cellular” option, scroll down to the “Cellular Plans” section, and then choose “Remove Cellular Plan”. However, this should be done under the supervision of a carrier representative to avoid any unexpected complications. After completing this process, it's recommended to restart your device to ensure the changes have been properly implemented. It is also rather important not to ignore the instructions provided by your carrier as it could lead to unnecessary complications or delays in the removal of your eSIM. Understand that this process takes time and it could take up to several hours to remove an eSIM profile depending on the carrier's policy. Following carrier instructions not only hastens this process but also helps unravel any complications that may unknowningly occur. Lastly, one critical element to remember during this process is ensuring that your phone has an active internet connection. An eSIM profile removal process involves the cooperation of the eSIM servers for its successful completion. The servers have to acknowledge the command and confirm the eSIM profile removal, which requires an active connection between the device and carrier. Hence, ensure your device is connected to Wi-Fi or has an active cellular data connection with good reception. Following carrier instructions to remove an eSIM from your iPhone is a practical and coordinated approach. It allows you to perform the tasks efficiently while maintaining the functionality of your device. It's a reliable, safe, and recommended method given the digital nature of eSIM cards.