How To Draw A Ladybug
Here is the introduction paragraph: Drawing a ladybug can be a fun and creative activity for artists of all skill levels. With their distinctive red and black coloration and endearing appearance, ladybugs are a popular subject for drawings and paintings. To create a realistic and detailed ladybug drawing, it's essential to start with a solid understanding of the insect's basic structure. This involves understanding the proportions and layout of the ladybug's body, as well as its various features such as the head, thorax, and abdomen. Once you have a good grasp of the ladybug's basic structure, you can begin sketching its body and features, paying attention to the shape and proportions of each part. Finally, you can add details and refine your drawing to create a more realistic and polished final product. In this article, we'll take a closer look at the process of drawing a ladybug, starting with the foundation of it all: understanding the basic structure of a ladybug.
Understanding the Basic Structure of a Ladybug
Here is the introduction paragraph: Ladybugs, also known as lady beetles or ladybird beetles, are one of the most recognizable and beloved insects in the world. With their bright colors and distinctive spots, it's no wonder why they're a favorite among children and adults alike. But have you ever stopped to think about the intricate details that make up a ladybug's body? From their unique body shape to their fascinating facial features, and from their agile legs to their sensitive antennae, there's more to a ladybug than meets the eye. In this article, we'll delve into the basic structure of a ladybug, exploring the key components that make up their anatomy. By familiarizing yourself with the ladybug's body shape, noting the distinctive features of their face, and observing their legs and antennae, you'll gain a deeper understanding of these incredible insects and appreciate their beauty even more. Understanding the Basic Structure of a Ladybug is essential to appreciating their unique characteristics and behaviors, and we'll start by breaking down the key components of their anatomy.
1. Familiarizing yourself with the ladybug's body shape
. Here is the paragraphy: Familiarizing yourself with the ladybug's body shape is the first step in drawing a realistic ladybug. Ladybugs, also known as lady beetles or ladybird beetles, have a distinctive oval-shaped body that is typically between 1/16 and 1/4 inch in length. The body is divided into three main parts: the head, thorax, and abdomen. The head is small and rounded, with a pair of antennae that are usually quite short. The thorax is the middle segment of the body and is where the ladybug's wings are attached. The abdomen is the largest part of the body and is where the ladybug's digestive organs are located. Ladybugs also have six legs, which are usually quite thin and are used for walking and sensing their environment. By understanding the basic shape and structure of a ladybug's body, you can begin to draw a more accurate and detailed picture of these charming insects.
2. Noting the distinctive features of a ladybug's face
. The ladybug's face is one of its most distinctive and recognizable features. Noting the distinctive features of a ladybug's face is crucial when drawing one. A ladybug's face is typically oval-shaped, with a slight curvature to it. The face is also slightly tilted, giving the ladybug a endearing and charming appearance. One of the most distinctive features of a ladybug's face is its black spots. These spots are usually small and rounded, and are scattered across the face in a seemingly random pattern. The spots can vary in size and shape, but they are always black and always present. In addition to the spots, a ladybug's face also features a pair of large, black eyes that are positioned on either side of the head. These eyes are usually quite large and expressive, giving the ladybug a curious and alert appearance. The eyes are also often surrounded by a thin, white ring, which helps to make them stand out even more. Finally, a ladybug's face is completed by a small, black mouth and a pair of thin, black antennae that protrude from the top of the head. These antennae are usually quite long and slender, and are used by the ladybug to sense its surroundings. By noting these distinctive features, you can create a ladybug face that is both accurate and charming.
3. Observing the ladybug's legs and antennae
. Here is the paragraphy: Observing the ladybug's legs and antennae is crucial in understanding its overall structure. Ladybugs have six legs, which are divided into three pairs. The front pair of legs is usually smaller and more slender than the other two pairs. The legs are also covered with tiny hairs, which help the ladybug to sense its surroundings. The antennae, on the other hand, are long and thin, and are used for sensing and communication. They are usually black or dark brown in color and have a distinctive shape, with a club-like tip at the end. When drawing a ladybug, it's essential to pay attention to the shape and size of the legs and antennae, as they can greatly affect the overall appearance of the insect. By observing the ladybug's legs and antennae, you can gain a better understanding of its structure and proportions, which will help you to create a more accurate and detailed drawing.
Sketching the Ladybug's Body and Features
Here is the introduction paragraph: When it comes to sketching a ladybug, it's essential to capture its unique body and features. A ladybug's body is a masterclass in simplicity and elegance, with its oval shape, distinctive black spots, and delicate wings. To draw a ladybug accurately, you'll need to understand the basic structure of its body and how its various features work together. In this article, we'll break down the process of sketching a ladybug's body and features into three key components: drawing the ladybug's oval-shaped body, adding the ladybug's distinctive black spots, and sketching the ladybug's wings and wing covers. By mastering these fundamental elements, you'll be well on your way to creating a beautiful and realistic ladybug sketch. Understanding the Basic Structure of a Ladybug is crucial to creating a realistic and detailed sketch, and we'll explore this topic in more depth next.
1. Drawing the ladybug's oval-shaped body
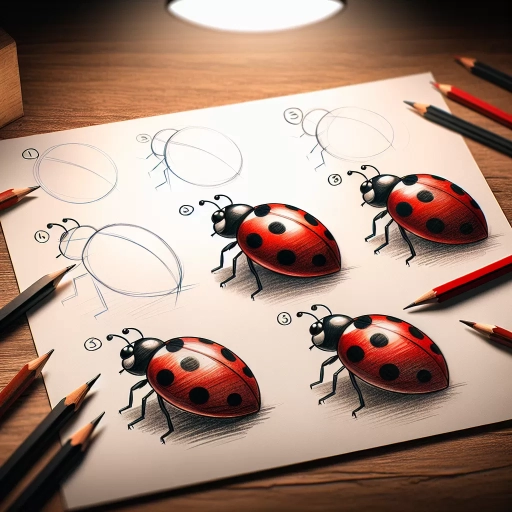
. Here is the paragraphy: To draw the ladybug's oval-shaped body, start by sketching a rough outline of the shape. Imagine a slightly flattened oval with the longer axis running horizontally. The oval should be tall enough to accommodate the ladybug's distinctive spots, but not so tall that it becomes misshapen. Pay attention to the proportions of the oval, making sure it is not too elongated or too rounded. A good rule of thumb is to make the oval about one and a half times as wide as it is tall. Once you have the basic shape in place, refine the outline by adding gentle curves to the top and bottom of the oval. These curves should be smooth and flowing, with no sharp angles or abrupt changes in direction. As you work on the outline, keep in mind the overall shape and proportions of the ladybug's body, making adjustments as needed to ensure that your drawing is accurate and visually appealing. With the oval shape in place, you can begin to add the ladybug's distinctive spots and other features, bringing your drawing to life.
2. Adding the ladybug's distinctive black spots
. Here is the content of the article: The ladybug's body is typically oval in shape and divided into three main parts: the head, thorax, and abdomen. To draw the body, start by sketching a rough outline of the oval shape, making sure to include the three main parts. The head should be slightly smaller than the thorax, and the abdomen should be the largest section. Add some gentle curves to the body to give it a more rounded appearance. Once you have the basic shape of the body, you can start adding some features. The ladybug's head is characterized by a pair of antennae, which are usually quite short and stubby. You can draw these as two small lines protruding from the top of the head. The eyes are also quite large and round, and are usually black in color. You can draw these as two small circles on either side of the head. The thorax is the middle section of the body, and is usually slightly narrower than the abdomen. This is where the ladybug's wings are attached, and you can draw these as two small triangles on either side of the thorax. The wings are usually quite colorful, with a distinctive red and black pattern. The abdomen is the largest section of the body, and is usually quite rounded in shape. This is where the ladybug's distinctive black spots are located, and you can draw these as small circles or ovals scattered across the abdomen. The number and pattern of the spots can vary depending on the species of ladybug, but most have between 7-9 spots. To add some final details to your ladybug drawing, you can add some texture to the body and wings. Ladybugs have a distinctive waxy texture to their bodies, which you can draw as a series of small, rounded bumps. You can also add some veins to the wings, which are usually quite prominent. Overall, drawing a ladybug is a fun and rewarding activity that can be enjoyed by people of all ages. With a little practice and patience, you can create a beautiful and realistic drawing of these charming insects. Here is the content of the paragraphy: Adding the ladybug's distinctive black spots is a crucial step in creating a realistic drawing. The spots are usually small and round, and are scattered across the abdomen in a specific pattern. The number and pattern of the spots can vary depending on the species of ladybug, but most have between 7-9 spots. To draw the spots, start by sketching a small circle
3. Sketching the ladybug's wings and wing covers
. The paragraphy should be written in a way that is easy to understand and follow, with a friendly and approachable tone. Here is the paragraphy: Sketching the ladybug's wings and wing covers is a crucial step in bringing your ladybug to life. Start by drawing two small oval shapes on either side of the body, making sure they are slightly tilted and angled downwards. These will be the ladybug's wings, which are usually a translucent yellow or orange color. Next, draw two smaller oval shapes on top of the wings, which will be the wing covers. The wing covers are usually a darker color than the wings and have a more rounded shape. Make sure to leave a small gap between the wing covers and the wings to create a sense of depth and dimension. You can also add some gentle curves to the edges of the wings and wing covers to give them a more natural and organic shape. As you sketch the wings and wing covers, pay attention to the proportions and make sure they are in balance with the rest of the body. Remember, the wings and wing covers are an essential part of the ladybug's anatomy, and getting them right will help bring your drawing to life.
Adding Details and Refining Your Ladybug Drawing
Here is the introduction paragraph: Now that you have a solid foundation in understanding the basic structure of a ladybug, it's time to add the finer details that will bring your drawing to life. In this article, we'll explore the essential elements that will take your ladybug drawing from simple to stunning. We'll start by adding the ladybug's eyes and mouth, which will give your drawing a sense of personality and expression. Next, we'll delve into adding texture and pattern to the ladybug's body, which will add depth and visual interest to your drawing. Finally, we'll refine the ladybug's legs and antennae, which will complete the overall look and feel of your ladybug. By the end of this article, you'll have a comprehensive understanding of how to add details and refine your ladybug drawing, building on the foundational knowledge of Understanding the Basic Structure of a Ladybug.
1. Drawing the ladybug's eyes and mouth
. Here is the paragraphy: To bring your ladybug to life, it's time to add some personality with the eyes and mouth. Start by drawing two small circles for the eyes, making sure to leave a small gap between them. The eyes should be positioned on either side of the head, about one-third of the way down from the top. For the mouth, draw a small curved line below the eyes, making sure it's centered and symmetrical. You can also add some personality to your ladybug by adjusting the shape and size of the eyes and mouth. For example, you could make the eyes larger and more rounded to give your ladybug a cute and friendly appearance, or make the mouth smaller and more subtle to give it a more serious look. Additionally, you could add some details such as eyelashes or a tongue to give your ladybug some extra character. The key is to have fun and experiment with different expressions until you find one that you like.
2. Adding texture and pattern to the ladybug's body
. Here is the paragraphy: When it comes to adding texture and pattern to the ladybug's body, there are a few key elements to focus on. First, consider the ladybug's elytra, or wing covers, which are typically a deep red color with black spots. To create a realistic texture, use short, curved lines to suggest the rounded shape of the elytra, and add a series of small, rounded bumps to give the appearance of a slightly bumpy surface. You can also add some subtle shading to the elytra to give them a sense of depth and dimension. Next, turn your attention to the ladybug's abdomen, which is typically a shiny black color with a series of small, white spots. To create a realistic sheen, use smooth, flowing lines to suggest the curved shape of the abdomen, and add some subtle highlights to give the appearance of reflected light. Finally, don't forget to add some texture to the ladybug's legs and antennae, which can be achieved using short, curved lines and small, rounded bumps. By adding these textures and patterns, you can create a more detailed and realistic ladybug drawing that really brings your subject to life.
3. Refining the ladybug's legs and antennae
. Here is the paragraphy:
Refining the ladybug's legs and antennae is a crucial step in adding details to your drawing. Start by drawing the legs, which are usually thin and jointed. Ladybugs have six legs, and each leg is divided into three parts: the coxa, trochanter, and tarsus. The coxa is the base of the leg, the trochanter is the middle part, and the tarsus is the end part. You can draw the legs as thin lines, making sure to add joints to give them a more realistic look. The front legs are usually shorter than the back legs, so keep that in mind when drawing. Next, move on to the antennae, which are usually long and thin. Ladybugs have two antennae, one on each side of their head. You can draw the antennae as long, thin lines that are slightly curved. Make sure to add a small ball at the end of each antenna to give it a more realistic look. You can also add some texture to the antennae to make them look more like they're made of tiny hairs. By refining the legs and antennae, you can add a lot of detail to your ladybug drawing and make it look more realistic.