How To Crochet A Hat For Beginners
Here is the introduction paragraph: Welcome to the world of crochet, where creativity meets relaxation. If you're a beginner looking to try your hand at this rewarding hobby, you've come to the right place. In this article, we'll guide you through the process of crocheting a hat, a great project for those just starting out. To get started, it's essential to understand the basics of crochet, including the tools and techniques you'll need to know. Once you have a solid foundation, you can begin preparing to crochet a hat, choosing the right yarn, hook, and pattern for your project. With these basics in place, you'll be ready to start crocheting your hat, following a simple and straightforward process that will have you wearing your new creation in no time. So, let's begin by understanding the basics of crochet.
Understanding the Basics of Crochet
Understanding the basics of crochet is essential for beginners who want to create beautiful and intricate projects. To get started, it's crucial to grasp the fundamental concepts of crochet, including choosing the right hook and yarn, learning basic stitches and techniques, and understanding crochet patterns and abbreviations. By mastering these basics, crocheters can unlock a world of creative possibilities and produce stunning pieces that showcase their skills. Choosing the right hook and yarn is a critical first step, as it can significantly impact the overall look and feel of a project. With so many options available, selecting the perfect combination can be overwhelming, but with a little guidance, beginners can make informed decisions and set themselves up for success. By understanding the different types of hooks and yarns, crocheters can ensure that their projects turn out as envisioned, and that's where we'll start our journey into the world of crochet.
Choosing the Right Hook and Yarn
When it comes to choosing the right hook and yarn for your crochet project, there are several factors to consider. The type of yarn you choose will greatly impact the look and feel of your finished hat, so it's essential to select a yarn that suits the season and the style you're aiming for. For a beginner, it's best to start with a medium-weight yarn that is easy to work with and provides good stitch definition. Acrylic, cotton, and blends are popular choices for beginners because they are soft, durable, and easy to care for. When it comes to the hook, the size will depend on the type of yarn you've chosen and the tension of your stitches. A good rule of thumb is to start with a hook that is one size smaller than the recommended size on the yarn label. This will ensure that your stitches are not too loose or too tight, and will give you a fabric that is comfortable to wear. It's also important to consider the material of the hook, with aluminum and steel being popular choices for their durability and smoothness. Ultimately, the key to choosing the right hook and yarn is to experiment and find what works best for you and your project. By trying out different combinations, you'll be able to find the perfect pairing that will help you create a beautiful and comfortable hat.
Learning Basic Stitches and Techniques
Learning basic stitches and techniques is a crucial step in mastering the art of crochet. To start, it's essential to understand the basic stitches, including the chain stitch, single crochet, half double crochet, and double crochet. The chain stitch is the foundation of most crochet projects, and it's used to create a starting chain or to join two pieces of crocheted fabric together. The single crochet is a versatile stitch that can be used to create a wide range of fabrics, from lacy to dense. The half double crochet and double crochet stitches are used to create more textured and dimensional fabrics. In addition to mastering these basic stitches, it's also important to learn various techniques, such as increasing and decreasing stitches, working in the round, and joining and fastening off. Increasing stitches allows you to shape your project, while decreasing stitches helps to reduce the number of stitches in a row. Working in the round is a technique used to create circular or tubular shapes, such as hats, sleeves, and cuffs. Joining and fastening off are essential techniques to know, as they allow you to join two pieces of crocheted fabric together and secure the final stitches of your project. By mastering these basic stitches and techniques, you'll be well on your way to creating beautiful and professional-looking crochet projects, including hats, scarves, and other accessories. With practice and patience, you'll be able to tackle more complex projects and develop your own unique crochet style.
Understanding Crochet Patterns and Abbreviations
Understanding crochet patterns and abbreviations is a crucial step in learning how to crochet a hat for beginners. Crochet patterns are written instructions that guide you through the process of creating a specific project, such as a hat. These patterns use a combination of words, symbols, and abbreviations to convey the necessary information. To read a crochet pattern, you need to understand the abbreviations and symbols used. Common abbreviations include ch (chain), sc (single crochet), hdc (half double crochet), dc (double crochet), and st (stitch). You'll also encounter symbols such as * (asterisk), which indicates a repeat, and ( ) (parentheses), which group stitches together. Familiarizing yourself with these abbreviations and symbols will help you to read patterns with confidence and accuracy. Additionally, understanding the pattern's structure, including the gauge, yarn weight, and hook size, is essential to ensure that your finished hat fits properly and looks as intended. By taking the time to learn and understand crochet patterns and abbreviations, you'll be able to tackle a wide range of projects, including hats, scarves, and blankets, and enjoy the creative process of crochet.
Preparing to Crochet a Hat
Preparing to crochet a hat can be a fun and rewarding experience, but it requires some planning and preparation to ensure a perfect fit and a beautiful finish. To start, it's essential to measure your head to determine the correct size of your hat. This will ensure that your hat is comfortable and sits properly on your head. In addition to measuring your head, selecting the right yarn and hook size is crucial to achieve the desired texture and drape of your hat. A swatch is also necessary to ensure that your tension and gauge are correct, which will affect the overall size and fit of your hat. By taking the time to measure your head, select the right yarn and hook size, and create a swatch, you'll be well on your way to creating a beautiful and well-fitting hat. So, let's start with the first step: Measuring Your Head for a Perfect Fit.
Measuring Your Head for a Perfect Fit
To ensure a perfect fit, measuring your head is a crucial step in crocheting a hat. To do this, you'll need a flexible measuring tape or a piece of string. Wrap the measuring tape or string around the widest part of your head, usually just above your eyebrows and ears. Make sure the tape or string is level and not too tight or too loose. Take note of the circumference of your head in inches or centimeters. You can also use a hat that fits you well as a reference to measure the circumference. If you're using a pattern, check the recommended head circumference to ensure you're making the right size. Keep in mind that different yarns and stitch patterns can affect the fit of the hat, so it's always a good idea to swatch and block your work before starting your project. By taking the time to measure your head accurately, you'll be able to create a hat that fits comfortably and looks great.
Selecting the Right Yarn and Hook Size for Your Hat
When it comes to selecting the right yarn and hook size for your hat, there are several factors to consider. First, think about the season and the intended use of the hat. If you're making a winter hat, you'll want to choose a thicker, warmer yarn, while a summer hat can be made with a lighter, breathable yarn. Next, consider the fiber content of the yarn. Acrylic yarns are great for beginners because they're soft, easy to work with, and affordable. Wool yarns, on the other hand, are great for colder climates because they provide excellent insulation. Cotton yarns are perfect for spring and summer hats because they're lightweight and absorbent. When it comes to hook size, it's essential to choose a hook that's the right size for your yarn. A hook that's too small will result in a dense, stiff fabric, while a hook that's too large will result in a loose, sloppy fabric. To ensure you're using the right hook size, check the yarn label for recommendations or consult a crochet pattern specifically designed for your yarn. As a general rule, a smaller hook is best for intricate patterns, while a larger hook is best for looser, more textured patterns. By choosing the right yarn and hook size, you'll be able to create a hat that's not only beautiful but also comfortable and functional.
Creating a Swatch to Ensure Tension and Gauge
Creating a swatch is a crucial step in ensuring that your crochet hat turns out the right size and has the desired texture. A swatch is a small sample of crocheted fabric that allows you to test your yarn, hook, and stitch pattern before starting your project. To create a swatch, start by crocheting a square or rectangle using the same yarn, hook, and stitch pattern that you plan to use for your hat. Make sure to crochet a sufficient number of rows and stitches to get an accurate gauge. The gauge is the measure of how many stitches and rows are in a certain measurement, usually 4 inches (10 cm). Once you have completed your swatch, block it by wetting it, stretching it out to the desired shape, and allowing it to dry. This will give you an accurate measurement of your gauge. If your gauge is off, you may need to adjust your hook size or yarn weight to get the desired tension. By taking the time to create a swatch, you can ensure that your hat will be the right size and have the desired texture, saving you time and frustration in the long run.
Crocheting a Hat for Beginners
Here is the introduction paragraph: Crocheting a hat for beginners can be a fun and rewarding project, allowing you to create a unique and personalized accessory while developing your crochet skills. To get started, it's essential to begin with a simple beanie pattern, which will help you build confidence and master the basic stitches. As you progress, you'll learn how to work in the round and shape the hat to fit your head perfectly. Finally, you'll discover how to add a brim and finish the hat with a professional touch. In this article, we'll guide you through each step, starting with a simple beanie pattern that will lay the foundation for your crochet hat-making journey.
Starting with a Simple Beanie Pattern
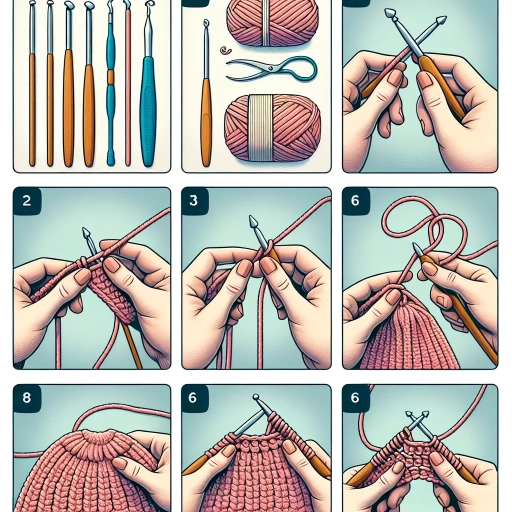
When starting with a simple beanie pattern, it's essential to begin with the basics. First, choose a yarn that suits the season and the desired texture of your hat. Acrylic, cotton, and blends are popular choices for beginners. Next, select a hook size that corresponds to the yarn weight and the desired tension of your stitches. A size J (6.0mm) or K (6.5mm) hook is a good starting point for most beanie patterns. Now, let's move on to the pattern itself. A simple beanie typically starts with a magic ring or a chain of stitches that form the foundation of the hat. The magic ring is a great way to start, as it creates a seamless join and allows you to work in a continuous spiral. To create a magic ring, hold the yarn in your non-dominant hand, make a loop with the yarn, and then insert the hook into the loop. Pull the yarn tight to create a small ring, and then chain one stitch to secure it. From here, you can start crocheting in a spiral, working in a continuous round without joining. The most common stitch pattern for a simple beanie is the single crochet (sc) stitch. To work a sc stitch, insert the hook into the stitch indicated, yarn over, pull up a loop, yarn over, pull through both loops on the hook. Repeat this process, working in a spiral, until your hat reaches the desired height. As you work, make sure to keep your tension even and not too tight, as this can cause the hat to pucker. Finally, when you're ready to finish your hat, simply fasten off the yarn and weave in the ends. You can also add a border or a pom-pom to give your hat a personalized touch. With these simple steps, you'll be well on your way to creating a cozy and stylish beanie that's perfect for any occasion.
Working in the Round and Shaping the Hat
Working in the round and shaping the hat are crucial steps in crocheting a hat for beginners. To work in the round, you'll need to join the first stitch of the round to the last stitch of the previous round, creating a seamless circle. This is typically done by inserting the hook into the stitch indicated in the pattern or the first stitch of the round, and then pulling up a loop. You'll then continue to crochet in a spiral, working one stitch in each stitch around the circle. As you work in the round, you'll need to keep track of the first stitch of each round, which can be marked with a stitch marker. Shaping the hat involves decreasing stitches to form the crown of the hat. This is typically done by working two stitches together, which will reduce the number of stitches in the round. The pattern will usually indicate when to start decreasing stitches, and how many stitches to decrease in each round. It's essential to follow the pattern carefully, as decreasing too many stitches can result in a hat that's too small, while decreasing too few stitches can result in a hat that's too large. By working in the round and shaping the hat correctly, you'll be able to create a hat that fits comfortably and looks great.
Adding a Brim and Finishing the Hat
Adding a brim and finishing the hat is the final step in creating a beautiful and functional crochet hat. To add a brim, start by single crocheting around the entire hat, making sure to maintain a consistent tension. This will create a smooth and even edge. Next, chain one and work a single crochet stitch in each stitch around the hat, working in a continuous spiral. This will create a sturdy and comfortable brim that will help the hat stay in place. To finish the hat, fasten off the yarn and weave in the ends. Block the hat to give it a professional finish and to even out the stitches. Finally, add any embellishments, such as a pom-pom or a button, to give the hat a personalized touch. With these final steps, your crochet hat is now complete and ready to wear.