How To Test Yeast
Yeast, a microscopic fungus, plays a crucial role in baking, brewing, and various culinary applications. Its ability to ferment sugars and produce carbon dioxide is essential for creating light, airy breads and other baked goods. However, the success of these processes heavily depends on the viability and quality of the yeast being used. Understanding how to test yeast is vital for both professional bakers and home cooking enthusiasts to ensure consistent and delicious results. This article will explore the importance of yeast in baking, common methods for testing yeast viability, and advanced techniques for assessing yeast quality. By delving into these topics, readers will gain a comprehensive understanding of yeast testing, enabling them to make informed decisions about their baking ingredients and processes. Whether you're a novice baker or an experienced professional, mastering the art of yeast testing can significantly improve your culinary creations. To begin our exploration of yeast testing, let's first examine the nature of yeast and its significance in the baking process.
Understanding Yeast and Its Importance in Baking
Yeast, a microscopic fungus, plays a crucial role in the world of baking, transforming simple ingredients into delectable breads, pastries, and other baked goods. This tiny organism has been a staple in kitchens for thousands of years, yet many home bakers and cooking enthusiasts still find it mysterious and sometimes intimidating. In this article, we will demystify yeast and explore its significance in the baking process. We'll begin by delving into the role of yeast in fermentation and leavening, uncovering how it creates the bubbles that make our breads rise and develop complex flavors. Next, we'll examine the different types of yeast available to bakers, from active dry to instant and fresh yeast, discussing their unique characteristics and best uses. Finally, we'll investigate the various factors that affect yeast activity and performance, such as temperature, sugar content, and pH levels, providing insights on how to optimize your baking results. By the end of this exploration, you'll have a comprehensive understanding of yeast and its importance in baking, empowering you to create perfect loaves and pastries with confidence.
The role of yeast in fermentation and leavening
Yeast plays a crucial role in fermentation and leavening, two fundamental processes in baking that contribute significantly to the texture, flavor, and appearance of baked goods. As single-celled microorganisms belonging to the fungus kingdom, yeast species such as Saccharomyces cerevisiae are the unsung heroes of the baking world, working tirelessly behind the scenes to transform simple ingredients into delectable treats. During fermentation, yeast consumes sugars present in the dough or batter, converting them into carbon dioxide gas and ethanol through a process called alcoholic fermentation. This metabolic activity serves two primary purposes in baking. Firstly, the production of carbon dioxide gas is responsible for the leavening effect, causing the dough to rise and create the characteristic airy texture found in many baked goods. As the gas bubbles form and expand, they become trapped within the gluten network of the dough, resulting in a light and fluffy final product. Secondly, the fermentation process contributes to the development of complex flavors and aromas that are hallmarks of well-crafted breads and pastries. The leavening action of yeast is particularly important in bread-making, where it is responsible for creating the open, porous structure that defines many bread varieties. As the yeast continues to produce carbon dioxide during proofing and the early stages of baking, the dough expands, forming the characteristic holes or "crumb" in the bread's interior. This process not only affects the texture but also influences the bread's ability to absorb sauces and hold toppings, making it an essential component of the overall eating experience. Moreover, the byproducts of yeast fermentation, including organic acids and aromatic compounds, contribute to the depth of flavor in baked goods. These compounds interact with other ingredients and undergo further reactions during baking, resulting in the complex taste profiles that distinguish artisanal breads from their mass-produced counterparts. The slight tang in sourdough breads, for instance, is a direct result of the lactic and acetic acids produced by wild yeast strains during extended fermentation periods. Understanding the role of yeast in fermentation and leavening is crucial for bakers seeking to perfect their craft. By manipulating variables such as yeast quantity, fermentation time, and temperature, bakers can control the final texture, flavor, and appearance of their products. This knowledge allows for the creation of a wide range of baked goods, from light and airy brioche to dense and chewy bagels, each with its own unique characteristics derived from the careful management of yeast activity. In conclusion, the role of yeast in fermentation and leavening is indispensable in the world of baking. Its ability to produce gas, develop flavors, and create textures makes it a versatile and powerful tool in the baker's arsenal. By harnessing the power of these microscopic organisms, bakers can continue to innovate and create the diverse array of breads and pastries that enrich our culinary experiences.
Different types of yeast and their characteristics
Yeast, a microscopic fungus, plays a crucial role in baking, and understanding the different types and their characteristics is essential for achieving optimal results in your baked goods. There are several varieties of yeast available to bakers, each with its own unique properties and applications. Active dry yeast is one of the most common types used in home baking. It comes in small granules and needs to be rehydrated before use, typically in warm water with a pinch of sugar. This type of yeast is known for its reliability and long shelf life, making it a popular choice for occasional bakers. Active dry yeast produces a slower, more controlled rise, which can be beneficial for developing complex flavors in bread. Instant yeast, also known as rapid-rise or quick-rise yeast, is another widely used variety. As the name suggests, it doesn't require rehydration and can be mixed directly into dry ingredients. Instant yeast is more finely ground than active dry yeast and contains enzymes that allow it to work more quickly. This makes it ideal for recipes that require a shorter rising time or for bakers who want to speed up the process. Fresh yeast, also called cake yeast or compressed yeast, is less common in home baking but is favored by many professional bakers. It comes in small blocks and has a crumbly texture. Fresh yeast is highly perishable and must be refrigerated, but it's prized for its robust flavor and vigorous fermentation. It's particularly well-suited for enriched doughs like brioche or sweet rolls. Sourdough starter is a unique form of wild yeast cultivation. It's a fermented mixture of flour and water that contains naturally occurring wild yeasts and bacteria. Sourdough starters require regular feeding and maintenance but offer complex flavors and textures that can't be achieved with commercial yeasts. They're essential for creating authentic sourdough breads and can also be used in various other baked goods for added depth of flavor. Brewers' yeast, while not typically used in baking, is worth mentioning for its nutritional properties. It's a byproduct of beer making and is rich in B-vitamins and minerals. While it has a bitter taste that makes it unsuitable for most baked goods, it's often used as a nutritional supplement. Each type of yeast has its own temperature range for optimal activity. Active dry and instant yeasts generally perform best between 110°F and 115°F, while fresh yeast prefers slightly cooler temperatures around 95°F to 100°F. Sourdough starters are typically maintained at room temperature or in the refrigerator, depending on feeding schedules. Understanding these different types of yeast and their characteristics allows bakers to choose the most appropriate variety for their recipes and desired outcomes. Whether you're looking for convenience, flavor complexity, or nutritional benefits, there's a type of yeast suited to your baking needs. Experimenting with different yeasts can open up new possibilities in your baking adventures, leading to a diverse range of textures, flavors, and fermentation profiles in your bread and other yeast-leavened products.
Factors that affect yeast activity and performance
Yeast, a microscopic fungus, plays a crucial role in baking, particularly in the production of bread and other leavened goods. Its ability to ferment sugars and produce carbon dioxide gas is what gives bread its characteristic rise and texture. However, several factors can significantly impact yeast activity and performance, ultimately affecting the quality of the final baked product. Temperature is perhaps the most critical factor influencing yeast activity. Yeast thrives in warm environments, typically between 70°F and 80°F (21°C to 27°C). At these temperatures, yeast cells multiply rapidly and produce carbon dioxide efficiently. Cooler temperatures slow down yeast activity, while excessive heat can kill the yeast cells altogether. This is why it's essential to use lukewarm water when activating yeast and to proof dough in a warm, draft-free area. The availability of food sources also greatly affects yeast performance. Yeast primarily feeds on simple sugars, which are typically present in flour or added separately to the dough. Without an adequate food supply, yeast activity will be limited, resulting in poor fermentation and insufficient rise. Conversely, too much sugar can actually inhibit yeast activity due to osmotic stress on the cells. Moisture levels play a significant role in yeast activity as well. Yeast requires a moist environment to thrive and perform its fermentation process effectively. Insufficient moisture can lead to slow or incomplete fermentation, while excess moisture can dilute the dough and affect its texture. Achieving the right balance of hydration in your dough is crucial for optimal yeast performance. The pH level of the dough also impacts yeast activity. Yeast prefers slightly acidic environments, with an optimal pH range between 4.5 and 6.0. Ingredients like salt, which is commonly used in bread recipes, can affect the pH and, in turn, influence yeast activity. While salt is necessary for flavor and to control yeast growth, excessive amounts can inhibit yeast performance. Other ingredients in the dough can also affect yeast activity. For instance, fats and oils can coat yeast cells, potentially slowing down their metabolism. Similarly, certain spices and herbs with antimicrobial properties may inhibit yeast growth if used in large quantities. The freshness and quality of the yeast itself are paramount. Expired or improperly stored yeast may have reduced activity or be completely inactive. This is why it's crucial to store yeast properly and check its viability before use, especially if it's been sitting in your pantry for a while. Lastly, the presence of competing microorganisms can impact yeast performance. While some bacteria, like those in sourdough starters, can work synergistically with yeast, others may compete for resources or produce compounds that inhibit yeast activity. Understanding these factors and how they interplay is essential for bakers looking to achieve consistent, high-quality results in their bread-making endeavors. By carefully controlling these variables, bakers can optimize yeast activity and performance, leading to perfectly risen, flavorful, and textured breads.
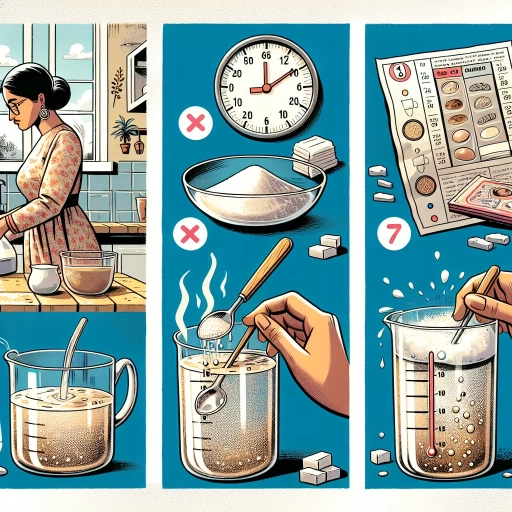
Common Methods for Testing Yeast Viability
Yeast is a crucial ingredient in baking, responsible for the rise and flavor development in many beloved breads and pastries. However, the success of your baked goods often hinges on the viability of the yeast you use. Ensuring that your yeast is active and ready to perform its leavening magic is essential for achieving consistent, high-quality results in your baking endeavors. This article explores three common methods for testing yeast viability, each offering a simple yet effective approach to determining whether your yeast is up to the task. We'll delve into the proofing method, which involves testing yeast in warm water and sugar to observe its fermentation activity. Next, we'll examine the float test, a quick technique for assessing yeast activity using cold water. Finally, we'll discuss the use of a thermometer to check yeast activation temperature, ensuring optimal conditions for yeast performance. By mastering these methods, you'll be better equipped to troubleshoot baking issues and achieve superior results in your kitchen. Before we explore these testing techniques in detail, let's first gain a deeper understanding of yeast and its vital role in the baking process.
The proofing method: Testing yeast in warm water and sugar
The proofing method, also known as the yeast activation test, is a popular and reliable technique for assessing yeast viability before incorporating it into a recipe. This method is particularly useful for bakers and home cooks who want to ensure their yeast is active and capable of producing the desired leavening effect in their baked goods. The process involves combining yeast with warm water and sugar, creating an environment that encourages yeast activity and allows for easy observation of its performance. To begin the proofing method, start by measuring a small amount of warm water, typically around 110°F to 115°F (43°C to 46°C). This temperature range is crucial, as water that is too hot can kill the yeast, while water that is too cool may not activate it effectively. Next, add a pinch of sugar to the warm water, which serves as a food source for the yeast and helps stimulate its activity. Finally, sprinkle the yeast over the surface of the sugar-water mixture and gently stir to combine. After combining the ingredients, allow the mixture to sit undisturbed for about 5 to 10 minutes. During this time, if the yeast is viable and active, you should observe several key indicators. First, the mixture will begin to foam and develop a creamy, frothy layer on top. This foam is a result of the yeast consuming the sugar and producing carbon dioxide as a byproduct. Additionally, you may notice a distinct yeasty aroma emanating from the mixture, further confirming the yeast's activity. The proofing method is particularly effective because it mimics the conditions yeast encounters in a typical bread dough or other yeasted recipe. By providing warmth, moisture, and a food source, you create an ideal environment for the yeast to thrive and demonstrate its viability. This test not only confirms that the yeast is alive but also provides insight into its vigor and potential performance in your recipe. It's important to note that different types of yeast may react slightly differently during the proofing process. For instance, active dry yeast typically requires proofing and will show more dramatic foaming compared to instant yeast, which can often be added directly to dry ingredients without proofing. However, testing instant yeast using this method can still provide valuable information about its viability, especially if the yeast is nearing its expiration date or has been stored in less-than-ideal conditions. If your yeast fails to produce foam or show signs of activity during the proofing test, it's likely that the yeast is no longer viable and should be discarded. In this case, it's crucial to obtain fresh yeast before proceeding with your recipe to ensure successful leavening and proper rise in your baked goods. By incorporating the proofing method into your baking routine, you can confidently assess the quality of your yeast and avoid the disappointment of flat or poorly risen baked products.
The float test: Determining yeast activity in cold water
The float test is a simple yet effective method for determining yeast activity in cold water, making it an invaluable tool for bakers and brewers alike. This test is particularly useful when working with dry yeast, as it provides a quick and easy way to assess the yeast's viability before incorporating it into a recipe. The principle behind the float test is straightforward: active yeast cells will produce carbon dioxide gas when exposed to water and sugar, causing them to float to the surface. To perform the float test, begin by filling a small glass or cup with lukewarm water (about 100°F or 38°C). Add a small amount of sugar (about 1/8 teaspoon) to the water and stir until dissolved. This sugar provides food for the yeast, encouraging activity if the cells are viable. Next, sprinkle a small amount of dry yeast (about 1/4 teaspoon) onto the surface of the water. It's important not to stir the mixture at this point, as doing so could interfere with the results. Observe the yeast for about 10 minutes. If the yeast is active and viable, you should see it begin to foam and rise to the surface within 5-10 minutes. This foaming action is caused by the production of carbon dioxide gas as the yeast metabolizes the sugar in the water. The more vigorous the foaming and the quicker it occurs, the more active the yeast is likely to be. If you see little to no activity after 10 minutes, it's a strong indication that the yeast may be dead or have significantly reduced viability. While the float test is a useful indicator of yeast activity, it's important to note that it has some limitations. For instance, it may not be as accurate for testing instant yeast, which is designed to be mixed directly into dry ingredients. Additionally, factors such as water temperature and the age of the yeast can influence the results. Water that is too cold may slow down yeast activity, while water that is too hot can kill the yeast cells outright. Despite these limitations, the float test remains a popular and accessible method for home bakers and small-scale brewers to quickly assess yeast viability. It requires no specialized equipment and can be performed with materials readily available in most kitchens. By incorporating this simple test into their baking or brewing routine, individuals can save time and ingredients by identifying inactive yeast before it compromises their recipes. In conclusion, the float test is a valuable tool in the arsenal of techniques for testing yeast viability. Its simplicity, speed, and reliability make it an excellent first-line method for assessing yeast activity, particularly when working with dry yeast in home baking and brewing applications. While it should not be relied upon as the sole indicator of yeast health, the float test provides a quick and easy way to gauge yeast viability and can help ensure successful fermentation in a wide range of culinary and brewing projects.
Using a thermometer to check yeast activation temperature
Using a thermometer to check yeast activation temperature is a crucial step in ensuring optimal yeast performance and, ultimately, the success of your fermentation process. This method provides valuable insight into whether your yeast is ready to begin its work and can help you avoid common pitfalls associated with improper temperature control. To begin, it's essential to understand that different yeast strains have varying ideal temperature ranges for activation. Generally, most yeast strains prefer temperatures between 95°F and 115°F (35°C to 46°C). However, always consult the specific instructions for your yeast strain, as some may have more precise requirements. To perform this test, you'll need a clean, accurate thermometer – preferably a digital instant-read thermometer for quick and precise readings. Start by adding your yeast to a small amount of warm water or wort, following the manufacturer's recommended ratios. Gently stir the mixture to ensure even distribution of the yeast. Insert the thermometer into the liquid, being careful not to touch the sides or bottom of the container, as this can affect the reading. Wait for the temperature to stabilize, which usually takes about 15-30 seconds. Compare the reading to the recommended activation temperature for your specific yeast strain. If the temperature is within the ideal range, you can expect to see signs of activation within 5-15 minutes. These signs may include foaming, bubbling, or a slight change in the mixture's appearance. If the temperature is too low, the yeast may remain dormant or activate slowly, potentially leading to a sluggish fermentation. Conversely, if the temperature is too high, you risk damaging or killing the yeast cells, which can result in off-flavors or failed fermentation. It's important to note that this method not only helps you determine if the yeast is at the right temperature for activation but also serves as a safeguard against accidentally using water that's too hot, which is a common mistake among novice brewers. By consistently checking the temperature before pitching your yeast, you can develop good habits that will improve your brewing process over time. While using a thermometer is an excellent way to ensure proper activation temperature, it's just one part of a comprehensive approach to yeast management. Combining this method with other viability tests, such as the rehydration test or microscopic examination, can provide a more complete picture of your yeast's health and readiness for fermentation. Remember that temperature control remains crucial throughout the fermentation process, not just during activation. Many brewers and winemakers use temperature-controlled fermentation chambers or water baths to maintain ideal conditions for their yeast throughout the entire fermentation period. By paying close attention to temperature at every stage, you'll be well on your way to consistently producing high-quality fermented beverages.
Advanced Techniques for Yeast Quality Assessment
In the world of baking, yeast plays a pivotal role in creating the perfect loaf of bread, the fluffiest pizza crust, or the most delectable pastries. As such, ensuring the quality of yeast is paramount for both professional bakers and home enthusiasts alike. Advanced techniques for yeast quality assessment have evolved significantly, allowing for more precise and reliable evaluations of this crucial ingredient. This article delves into three cutting-edge methods that have revolutionized yeast quality control: microscopic examination of yeast cells, measuring gas production with specialized equipment, and conducting pH tests to evaluate yeast health. By employing these sophisticated techniques, bakers can gain invaluable insights into the viability, activity, and overall performance of their yeast, ultimately leading to superior baked goods. As we explore these advanced assessment methods, it becomes clear that the science behind yeast quality is as intricate as it is fascinating. Understanding these techniques not only enhances the baking process but also deepens our appreciation for the complex nature of yeast and its vital importance in the culinary world. Let us now embark on a journey to uncover the mysteries of yeast and its significance in the art of baking.
Microscopic examination of yeast cells
Microscopic examination of yeast cells is a fundamental yet powerful technique in assessing yeast quality, offering invaluable insights into the health, viability, and overall condition of a yeast population. This method allows brewers and quality control specialists to directly observe individual cells, providing a wealth of information that complements other analytical techniques. To perform a microscopic examination, a small sample of yeast is placed on a slide and viewed under a microscope, typically at 400x to 1000x magnification. The use of phase contrast microscopy can enhance the visibility of cellular structures without the need for staining. However, various staining techniques can be employed to highlight specific cellular features or differentiate between live and dead cells. One of the primary aspects observed during microscopic examination is cell morphology. Healthy yeast cells appear plump, oval-shaped, and uniform in size. Irregularities in shape or size can indicate stress, contamination, or genetic mutations. The presence of elongated cells, known as pseudohyphae, may suggest nutrient deficiencies or other environmental stressors. Budding patterns and scars are also important indicators of yeast health and generation. Young, healthy cells typically exhibit clear bud scars, while older cells may show multiple scars. The observation of budding patterns can provide insights into the yeast's reproductive rate and overall vitality. Microscopy allows for the detection of intracellular structures such as vacuoles, which can indicate the cell's metabolic state. Large, prominent vacuoles might suggest nutrient depletion or cellular stress. Additionally, the presence and appearance of glycogen and lipid deposits within cells can offer clues about the yeast's nutritional status and storage reserves. One of the most critical applications of microscopic examination is the assessment of yeast viability. Techniques such as methylene blue staining can differentiate between live and dead cells, with dead cells appearing blue due to their compromised cell membranes. This simple yet effective method provides a quick estimate of the viable cell count, which is crucial for determining pitching rates and assessing overall yeast health. Furthermore, microscopic examination is invaluable for detecting contamination. Bacterial cells, wild yeasts, or other microorganisms can be visually identified, allowing for early detection of potential issues in the brewing process. The presence of bacteria, which appear much smaller than yeast cells and often have distinct shapes, can be a clear sign of contamination that requires immediate attention. Advanced microscopy techniques, such as fluorescence microscopy, can provide even more detailed information about yeast cell physiology. Fluorescent dyes can be used to visualize specific cellular components or metabolic activities, offering deeper insights into cell function and health. In conclusion, microscopic examination of yeast cells is an essential tool in the brewer's arsenal for quality assessment. It provides real-time, visual data on cell morphology, viability, contamination, and overall yeast health. When combined with other analytical methods, microscopic examination contributes to a comprehensive understanding of yeast quality, enabling brewers to make informed decisions throughout the brewing process and ultimately produce consistently high-quality beer.
Measuring gas production with specialized equipment
Measuring gas production with specialized equipment is a crucial advanced technique for assessing yeast quality in brewing and baking industries. This method provides valuable insights into yeast activity, fermentation efficiency, and overall performance. By quantifying the amount of carbon dioxide produced during fermentation, brewers and bakers can accurately evaluate yeast vitality and predict the final product's quality. One of the most common instruments used for measuring gas production is the pressure-based manometric method. This technique utilizes a sealed vessel connected to a pressure sensor or manometer. As yeast metabolizes sugars and produces carbon dioxide, the gas accumulates in the headspace, increasing pressure within the vessel. The pressure change is then measured over time, providing a real-time profile of yeast activity. Modern systems often incorporate digital sensors and data logging capabilities, allowing for precise measurements and easy analysis of results. Another advanced method is the use of gas chromatography (GC) coupled with mass spectrometry (MS). This powerful analytical technique not only measures the total gas production but also identifies and quantifies individual volatile compounds produced during fermentation. GC-MS analysis can detect various flavor compounds, off-flavors, and metabolic byproducts, offering a comprehensive assessment of yeast performance and potential flavor impacts on the final product. Respirometry is another sophisticated technique used to measure yeast metabolic activity. This method monitors oxygen consumption and carbon dioxide production simultaneously, providing a more complete picture of yeast metabolism. Respirometers can measure both aerobic and anaerobic respiration, making them valuable tools for studying yeast behavior under different environmental conditions. In recent years, optical sensing technologies have gained popularity for measuring gas production. These systems use specialized sensors that detect changes in fluorescence or absorbance caused by dissolved carbon dioxide. Optical sensors offer the advantage of non-invasive, real-time monitoring without the need for sample extraction or complex setups. For large-scale industrial applications, inline gas analyzers are often employed. These systems continuously monitor gas composition in fermentation tanks or production lines, providing real-time data on carbon dioxide levels, oxygen depletion, and other relevant gases. This information allows for immediate process adjustments and quality control measures. When interpreting gas production data, it's essential to consider factors such as temperature, substrate concentration, and yeast strain characteristics. Advanced software and modeling tools can help analyze complex datasets and provide meaningful insights into yeast performance. By combining gas production measurements with other quality assessment techniques, such as cell counting, viability testing, and genetic analysis, brewers and bakers can develop a comprehensive understanding of yeast quality and optimize their processes accordingly.
Conducting pH tests to evaluate yeast health
Conducting pH tests is a crucial advanced technique for evaluating yeast health and ensuring optimal fermentation conditions. The pH level of a yeast culture or fermentation medium directly impacts yeast metabolism, growth, and overall performance. By monitoring and controlling pH, brewers and fermentation specialists can optimize yeast activity and produce high-quality products consistently. To conduct a pH test, brewers typically use electronic pH meters or pH strips. Electronic pH meters offer greater precision and are ideal for continuous monitoring, while pH strips provide a quick and cost-effective solution for spot checks. Before testing, it's essential to calibrate pH meters using standard buffer solutions to ensure accuracy. When collecting samples for pH testing, it's crucial to minimize exposure to air, as this can affect the pH reading. The optimal pH range for most brewing yeasts falls between 4.5 and 5.5, with slight variations depending on the specific strain and style of beer being produced. During fermentation, the pH naturally decreases as yeast produces organic acids. Monitoring this pH drop can provide valuable insights into fermentation progress and yeast health. A rapid or excessive drop in pH may indicate stressed yeast or contamination, while a slow decrease might suggest sluggish fermentation or poor yeast viability. Advanced pH testing techniques often involve analyzing the buffering capacity of the wort or must. This involves titrating the sample with a standard acid or base solution to determine how resistant it is to pH changes. A higher buffering capacity can help maintain stable pH levels during fermentation, potentially improving yeast performance and flavor development. Some brewers and researchers also employ pH profiling techniques, where they track pH changes throughout the entire fermentation process. This approach can reveal patterns in yeast activity and help identify optimal pH ranges for different stages of fermentation. By correlating pH profiles with other parameters such as gravity readings and volatile compound production, brewers can gain a comprehensive understanding of yeast health and fermentation dynamics. It's important to note that pH testing should be used in conjunction with other yeast quality assessment methods for a holistic evaluation. Factors such as temperature, nutrient availability, and oxygen levels can all influence pH and yeast health. Therefore, interpreting pH test results in the context of these other variables is crucial for accurate yeast health assessment. In summary, conducting pH tests is an invaluable technique for evaluating yeast health and optimizing fermentation conditions. By employing advanced pH testing methods and integrating them with other quality assessment techniques, brewers and fermentation specialists can ensure consistent yeast performance and produce high-quality fermented products.