How To Propagate Rubber Plant
 Delving into the wonderful world of botany, one quickly discovers the satisfying and rewarding nature of plant propagation. While this may sound like a complex endeavor, once mastered, it opens doors to an impressive in-house nursery. A prime example of plants perfect for this venture is the rubber plant, a household favorite due to its gorgeous, glossy leaves and air-purifying properties. This article will strip away the mystery of rubber plant propagation, walking you through the process from start to finish. Segment one will demystify the process, explaining the details and steps integral to successful propagation. The second part will arm you with the necessary tools and optimal conditions your rubber plant needs, to not just survive, but to thrive. Lastly, a compilation of time-tested tips and tricks await, that will ensure you grow a healthy, robust rubber plant. Brace yourself, as we traverse the fascinating journey from simple leaf cutting to luxuriant plant life-making, commencing with “Understanding the Process of Rubber Plant Propagation.”
Understanding the Process of Rubber Plant Propagation
Understanding the complex but extraordinary process of rubber plant propagation requires adequate knowledge and proper implementation. This intricate procedure involves a plethora of steps, which, if acted out thoroughly, can lead to the successful multiplication of these beautiful, air-purifying plants. In this article, we dig deep into the underlying science that propels propagation. We unravel the series of steps a gardener must take to ensure an efficient process. Additionally, we shed light on some common mistakes enthusiasts often make, along with their solutions. As we embark on this green journey, we'll first focus on understanding the Science Behind Propagation—an aspect that forms the backbone of the process. With this comprehension, we hope to enable enthusiasts to see beyond the mere act of cutting and planting, appreciating the intricate organic mechanics that make plant propagation possible. So, be prepared to dive deep into the captivating world of plant biology and its application in our everyday gardening activities—a topic guaranteed to amaze both beginners and seasoned gardeners alike. Let's begin by deciphering the science that makes propagation a possibility.
The Science Behind Propagation
The science behind propagation is both fascinating and crucial for successful rubber plant multiplication. In the natural world, propagation is the process through which plants reproduce, either asexually, using parts of themselves, or sexually, through seed production. As for our focus – the Ficus Elastica, commonly known as the rubber plant, it favors the asexual propagation method – meaning it uses its own body parts like stems, leaves, or cuttings to create new plants. The marvel of this process lies in the plant’s ability to reproduce from a single cell. This cell holds the identical genetic makeup as the parent plant, allowing the "offspring" plant to inherit their parent's traits entirely. This is advantageous for gardeners who wish to preserve certain desirable characteristics of the parent plant, such as its resilience, color, size, or growth pattern. Taking cuttings from the rubber plant leads to a new plant that shares the exact hardiness and adaptive traits of its parent, ensuring continuity of its inherent qualities. Rubber plant propagation is particularly favored for its simplicity and high success rate. The process starts with taking a cutting - preferably from a healthy, mature rubber plant – making sure it includes a leaf node, the point on the plant stem where new leaves originate. These nodes contain meristematic cells, which hold the power to differentiate into various types of plant tissue. When these cuttings are planted appropriately, these cells spring into action, creating everything necessary for a new, independent plant to grow. The cuttings' success is also dictated by external factors like warmth, light, and humidity. To boost the success rate, gardeners often use rooting hormone to stimulate root growth in the cuttings. In essence, the science behind propagation elucidates our understanding of the amazing capabilities of plants to self-replicate, almost like a natural form of cloning. This provides gardeners an opportunity to create new plants, maintain plant traits, and even conserve plant species. Therefore, grasping the principles of propagation and its requirements becomes vital for any plant enthusiast looking to expand their rubber plant family.
The Steps To Follow in Propagation
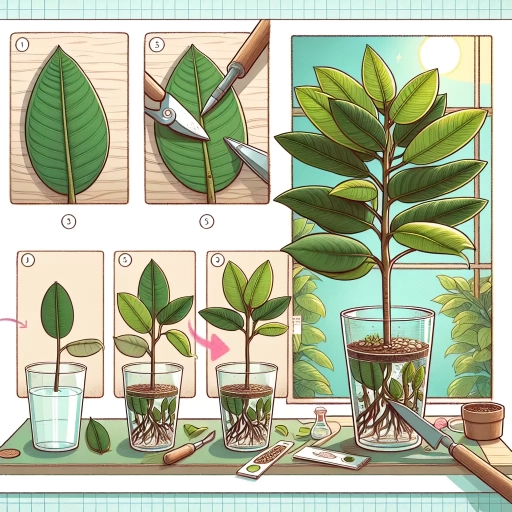
The propagation of the rubber plant is a multi-step process that involves careful planning and meticulous execution. Each step plays a crucial role in ensuring that the new plant is healthy and ready to grow. Understanding this process and all its stages is fundamental to having success in rubber plant propagation. The process starts by selecting a healthy parent plant. This is vital because a plant's overall health and condition get transferred to the new plant propagated from it. You need to pick an adult rubber plant that is in good health, vibrant, and exhibits vigorous growth. The second step is to choose the right time for propagation. The best time for rubber plant propagation is early spring, during its period of active growth. This timing is essential because the plant recover more rapidly from the 'wound' where you've removed the cutting. Subsequently, you should make a cut. Using a sharp and sterile blade, make a downward slanting cut about 5 to 7 inches long on the stem. Make sure to cut right below a node, as this is the point from where new roots will spring. Next, it's time to prepare your cutting. Remove the leaves from the bottom half of the cutting but leave a couple of leaves at the top. This is to ensure that the plant has enough foliage to continue photosynthesis but not so much that it exerts unnecessary pressure on the new roots trying to grow. The next step is to dip the end of the cutting in a rooting hormone. This hormone will stimulate root growth and increase the cutting's chances of survival. The final step is planting your cutting. Use a pot with drainage holes and fill it with a well-draining potting mix. Place the cut end of the cutting into the soil, ensuring that the node is covered. Over the next few weeks, keep the soil moist but not water-logged, and place the pot in a warm, well-lit location. Overall, the process of rubber plant propagation may seem involved, but it's also rewarding. By carefully following these steps, even inexperienced gardeners can successfully propagate a rubber plant. So go ahead, give it a try, and find the joy of watching a new rubber plant grow from a cutting.
Common Mistakes and Solutions in Propagation
One of the most critical aspects of rubber plant propagation is avoiding common pitfalls to ensure the overall health and success of your new plant. Many gardening enthusiasts, both novices and pros, often make mistakes that can detrimentally affect the propagation process. Understanding these mistakes and their corresponding solutions is key to achieving propagation success. First and foremost is the error of improper cutting. Taking the wrong cuttings - too short, too long, or from the wrong part of the plant, can stall the propagation process or stop it altogether. To remedy this, ensure your cuttings are of appropriate length, around 4-6 inches, have at least three healthy leaves, and are taken from a healthy branch. Next is less-than-ideal timing. Plants have their growth spurts and dormant periods. Propagating during the latter often leads to a failed propagation attempt. Avoid this mistake by doing your propagation in late spring or early summer when the plant is naturally growing. Another typical error is overwatering or underwatering the cuttings in the propagation medium. Both can result in plant stress, fungus growth, or rot, hindering healthy root formation. Maintaining balanced moisture levels is the key. The medium should be saturated but not waterlogged. Ignoring the right environment is another factor that leads to propagation failure. Rubber plants thrive in warm, humid environments, so it's best to recreate this climate at home. Placing the cuttings in a location with indirect light and occasional misting will help create a humidity dome, consisting of the right environment for propagation. Lastly, impatience is a mistake that deter propagators. Root development varies and can take anywhere from a few weeks to a few months. Constant checking can disturb the developing roots and slow down the process. Allow your plant to grow at its own pace and only check the cuttings for water needs or signs of decay. By understanding these common rubber plant propagation mistakes and their solutions, you can bolster the success of your propagation process. Remember, keen observation, patience, and consistent care are vital to thriving, robust rubber plants.
The Necessary Tools and Conditions for Successful Rubber Plant Propagation
The successful propagation of Rubber plants involves an intricate process that demands a deep insight into certain vital factors and tools. This step-by-step guide aims to enlighten enthusiasts, taking them through the essential tools for propagation, unraveling the optimal growing conditions and establishing the perfect environment for propagation. Realizing your gardening dreams begins with understanding the instrumental workflows. Tools, such as sharp shears, quality potting mix, rooting hormone, and a healthy parent plant, lay a solid foundation. Subsequently, optimal growing conditions, incorporating the right blend of light, temperature, and humidity, play key roles in ascertaining growth. Lastly, but not of less significance, creating the perfect propagation environment involves interplay between placement, pot dimensions, drainage, and disease control. As we delve into the details of these three critical aspects of rubber plant propagation, we commence with the understanding of the essential tools for propagation, their roles, how you can get your hands on them, and practical tips on their best use.
Essential Tools for Propagation
When it comes to propagating your rubber plant, having the right tools at your disposal is crucial for success. First and foremost, you are going to need a sharp, clean pair of pruning shears or a knife. This implement will allow you to make a precise cutting from the mother plant, reducing damage and increasing the chance of a successful propagation. Ensure that you sterilize the tool before use to prevent disease transmission. Next, a quality rooting hormone can significantly expedite and enhance the rooting process. While not strictly necessary, it stimulates quicker root development, indirectly increasing your plant's survival odds. Rooting hormones come in various forms, including gel, powder, and liquid, each with their specific application methods. Moreover, you will need a suitable container filled with the right potting medium for housing your new plant cutting. Many prefer a light, well-draining medium like a mix of perlite and peat moss. This mix retains enough moisture for the cutting to root while preventing waterlogging, a common issue that often leads to rotting. Furthermore, a clear plastic bag or a cloche provides a humid environment to encourage rooting. This tool lets you create a mini greenhouse that retains moisture and heat, stimulating root growth. However, be aware too much humidity may lead to fungus and mold growth, so ventilation is key. Don't forget about the use of a good quality, balanced water-soluble fertilizer. Once your rubber plant cutting has successfully rooted and shows new growth, you'll start feeding it to support its development. Regularly nourishing it with a blend of essential macro and micro-nutrients will lay the groundwork for a strong, healthy plant. Finally, a well-lit but indirect sunlight location will serve as a perfect setting for your propagating rubber plant. Too much direct sunlight may scorch the tender cutting, while too little light can inhibit growth. The delicate balance of these elements will pave the way for successful propagation, adding another thriving rubber plant to your indoor green oasis. In conclusion, while propagation may seem like a daunting task, equipped with these essential tools and armed with patience, anyone can have a hand at propagation. With careful attention to detail and a nurturing hand, your rubber plant cutting can flourish into a towering testament to your successful propagation journey. Remember, nature takes time; don't rush the process. Enjoy every moment of your propagation journey, from the initial cutting all the way to the final, flourishing plant.
Optimal Growing Conditions for Propagation
Understanding the optimal growing conditions for propagation is essential in successful rubber plant propagation. Initially, it's important to emulate the rubber plant's natural habitat that is typified by a warm, humid tropical climate. These conditions foster healthy leaf growth and aid in root development during the propagation phase. The temperature is the first parameter to look at closely, as it plays a significant role in dictating the growth rate and overall health of the rubber plant. Ideally, temperatures should be maintained between 60°F and 75°F, as anything lower risks slowing down the plant's growth rate, while anything excessively warm can lead to leaf drop. Equally significant is the role of humidity in this process. High humidity level, preferably around 50% to 70%, stimulates root formation within the cuttings. You can maintain this level of humidity by employing different methods, such as misting or using a humidity tray. Lighting is another critical factor. Rubber plants love bright, indirect sunlight. During propagation, it's best to ensure the cuttings receive enough light without the risk of scorching them. This often means placing them in a location with filtered sunlight or using fluorescent light fixtures that are about 2 feet above the propagation tray. Lastly, the pH levels of the soil also have a significant bearing on the propagation process. Slightly acidic soil (around pH 5.5-7.5) is most conducive to the healthy growth and development of rubber plants. It facilitates nutrient uptake, allowing the plant to grow strongly and vigorously. Maintaining these optimal growing conditions will create an environment that encourages effective rubber plant propagation. By mimicking the plant's natural environment as closely as possible, you can instigate strong root development and leaf growth, setting the stage for a thriving and robust rubber plant.
Creating the Perfect Propagation Environment
Creating the Perfect Propagation Environment is a critical aspect to consider when you want to initiate successful propagation of a rubber plant. A healthy environment serves as the cradle for the plant's growth, bolstering its chances of flourishing. Firstly, light holds paramount importance in the propagation environment – rubber plants thrive in bright, indirect sunlight. A common mistake is placing the cutting in direct sunlight, which can lead to leaf scorch. Hence, an east or north-facing window is ideal to maintain the right level of brightness - necessary for photosynthesis and growth. Secondly, temperature and humidity are interlinked variables that should be balanced delicately. A temperature of around 70-72 degrees Fahrenheit is perfect, straying too far away from this could detriment the plant health. Simultaneously, a high level of humidity (about 75-80%) accelerates the rooting process by preventing water loss. Covering the plant with a plastic bag or using a humidifier can sustain high humidity levels. Watering is a crucial variable as well. Moist, well-drained soil is optimal for rubber plant cuttings. Overwatering may cause root rot while under watering might leave the plant dehydrated - striking the right balance is key. Hence, using a good mixture of peat and perlite soil can ensure the soil stays moist but not soggy. At the same time, the cleanliness of tools and pots used in propagation can’t be underemphasized. Any fungal or bacterial contaminants might harm the cutting. Therefore, it is advised to sterilize shears, pots, and other tools before use. Last but not least, timing plays an important role. Rubber plants are best propagated during their active growing period (spring or early summer), where they can quickly heal and generate new growth. By controlling all the above factors, you create the perfect propagation environment, which is like a safety net that ensures the success of the propagation process. It minimizes risk factors and maximizes the plant's potential to generate new, healthy rubber plants. It is an intricate dance of several factors, each of which holds a piece of the puzzle to successful rubber plant propagation.
Tips and Tricks for Growing a Healthy Rubber Plant from Propagation
Growing a healthy rubber plant from propagation is a rewarding endeavor if executed correctly. This article will equip you with essential tips and tricks to navigate this process and increase your chances of success. Various factors contribute to the growth and well-being of a rubber plant, each demanding a detailed focus. Specifically, three core areas need to be meticulously addressed. Namely, fostering root growth in your propagated plant, transitioning your propagated plant to a larger pot, and maintaining the health of your rubber plant over time. Firstly, we will explore fostering root growth, a delicate phase that is fundamental to the survival and initial establishment of your plant. Mastering this will lay down the groundwork for a thriving plant. Equipped with the right knowledge and techniques, you can successfully propagate and enjoy the lush greenery of a healthy rubber plant. Let's dive into the first crucial step – fostering root growth in your propagated plant.
Fostering Root Growth in Your Propagated Plant
Fostering the root growth of your propagated plant is a critical and fascinating stage in the lifecycle of a rubber plant. Root development is crucial in propagation as it facilitates nutrient absorption enabling the plant to thrive and grow. One of the cardinal tips to encourage root growth in your propagated rubber plant is maintaining an optimal environment. This includes ensuring the right level of moisture - not too damp as to cause rotting, yet enough to keep the plant from drying out. The use of a rooting hormone can significantly expedite this process. These hormones are typically available in a gel or powder form, which you can lightly dust onto the cut ends of your plant before placing it into your chosen growth medium. Bear in mind, it's always important to provide ample light—a crucial component for photosynthesis. However, avoid direct sunlight, as it can scorch the young and sensitive plant. Using a quality soil mixture can also play a pivotal role in facilitating root growth. It should be light enough to allow the roots to breathe, yet dense enough to withhold moisture. A mixture of peat moss and perlite, or an equally breathable potting mix, is often your best bet. You can further enhance it with mycorrhizae—a form of beneficial fungi that aids in nutrient absorption and guards against potential root diseases. Take care to maintain a constant and relatively warm temperature within the environment. A temperature range of 70 to 75 degrees Fahrenheit is typically optimal for rubber plant propagation. And finally, patience is your constant companion during this process of fostering root growth in your propagated rubber plant. Propagation isn't always an instant success, but with careful observation, patience, and the right cultivation techniques, you will soon witness the rise of a healthy, robust rubber plant from the shoots you lovingly nurtured. Remember, the trick lies less in possessing a green thumb, and more in understanding the delicate balance of elements that contribute to the successful propagation and growth of these exquisite plants. The process of fostering root growth, while intricate, is rewarding, transforming a leaf or stem cutting into a fully-fledged rubber plant pulsing with vigor, a testament to your skill and nurturing.
Transitioning Your Propagated Plant to a Larger Pot
Transitioning Your Propagated Plant to a Larger Pot can sometimes feel daunting, yet it's an integral part of your rubber plant's journey from propagation to drama-filled grocery. Firstly, it's critical to make sure the roots of your propagated cutting are mature enough to handle the transition, usually after at least a month or two. Look for a strong root system that's at least 3 inches long and has multiple branches. When it comes to choosing the pot, a common misconception is to opt for a pot that's significantly larger. However, this can lead to waterlogging, as the excess soil retains more moisture than the plant can absorb, ultimately leading to root rot. Instead, select a terracotta or ceramic pot that's just a few inches bigger in diameter than the current container. A pot with sufficient drainage is a must to ensure excess water escapes, thus preventing root rot. Before transferring, prepare your pot with a high-quality potting mix, preferably peat-based mixed with perlite for improved drainage. Creating a small well in the centre will provide a snug spot for your plant. The next step involves gently pulling the cutting from its current container, taking care not to damage its delicate roots. Place the cutting into the well, filling it back with the potting mix and patting it down to provide stability. Now, your plant is ready to thrive in its new home. But remember - re-potting can cause stress. To help your plant adapt, avoid direct sunlight for a few days and maintain your regular watering routine. It might take time for your plant to acclimate and start growing, so patience is crucial during this phase. It’s just as important to ensure the pot's location suits the plant's needs in terms of light and humidity. Invest time in studying its preferences. A well-drained, indirectly sunlit spot is generally suitable for a rubber plant. Once you've successfully transferred your propagated rubber plant, it's a continuous process of monitoring, nurturing, and adjusting. The key is to strike a balance between providing enough attention and giving your plant space to grow. Keep these tips in mind while transitioning your propagated rubber plant to a larger pot and experience the joy of watching it flourish and add that much-needed touch of greenery and vita to your living space. It's a rewarding process that enhances your urban gardening skills and fosters a deeper relationship with nature.
Maintaining the Health of Your Rubber Plant Over Time
Maintaining the health of your Rubber Plant over time is akin to making a long-term investment. The benefits are manifold, from improving the aesthetic appeal of your interiors to uplifting the ambience of your space. One principal factor in this maintenance regime is adequate watering. Rubber plants are native to the tropical rainforests of Southeast Asia, thus, they thrive well in a humid environment. Overwatering, however, can lead to root rot - a common issue confronted by many domestic gardeners. Therefore, finding a balance is crucial. A thumb rule is to water the plant when the first 1-2 inches of soil is dry. The use of well-draining soil also helps in preventing waterlogged conditions. Apart from watering, exposure to suitable light conditions also forms an integral part of rubber plant health care. While they can survive in low light conditions, to truly flourish, they need bright, indirect light. Direct sunlight can scorch the leaves while insufficient light can lead to leaf-drop. Hence, place your rubber plant near an east or west-facing window that gets abundant filtered light. Pruning also plays a notable role. Compared to your average houseplant, rubber plants tend to grow tall, often touching the ceiling. Pruning them not only keeps their height in check, but it also retains the plant's bushy look while encouraging new growth. This ensures your rubber plant stays lush and attractive throughout the course of its life. Equally important is the aspect of cleaning the plant's leaves. The large, glossy leaves of the rubber plant often gather dust. Regularly wiping them with a soft, damp cloth not only keeps the leaves shiny, but it also ensures that they can photosynthesize efficiently. This in turn contributes to a healthy, vigorous plant. Lastly, the role of proper feeding should not be overlooked. While rubber plants are not heavy feeders, they do appreciate being nourished once a month with an organic houseplant fertilizer during the growing seasons of spring and summer. This helps in maintaining the vibrant color of the leaves and in boosting overall plant health. Maintaining the health of your rubber plant over time may require patience and dedication, yet the payoff in terms of a robust, thriving plant is undeniably worth it. Not just a beautiful addition to your home or office, but also a testament to your green thumb and nurturing spirit.