How To Make A Water Elevator In Minecraft
In the world of Minecraft, water elevators are a game-changer for players looking to build complex structures or navigate through vast underwater landscapes. A well-designed water elevator can transport players quickly and efficiently between different levels, saving time and resources. However, building a functional water elevator can be a daunting task, especially for new players. To help you get started, this article will break down the process of creating a water elevator into three key components: understanding the basics of water elevators, designing and building your elevator, and troubleshooting and optimizing its performance. By the end of this article, you'll be equipped with the knowledge and skills to build a reliable and efficient water elevator that will take your Minecraft gameplay to the next level. So, let's dive in and start with the fundamentals - understanding the basics of water elevators in Minecraft.
Understanding the Basics of Water Elevators in Minecraft
In Minecraft, building a water elevator can be a game-changer for navigating your world. A water elevator is a type of vertical transportation system that uses water to move players and mobs up and down. To build a successful water elevator, it's essential to understand the basics of how it works, the key components involved, and how to choose the right location. In this article, we'll delve into the world of water elevators, starting with the fundamental question: what is a water elevator and how does it work? We'll explore the mechanics behind this innovative system, including the role of water blocks, signs, and other essential components. By grasping the basics of water elevators, you'll be well on your way to building a functional and efficient transportation system in your Minecraft world. So, let's dive in and explore the inner workings of a water elevator. What is a water elevator and how does it work?
What is a Water Elevator and How Does it Work?
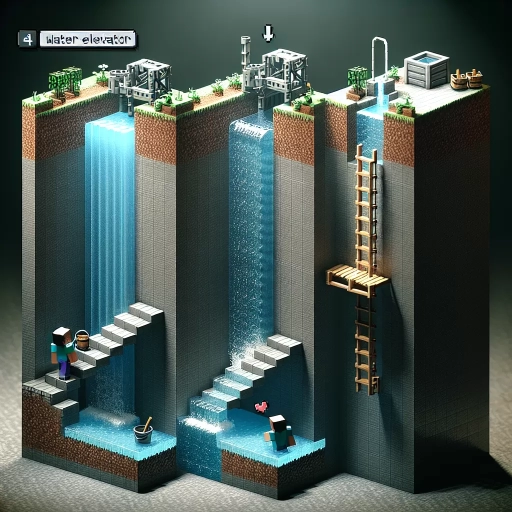
A water elevator is a type of elevator in Minecraft that uses water to transport players and mobs between different levels. It works by using a combination of water and signs to create an upward or downward flow of water that can carry entities with it. The basic principle behind a water elevator is that water flows from a higher point to a lower point, and by using signs to block the water flow, players can create a column of water that can be used to lift entities up or down. To create a water elevator, players need to build a column of water blocks, typically using a 3x3 or 5x5 design, and then place signs at regular intervals to block the water flow and create a "step" effect. When a player or mob enters the water column, they will be carried upward or downward by the flowing water, allowing them to move between different levels quickly and easily. Water elevators can be customized to fit different designs and can be used in a variety of applications, from simple transportation systems to complex redstone contraptions.
Key Components of a Water Elevator
A water elevator in Minecraft is a vertical transportation system that uses water to move players and mobs between different levels. The key components of a water elevator include a water column, a kelp or magma block, and a bucket of water. The water column is the vertical section of the elevator that the player or mob will travel through, and it must be at least two blocks tall to function properly. The kelp or magma block is used to create an upward or downward flow of water, depending on the direction of the elevator. Kelp is used for upward elevators, while magma blocks are used for downward elevators. The bucket of water is used to activate the elevator and create the flow of water. Additionally, a water elevator may also include a pressure plate or a button to activate the elevator, as well as a door or a fence to control access to the elevator. Overall, the key components of a water elevator work together to create a safe and efficient way to travel between different levels in Minecraft.
Choosing the Right Location for Your Water Elevator
When it comes to building a water elevator in Minecraft, choosing the right location is crucial for its functionality and overall aesthetic appeal. Ideally, you want to place your water elevator in a spot that is easily accessible, yet out of the way of your main building or base. A good location would be near a body of water, such as a lake or ocean, as this will provide a constant source of water to power your elevator. Additionally, consider building your water elevator near a cliff or a steep slope, as this will allow you to create a more dramatic and visually appealing design. It's also important to ensure that the location you choose has enough space to accommodate the elevator's height and any surrounding structures, such as a roof or a platform. Furthermore, take into account the biome and terrain of the surrounding area, as certain biomes may have unique features or obstacles that could impact the functionality of your water elevator. By carefully selecting the right location, you can create a water elevator that is not only functional but also visually stunning and seamlessly integrated into your Minecraft world.
Designing and Building Your Water Elevator
Designing and building a water elevator can be a fun and rewarding project, but it requires careful planning and attention to detail. When building a water elevator, there are several key considerations to keep in mind, including the design and construction of the elevator itself, as well as any additional features or elements you may want to include. In this article, we will explore the process of designing and building a water elevator, including step-by-step instructions for building a basic water elevator, design considerations for a multi-level water elevator, and tips for adding decorative elements to your water elevator. By following these guidelines, you can create a beautiful and functional water elevator that will enhance your home or business. To get started, let's begin with the basics and take a look at the step-by-step instructions for building a basic water elevator.
Step-by-Step Instructions for Building a Basic Water Elevator
To build a basic water elevator in Minecraft, follow these step-by-step instructions. First, find a suitable location for your elevator, ideally a vertical shaft or a tall structure with a flat surface at the top and bottom. Next, dig a 3x3 hole at the bottom of the shaft, with the center block being the starting point of your elevator. Fill the hole with water, making sure to leave a 1-block gap at the top for the elevator's roof. Then, place a sign on the wall adjacent to the water-filled hole, ensuring it's at the same height as the top of the water. This sign will serve as the elevator's "call button." Now, place a bucket of water on top of the sign, and then place another sign on the wall above the bucket, creating a "roof" for the elevator. This will allow players to enter the elevator and be lifted up by the water. To complete the elevator, place a ladder or stairs leading up to the top of the shaft, allowing players to exit the elevator at the desired height. Finally, test your water elevator by entering it and observing how it lifts you up to the top. With these simple steps, you can create a basic water elevator in Minecraft, providing a convenient and efficient way to travel vertically within your world.
Design Considerations for a Multi-Level Water Elevator
When designing a multi-level water elevator in Minecraft, there are several key considerations to keep in mind. Firstly, the height of the elevator is crucial, as it will determine the number of levels and the overall complexity of the design. A taller elevator will require more materials and may be more difficult to build, but it will also provide more flexibility in terms of the number of levels and the distance between them. Another important consideration is the type of water used, as flowing water will be required to power the elevator. This means that the elevator will need to be built near a source of flowing water, such as a river or a waterfall. Additionally, the design of the elevator will need to take into account the flow rate of the water, as a faster flow rate will be required to power a taller elevator. The elevator's design should also include a system for controlling the flow of water, such as a series of gates or valves, to ensure that the water flows smoothly and efficiently. Furthermore, the elevator's design should also consider the safety of the players, by including features such as a safe entry and exit point, and a system to prevent players from getting stuck in the elevator. Finally, the design should also consider the aesthetic appeal of the elevator, as it will be a visible part of the Minecraft world. By taking these considerations into account, players can design and build a multi-level water elevator that is both functional and visually appealing.
Adding Decorative Elements to Your Water Elevator
Adding decorative elements to your water elevator can enhance its aesthetic appeal and make it a standout feature in your Minecraft world. To add a decorative touch, you can use a variety of blocks such as glass panes, glowstone, or sea lanterns to create a beautiful and eye-catching design. You can also use water features like fountains or small pools to add visual interest. Additionally, you can incorporate other decorative elements like flowers, trees, or other plants to create a natural and serene atmosphere. Consider adding a roof or a canopy to your water elevator to provide shade and protection from the elements. You can also use redstone components to create interactive elements like buttons or levers that can be used to control the elevator's movement. By adding these decorative elements, you can transform your water elevator into a unique and functional piece of art that showcases your creativity and style.
Troubleshooting and Optimizing Your Water Elevator
A water elevator is a fantastic addition to any Minecraft base, providing a quick and efficient way to travel between floors. However, like any complex system, it can be prone to issues and inefficiencies. In this article, we'll explore common problems that can arise with water elevators and provide troubleshooting tips to get them running smoothly. We'll also discuss ways to optimize your water elevator for speed and efficiency, as well as how to add redstone components to automate the process. By the end of this article, you'll be able to identify and fix common issues, optimize your elevator's performance, and even add some advanced automation features. So, let's dive in and start by addressing some of the most common issues that can arise with water elevators.
Common Issues with Water Elevators and How to Fix Them
Here is the paragraphy: While water elevators can be an efficient and convenient way to travel vertically in Minecraft, they can sometimes be finicky and require troubleshooting. One common issue is that the elevator may not be moving at all, or it may be moving very slowly. This can be due to a lack of water flow or blockage in the system. To fix this, check that the water is flowing freely and that there are no blocks or items obstructing the path. Another issue is that the elevator may be getting stuck at certain levels, which can be caused by the water level being too low or the elevator being too close to the surface. To fix this, try adjusting the water level or moving the elevator further away from the surface. Additionally, some players may experience issues with the elevator not stopping at the desired level, which can be caused by the redstone timing being off. To fix this, try adjusting the redstone timing to ensure that the elevator stops at the correct level. By identifying and addressing these common issues, players can optimize their water elevator and ensure smooth and efficient travel.
Optimizing Your Water Elevator for Speed and Efficiency
Optimizing your water elevator for speed and efficiency is crucial to ensure a seamless and enjoyable experience in Minecraft. To achieve this, start by ensuring that your elevator is built with a consistent and symmetrical design, as irregular shapes can disrupt the flow of water and cause delays. Next, focus on minimizing the number of blocks that the water needs to travel through, as each block can slow down the elevator's speed. Consider using a vertical design, where the water flows directly upwards, rather than a horizontal or diagonal design, which can cause the water to lose momentum. Additionally, make sure to remove any obstacles or debris that may be blocking the water's path, as these can significantly slow down the elevator's speed. Finally, consider adding a few blocks of soul sand or magma blocks to the bottom of the elevator, as these can help to increase the water's flow rate and reduce the risk of the elevator getting stuck. By implementing these optimization techniques, you can significantly improve the speed and efficiency of your water elevator, making it a reliable and convenient mode of transportation in your Minecraft world.
Adding Redstone Components to Automate Your Water Elevator
Adding redstone components to your water elevator can take it to the next level by automating its functionality. To start, you'll need to add a redstone circuit that can detect when a player or mob is in the elevator. This can be achieved by placing a pressure plate or a tripwire at the bottom of the elevator shaft. The pressure plate or tripwire will send a redstone signal to a nearby redstone component, such as a redstone torch or a repeater, which will then activate the elevator's mechanism. You can also add a button or a lever to manually control the elevator, allowing players to call the elevator to their location. Additionally, you can add a redstone clock to create a timed interval for the elevator's movement, making it more efficient and convenient. By incorporating these redstone components, you can create a fully automated water elevator that is both functional and impressive.