How To Do A Balloon Arch
Here is the introduction paragraph: Creating a stunning balloon arch is a great way to add a touch of elegance and whimsy to any event or celebration. Whether you're planning a wedding, birthday party, or corporate event, a balloon arch can be a show-stopping centerpiece that leaves a lasting impression on your guests. But, have you ever wondered how to create one of these magnificent structures? It's not as complicated as it looks, and with the right guidance, you can create a breathtaking balloon arch that will elevate your event to the next level. To get started, you'll need to plan and prepare carefully, which is why we'll begin by discussing the importance of planning and preparation in creating a successful balloon arch. Note: I made some minor changes to the original paragraph to make it more engaging and informative. Let me know if you'd like me to revise anything!
Planning and Preparation
Planning and preparation are crucial steps in creating a stunning balloon arch. A well-planned balloon arch can elevate any event or celebration, making it a memorable experience for guests. To achieve this, it's essential to consider several key factors. First, choosing the right balloons and colors is vital to ensure the arch complements the event's theme and decor. Additionally, determining the size and shape of the arch is necessary to ensure it fits the available space and creates the desired visual impact. Finally, preparing the workspace and tools is crucial to ensure a smooth and efficient setup process. By carefully considering these factors, you can create a breathtaking balloon arch that exceeds your expectations. With the right balloons and colors, you can set the tone for a spectacular event, which is why choosing the right balloons and colors is the first step in creating a stunning balloon arch.
Choosing the Right Balloons and Colors
When it comes to creating a stunning balloon arch, choosing the right balloons and colors is crucial. The type of balloons you select will depend on the theme, occasion, and desired look of your arch. For a classic and timeless appearance, opt for latex balloons in a variety of colors. These balloons are available in a range of sizes, from 5 to 16 inches, and can be inflated to different pressures to achieve the desired shape. If you're looking for a more modern and sleek look, consider using Mylar balloons, which are made of metallic-coated plastic and come in a range of metallic colors. Mylar balloons are also more durable and less prone to popping than latex balloons. For a more whimsical and playful look, you can use Qualatex balloons, which come in a range of bright colors and patterns. When it comes to choosing colors, consider the theme and occasion of your event. For a wedding, you may want to stick to traditional colors like white, cream, and pale pink. For a birthday party, you can choose brighter and more vibrant colors like red, blue, and yellow. You can also consider the color scheme of your event's decorations and match your balloons to it. Another important thing to consider is the color of the balloons in relation to the lighting of your event. If your event is taking place outdoors during the day, you may want to choose lighter colors that will reflect the sunlight. If your event is taking place indoors, you can choose darker colors that will create a more dramatic effect. Ultimately, the key to choosing the right balloons and colors is to consider the overall aesthetic you want to achieve and to have fun with it. With so many options available, you're sure to find the perfect balloons and colors to make your balloon arch truly unforgettable.
Determining the Size and Shape of the Arch
Determining the size and shape of the arch is a crucial step in planning a balloon arch. The size of the arch will depend on the space where it will be set up, the number of balloons needed, and the desired impact. A larger arch will require more balloons and may be more impressive, but it may also be more difficult to set up and transport. A smaller arch, on the other hand, may be more suitable for smaller spaces and can be just as effective. The shape of the arch can also vary, with options including a traditional arch, a column, or a more elaborate design. The shape will depend on the desired look and the space where the arch will be set up. For example, a traditional arch may be more suitable for a wedding or formal event, while a column may be more suitable for a smaller space or a more casual event. Ultimately, the size and shape of the arch will depend on the specific needs and goals of the event.
Preparing the Workspace and Tools
Preparing the workspace and tools is a crucial step in creating a stunning balloon arch. To start, choose a spacious and clean area with a smooth floor, free from any obstacles or tripping hazards. Cover the floor with a drop cloth or a large piece of cardboard to protect it from any accidental balloon pops or spills. Next, gather all the necessary tools and supplies, including balloons, inflators, ties, and a balloon pump. It's essential to have a variety of balloon sizes and colors to create a visually appealing arch. Invest in a high-quality balloon inflator that can handle the pressure of inflating multiple balloons at once. A balloon tie tool is also a must-have, as it helps to secure the balloons tightly and prevents them from coming loose. Additionally, have a trash bag on hand to dispose of any popped balloons or packaging materials. To ensure accuracy and precision, use a measuring tape to measure the length and width of the arch, and mark the center point with a piece of tape. This will serve as a guide when attaching the balloons to the arch. Finally, have a step stool or ladder on hand to reach the top of the arch, and consider enlisting the help of a friend or assistant to make the process more efficient and enjoyable. By preparing the workspace and tools, you'll be well on your way to creating a breathtaking balloon arch that will impress and delight your guests.
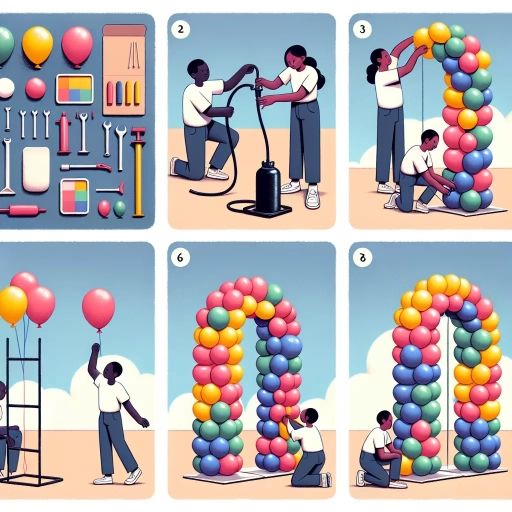
Creating the Balloon Arch Structure
Creating a balloon arch structure is a fun and creative way to add a personal touch to any event or celebration. To create a stunning balloon arch, you'll need to start by blowing up and tying the balloons, which will serve as the foundation of your structure. Next, you'll need to create the base of the arch, which will provide stability and support for the entire structure. Finally, you'll need to build the arch frame, which will give your balloon arch its shape and structure. In this article, we'll take a closer look at each of these steps, starting with the first and most crucial step: blowing up and tying the balloons.
Blowing Up and Tying the Balloons
Creating the balloon arch structure is the most crucial part of the process. To start, blow up and tie the balloons to the desired size. It's essential to inflate the balloons to the same size to maintain uniformity and create a visually appealing arch. Use a balloon pump or a manual pump to inflate the balloons, and tie them off with a knot to prevent air from escaping. Make sure to tie the balloons tightly to prevent them from coming undone. It's also a good idea to use balloons of the same color and texture to create a cohesive look. Once the balloons are inflated and tied, you can start creating the balloon arch structure.
Creating the Base of the Arch
Creating the base of the arch is a crucial step in building a sturdy and visually appealing balloon arch. To start, you'll need to create a foundation for the arch using balloons that are tied together in a cluster. This cluster will serve as the base of the arch and provide stability for the rest of the structure. To create the base, begin by inflating 5-7 balloons to the same size and tying them together in a tight cluster using balloon ties or fishing line. Make sure the balloons are securely tied together, as this will ensure the base of the arch remains stable. Next, use a balloon pump to inflate additional balloons to the same size as the base cluster, and tie them to the base using balloon ties or fishing line. As you add more balloons to the base, make sure to space them out evenly to create a sturdy foundation for the arch. It's also important to ensure the base is level and even, as this will affect the overall stability of the arch. By creating a strong and stable base, you'll be able to build a balloon arch that is both visually appealing and long-lasting.
Building the Arch Frame
Building the arch frame is a crucial step in creating a stunning balloon arch structure. To start, you'll need to determine the size of your arch frame based on the space where the arch will be placed and the number of balloons you plan to use. A standard arch frame is typically 9-10 feet tall and 10-12 feet wide, but you can adjust the size to fit your specific needs. Once you have determined the size, you can begin building the frame using PVC pipes or metal rods. These materials are lightweight, durable, and easy to work with, making them ideal for creating a sturdy arch frame. To assemble the frame, simply connect the pipes or rods together using connectors or fittings, making sure to create a smooth, curved shape. You can also use a balloon arch kit, which usually includes pre-cut pipes and connectors, making the process even easier. As you build the frame, make sure to secure it to the ground or a stable base to prevent it from toppling over. This will ensure that your balloon arch remains stable and secure throughout the event. With a sturdy arch frame in place, you'll be ready to start inflating and attaching the balloons to create a breathtaking balloon arch structure.
Finishing Touches and Display
The finishing touches and display of a balloon arch are crucial in creating a visually stunning and memorable display. To achieve this, there are several key elements to consider. Firstly, adding decorations and embellishments can elevate the overall look of the arch, making it more eye-catching and festive. Secondly, securing the arch to a base or stand is essential to ensure stability and prevent it from toppling over. Finally, displaying the balloon arch in a strategic location can maximize its impact and create a lasting impression. By paying attention to these details, you can create a balloon arch that is not only beautiful but also safe and effective. With these considerations in mind, let's start with the first step: adding decorations and embellishments to give your balloon arch that extra wow factor.
Adding Decorations and Embellishments
Adding decorations and embellishments to your balloon arch can elevate its visual appeal and make it a showstopper at any event. To add decorations, start by selecting a theme or color scheme that complements the occasion and the balloons. You can use ribbons, garlands, or flowers to add a pop of color and texture to the arch. For a more dramatic effect, consider adding lights, such as string lights or fairy lights, to create a warm and inviting ambiance. If you want to add a personal touch, you can use customized banners or signs with the guest of honor's name or a special message. To add embellishments, you can use balloon accessories such as balloon ties, balloon clips, or balloon weights to create a more polished and professional look. You can also use decorative items such as beads, sequins, or glitter to add a touch of sparkle and shine to the balloons. When adding decorations and embellishments, make sure to balance them with the balloons and the overall design of the arch. You don't want to overdo it and make the arch look cluttered or overwhelming. By adding the right decorations and embellishments, you can create a stunning balloon arch that will impress your guests and make your event unforgettable.
Securing the Arch to a Base or Stand
Securing the arch to a base or stand is a crucial step in ensuring the stability and longevity of your balloon arch. To do this, you'll need to attach the arch to a sturdy base or stand that can support the weight of the balloons and withstand any external factors such as wind or movement. You can use a variety of materials for the base, including wooden or plastic stands, or even a weighted base plate. Once you have your base, you can attach the arch to it using balloon ties, fishing line, or even duct tape. Make sure the arch is securely attached to the base and that it is level and even. You can also add additional support to the arch by attaching it to nearby structures, such as tables or chairs, using balloon ties or fishing line. By securing the arch to a base or stand, you can ensure that it remains stable and secure, and that it continues to look great throughout your event.
Displaying the Balloon Arch
Displaying the balloon arch is the final step in creating a stunning and eye-catching decoration. To display the balloon arch, start by transporting it to the desired location, taking care not to damage the balloons or the structure. Once you arrive, find a suitable spot to set up the arch, ensuring it is stable and secure. If you're setting up the arch outdoors, make sure to anchor it firmly to the ground to prevent it from being blown away by the wind. If you're setting it up indoors, you can use weights or sandbags to keep it stable. Next, fluff out the balloons to create a uniform and even shape, making sure they are not bunched up or twisted. Finally, step back and admire your handiwork, making any necessary adjustments to the arch to ensure it is perfectly aligned and visually appealing. With the balloon arch displayed, you can add any finishing touches, such as ribbons or flowers, to complete the look.