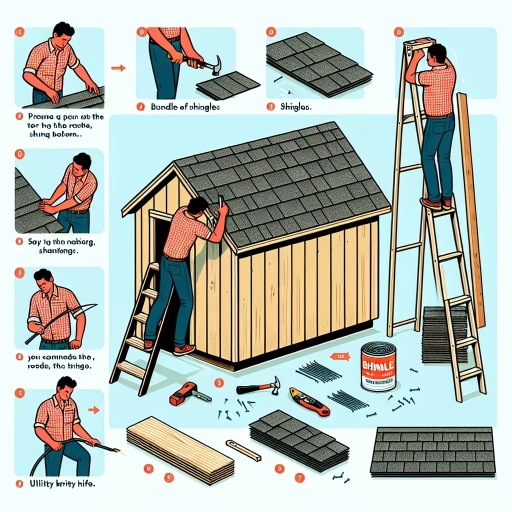
How To Shingle A Shed
Shingling a shed is a crucial aspect of its construction and maintenance, as it provides protection from the elements and enhances its overall appearance. A well-shingled shed can withstand harsh weather conditions, prevent water damage, and increase its lifespan. However, shingling a shed can be a daunting task, especially for those without prior experience. To ensure a successful shingling project, it's essential to understand the process and take the necessary steps. This article will guide you through the process of shingling a shed, covering the essential preparation, the step-by-step shingling process, and the finishing touches and safety considerations. By following these guidelines, you'll be able to achieve a professional-looking shed that will last for years to come. To get started, preparation is key, and in the next section, we'll explore the essential steps to take before beginning the shingling process.
Preparation is Key
When it comes to installing a new roof on your shed, preparation is key to ensuring a successful and stress-free experience. A well-prepared roof installation project can save you time, money, and headaches in the long run. To achieve this, it's essential to focus on three critical aspects: choosing the right shingles for your shed, preparing the roof surface, and gathering essential tools and materials. By paying attention to these details, you'll be able to tackle the project with confidence and achieve a professional-looking result. With the right shingles, you'll be able to protect your shed from the elements and enhance its overall appearance. So, let's start by exploring the importance of selecting the right shingles for your shed.
Choose the Right Shingles for Your Shed
When it comes to choosing the right shingles for your shed, there are several factors to consider. First and foremost, you'll want to think about the style and color of your shed. If you're looking for a traditional or rustic look, asphalt shingles are a popular choice. They come in a wide range of colors and are relatively inexpensive. On the other hand, if you're going for a more modern or sleek look, metal shingles may be the way to go. They're durable, low maintenance, and can be made to mimic the look of traditional shingles. Another option is cedar shingles, which offer a natural, rustic look and can be stained to match your shed's exterior. Additionally, consider the climate and weather conditions in your area. If you live in an area with high winds or heavy snowfall, you'll want to choose shingles that are specifically designed to withstand these conditions. Look for shingles with a high wind rating and a durable construction. Finally, think about your budget and the level of maintenance you're willing to commit to. Some shingles, like metal, require very little maintenance, while others, like cedar, may need to be stained or sealed regularly. By considering these factors, you can choose the right shingles for your shed and ensure it looks great and lasts for years to come.
Prepare the Roof Surface
Here is the paragraphy: Preparing the roof surface is a crucial step in the shed shingling process. Before installing new shingles, it's essential to ensure the roof surface is clean, dry, and free of debris. Start by removing any existing shingles, underlayment, and nails. Inspect the roof deck for any damaged or rotten wood and replace it as needed. Check for any gaps or holes and fill them with wood filler or caulk. Next, sweep the roof surface to remove any dirt, dust, or debris. Use a broom or a leaf blower to get into tight spaces and corners. Once the roof is clean, inspect it for any uneven or warped areas. Use a level and a straightedge to check for any deviations. If necessary, use a plane or a sanding block to smooth out the surface. Finally, apply a layer of roofing felt or underlayment to the entire roof surface, ensuring it's smooth and even. This will provide a solid foundation for your new shingles and help prevent water damage. By taking the time to properly prepare the roof surface, you'll ensure a successful and long-lasting shed shingling project.
Gather Essential Tools and Materials
To ensure a successful shed shingling project, it's crucial to gather all the essential tools and materials beforehand. Start by collecting the necessary roofing tools, including a utility knife, hammer, tape measure, square, level, chalk line, and roofing nails. You'll also need a ladder or scaffolding to access the roof safely. In terms of materials, you'll require a sufficient quantity of shingles, underlayment, and roofing felt. Don't forget to purchase ridge cap shingles, starter strip shingles, and valley flashing to complete the job. Additionally, consider investing in a roofing nailer to speed up the installation process. Make sure to choose shingles that are compatible with your shed's roof pitch and local building codes. It's also a good idea to have some extra materials on hand, such as roofing cement and sealant, to address any unexpected issues that may arise during the project. By gathering all the necessary tools and materials, you'll be well-prepared to tackle the shingling process and achieve a professional-looking result.
Step-by-Step Shingling Process
Here is the introduction paragraph: Shingling a roof is a complex process that requires careful planning and execution. To ensure a watertight seal and a durable roof, it's essential to follow a step-by-step approach. The process begins with applying underlayment and drip edge, which provides a solid foundation for the shingles. Next, starter shingles and the first course are installed, followed by overlapping courses that cover the entire roof. In this article, we'll break down the shingling process into manageable steps, starting with the crucial first step: applying underlayment and drip edge. Here is the supporting paragraph: Applying underlayment and drip edge is the first and most critical step in the shingling process. Underlayment is a waterproof layer that prevents water from seeping into the roof deck, while drip edge is a metal strip that directs water away from the roof's edges. To apply underlayment, start by rolling it out across the roof deck, ensuring it covers the entire surface. Secure the underlayment with staples or nails, making sure to space them evenly apart. Next, install drip edge along the roof's edges, using a chalk line to guide the installation. Ensure the drip edge is securely fastened to the roof deck to prevent water from seeping underneath. With the underlayment and drip edge in place, the roof is now ready for the installation of starter shingles and the first course.
Apply Underlayment and Drip Edge
Here is the paragraphy: Apply underlayment and drip edge to the shed roof. Underlayment is a waterproof layer that prevents water from seeping into the shed. It is usually made of asphalt-saturated felt or synthetic materials. Drip edge is a type of flashing that is installed along the edges of the roof to direct water away from the shed. It is typically made of metal or plastic. To apply underlayment, start by rolling it out across the roof, ensuring it covers the entire surface. Use a utility knife to cut it to size, and secure it with staples or nails. Make sure to overlap the underlayment by 6 inches to ensure a watertight seal. Next, install the drip edge along the edges of the roof, ensuring it is securely fastened with screws or nails. The drip edge should be installed so that it directs water away from the shed, rather than towards it. This will help to prevent water from accumulating around the shed and reduce the risk of damage. By applying underlayment and drip edge, you can help to protect your shed from water damage and ensure it remains safe and secure.
Install Starter Shingles and First Course
When installing starter shingles and the first course, it's essential to follow specific guidelines to ensure a watertight seal and a durable roof. Begin by applying a bead of roofing cement along the rake edge of the starter shingle, then press it firmly into place, ensuring it's aligned with the edge of the roof. The starter shingle should be cut to fit the rake edge, with the cut side facing upwards. Next, apply a second bead of roofing cement along the back of the starter shingle, about 1 inch from the top edge, and press the first course of shingles into place, making sure to maintain a 1/8-inch gap between the starter shingle and the first course. The first course of shingles should be installed with the tabs facing upwards, and the edges should be aligned with the rake edge of the starter shingle. Use a chalk line to mark the location of the first course, and use a utility knife or a shingle cutter to trim the shingles to fit around any vents, chimneys, or skylights. It's crucial to ensure the first course is installed correctly, as it sets the stage for the rest of the shingling process. By following these steps, you'll create a solid foundation for your shed's roof, providing a secure and watertight seal that will protect your shed from the elements.
Continue Shingling with Overlapping Courses
The paragraphy should be interesting, and easy to read. Continue shingling with overlapping courses, ensuring that each course overlaps the one below it by at least 2 inches. This will provide a watertight seal and prevent water from seeping underneath the shingles. As you work your way up the roof, stagger the joints between courses to prevent water from entering the roof through the joints. Use a chalk line to mark the location of each course, and use a level to ensure that the courses are straight and level. Apply shingles to the entire roof, working from the bottom up, and use a utility knife or a shingle cutter to trim the shingles at the rake edges and in the valleys. Make sure to leave a 1/8-inch gap between the shingles and the rake edges to allow for expansion and contraction. As you near the top of the roof, use a ridge cap to cover the ridge and prevent water from entering the roof through the ridge. Finally, apply a layer of shingle cement to the entire roof to seal the shingles in place and prevent water from seeping underneath.
Finishing Touches and Safety Considerations
When it comes to completing a roofing project, the finishing touches and safety considerations are just as important as the initial installation. A well-finished roof not only enhances the aesthetic appeal of a building but also ensures the safety of its occupants. To achieve a professional-looking finish, it is essential to seal gaps and secure shingles, install a ridge cap and ventilation system, and inspect the roof to ensure a safe working environment. By paying attention to these critical details, homeowners and builders can prevent costly repairs, reduce the risk of accidents, and create a durable and long-lasting roof. In this article, we will explore the importance of these finishing touches and safety considerations, starting with the crucial step of sealing gaps and securing shingles.
Seal Gaps and Secure Shingles
Sealing gaps and securing shingles are crucial steps in ensuring the longevity and weather-tightness of your shed's roof. Gaps between shingles can allow water to seep in, causing damage to the roof's underlayment, rafters, and even the shed's interior. To seal gaps, apply a bead of roofing sealant, such as silicone or polyurethane-based caulk, along the edges of the shingles where they meet. Make sure to follow the manufacturer's instructions for application and drying times. Additionally, inspect the shingles for any loose or missing fasteners and reattach them as needed. Use a roofing hammer to tap the shingles firmly into place, ensuring they are securely attached to the roof deck. It's also essential to check the shingles for any signs of damage, such as cracks or tears, and replace them if necessary. By sealing gaps and securing shingles, you'll help prevent water damage, reduce the risk of roof collapse, and ensure your shed remains safe and secure for years to come.
Install Ridge Cap and Ventilation
When installing ridge cap and ventilation, it's essential to ensure a watertight seal and adequate airflow to prevent moisture buildup and damage to the shed. Begin by cutting the ridge cap shingles to the correct length, leaving a 1/8-inch gap between each shingle. Apply a bead of roofing cement to the back of each shingle and press firmly onto the ridge, starting from the bottom and working your way up. Make sure to stagger the joints between shingles to prevent water from seeping in. For ventilation, install a ridge vent or power ventilator to allow warm air to escape and cool air to enter. This will help reduce the risk of ice dams and condensation. Additionally, consider installing soffit vents or eave vents to provide further airflow and prevent moisture from accumulating in the shed. By properly installing ridge cap and ventilation, you'll ensure a durable and long-lasting shed roof that can withstand the elements.
Inspect and Ensure a Safe Working Environment
Inspecting and ensuring a safe working environment is crucial when shingling a shed. Before starting the project, conduct a thorough inspection of the shed's roof and surrounding areas to identify potential hazards. Check for loose or damaged shingles, rotten wood, and uneven surfaces that could cause slips, trips, or falls. Ensure that the ladder or scaffolding is sturdy and securely positioned, and that all necessary safety gear, such as harnesses and ropes, are in good condition. Additionally, inspect the power tools and equipment to be used, ensuring they are in good working order and properly maintained. It's also essential to check the weather forecast and avoid working during strong winds, heavy rain, or extreme temperatures. Furthermore, ensure that the work area is well-ventilated, and that there are no flammable materials nearby. By taking these precautions, you can minimize the risk of accidents and ensure a safe working environment for yourself and others involved in the project.