How To Scan Documents On Printer
Here is the introduction paragraph: Scanning documents on a printer is a convenient and efficient way to digitize your important papers, receipts, and photos. With the advancement of technology, printers have become more versatile, allowing users to scan documents with ease. However, to ensure a smooth scanning process, it's essential to prepare your documents and printer beforehand. In this article, we will guide you through the process of scanning documents on a printer, from preparation to post-scanning tasks. We will cover the necessary steps to prepare your documents and printer, walk you through the scanning process, and provide tips on what to do after scanning. By following these steps, you'll be able to scan your documents quickly and efficiently. To get started, let's begin with the preparation phase, where we'll discuss how to prepare your documents and printer for scanning.
Preparation for Scanning Documents on Printer
Here is the introduction paragraph: When it comes to scanning documents on a printer, preparation is key to achieving high-quality digital copies. To ensure that your scanned documents are clear, legible, and accurately captured, it's essential to consider several factors before you begin. This includes choosing the right printer with scanning capability, understanding the scanner settings and features, and preparing the documents for scanning. By taking the time to prepare properly, you can save time and effort in the long run and ensure that your scanned documents meet your needs. In this article, we'll explore these factors in more detail, starting with the importance of choosing the right printer with scanning capability. Here is the supporting paragraph: Choosing the right printer with scanning capability is crucial for producing high-quality scanned documents. A printer with a built-in scanner can save space and streamline your workflow, but not all scanners are created equal. When selecting a printer, look for one with a high-resolution scanner, preferably with a resolution of at least 600 dpi. Additionally, consider the type of documents you'll be scanning most often and choose a printer with a scanner that can handle those types of documents. For example, if you'll be scanning a lot of photos, look for a printer with a scanner that has a high dynamic range and can capture a wide range of colors. By choosing the right printer with scanning capability, you'll be able to produce high-quality scanned documents that meet your needs. Here is the supporting paragraph: Understanding the scanner settings and features is also critical for achieving high-quality scanned documents. Most printers with scanners come with a range of settings and features that can be adjusted to optimize the scanning process. These may include settings for resolution, brightness, and contrast, as well as features such as automatic document feeder, duplex scanning, and image editing software. By taking the time to understand these settings and features, you can customize the scanning process to meet your specific needs and produce high-quality scanned documents. For example, if you're scanning a document with a lot of text, you may want to adjust the resolution and brightness settings to optimize the text recognition. By understanding the scanner settings and features, you can take control of the scanning process and produce high-quality scanned documents. Here is the supporting paragraph: Preparing the documents for scanning is the final step in the preparation process. Before scanning your documents, make sure they are clean, dry, and free of dust and debris. Remove any staples, paper clips, or other attachments that could interfere with the scanning process. If you're scanning a large number of
Choosing the Right Printer with Scanning Capability
Here is the paragraphy: When it comes to choosing the right printer with scanning capability, there are several factors to consider. First and foremost, determine the type of scanning you need. Do you need to scan documents, photos, or a combination of both? If you need to scan documents, look for a printer with an automatic document feeder (ADF) that can handle multiple pages at once. If you need to scan photos, look for a printer with a high-resolution flatbed scanner. Next, consider the resolution of the scanner. A higher resolution will result in clearer and more detailed scans. Look for a printer with a resolution of at least 600 dpi. Additionally, consider the scanning speed. If you need to scan large quantities of documents, look for a printer with a fast scanning speed. Some printers can scan up to 20 pages per minute. Another important factor to consider is the connectivity options. Do you need to scan documents wirelessly or via a USB connection? Look for a printer with Wi-Fi or Ethernet connectivity for easy scanning. Finally, consider the cost and compatibility of the printer. Look for a printer that is compatible with your computer or mobile device and fits within your budget. Some popular printer brands with scanning capability include HP, Canon, and Epson. By considering these factors, you can choose the right printer with scanning capability for your needs.
Understanding the Scanner Settings and Features
When scanning documents on a printer, understanding the scanner settings and features is crucial to achieve the desired results. The scanner settings allow you to customize the scanning process to suit your specific needs, such as adjusting the resolution, brightness, and contrast. The resolution setting determines the level of detail in the scanned image, with higher resolutions producing more detailed images. The brightness and contrast settings enable you to adjust the lightness and darkness of the image, which is particularly useful when scanning documents with varying levels of ink density. Additionally, many scanners come with features such as automatic document feeder (ADF), which allows you to scan multiple pages at once, and duplex scanning, which enables you to scan both sides of a document in a single pass. Some scanners also offer advanced features like optical character recognition (OCR), which converts scanned text into editable digital text, and image editing software, which enables you to enhance and manipulate the scanned images. Furthermore, some scanners may have specific settings for scanning different types of documents, such as photos, receipts, or business cards. By familiarizing yourself with the scanner settings and features, you can optimize the scanning process and produce high-quality digital copies of your documents.
Preparing the Documents for Scanning
Here is the paragraphy: Preparing the documents for scanning is a crucial step to ensure that the scanned images are clear, legible, and of high quality. Before scanning, it is essential to sort and organize the documents in the order you want them to be scanned. Remove any staples, paper clips, or other binding materials that may obstruct the scanning process or cause damage to the documents. If the documents are folded or creased, gently unfold or iron them to prevent any wrinkles or distortions. Check for any torn or damaged pages and consider repairing or replacing them before scanning. Additionally, remove any unnecessary pages, such as blank sheets or covers, to reduce the overall scanning time and file size. It is also a good idea to clean the documents gently with a soft brush or cloth to remove any dust, dirt, or debris that may affect the scan quality. Finally, ensure that the documents are aligned properly and facing the correct direction to prevent any scanning errors or misaligned images. By taking the time to prepare your documents properly, you can ensure that your scanned images are of the highest quality and meet your specific needs.
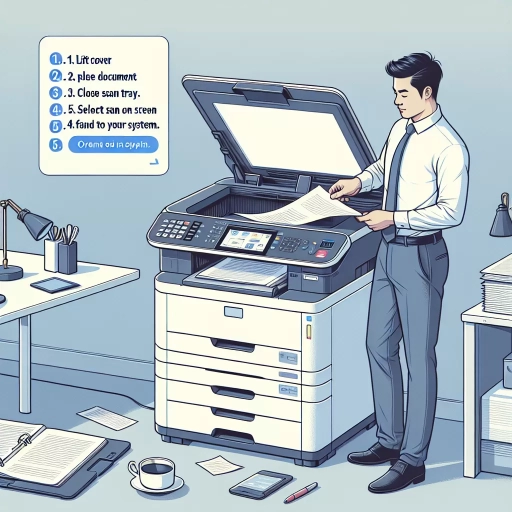
The Scanning Process on Printer
The scanning process on a printer is a crucial step in digitizing physical documents, allowing users to edit, share, and store them electronically. To initiate the scanning process, users must first place the documents on the scanner bed, ensuring they are aligned properly and within the designated scanning area. Once the documents are in place, users can select the scan settings and resolutions that best suit their needs, choosing from a range of options such as resolution, file format, and color mode. Finally, with the documents prepared and settings selected, users can initiate the scanning process, which involves the printer's scanner head moving across the document, capturing its contents and converting them into a digital format. By following these steps, users can achieve high-quality scans that meet their specific requirements. To begin, let's take a closer look at the first step in the scanning process: Placing the Documents on the Scanner Bed.
Placing the Documents on the Scanner Bed
Placing the documents on the scanner bed is a crucial step in the scanning process. To ensure accurate and high-quality scans, it's essential to position the documents correctly on the scanner bed. Start by lifting the scanner lid and placing the document face down on the glass surface. Make sure the document is aligned with the guides on the scanner bed, which are usually marked with arrows or lines. This will help you position the document correctly and prevent it from getting crooked or skewed during the scanning process. If you're scanning multiple pages, you can place them in a stack on the scanner bed, but make sure they are aligned properly and not overlapping. Some scanners also come with an automatic document feeder (ADF), which allows you to load multiple pages at once and scan them automatically. In this case, simply load the documents into the ADF tray and the scanner will take care of the rest. Once the documents are in place, gently close the scanner lid to ensure they are secure and won't move during the scanning process. It's also a good idea to check the scanner settings to ensure that the correct document size and orientation are selected. This will help the scanner to accurately detect the document and produce a high-quality scan. By following these simple steps, you can ensure that your documents are placed correctly on the scanner bed and ready for scanning.
Selecting the Scan Settings and Resolutions
When selecting the scan settings and resolutions, it's essential to consider the purpose of the scan and the type of document being scanned. For standard documents, such as text-based files, a resolution of 300 dpi (dots per inch) is usually sufficient. However, for images, graphics, or documents with fine details, a higher resolution of 600 dpi or more may be required. Additionally, the scan settings should be adjusted according to the document's size, with larger documents requiring lower resolutions to avoid oversized files. The scan mode should also be selected based on the document's color content, with options ranging from black and white to color and grayscale. Furthermore, the file format should be chosen based on the intended use of the scanned document, with popular options including PDF, JPEG, and TIFF. By carefully selecting the scan settings and resolutions, users can ensure that their scanned documents are of high quality, easily editable, and suitable for their intended purpose.
Initiating the Scanning Process
Initiating the scanning process on your printer is a straightforward process that requires a few simple steps. To begin, ensure your printer is turned on and connected to your computer via a USB cable or wirelessly through your network. Next, place the document you want to scan face down on the scanner glass, following the guides on the scanner bed to position it correctly. Make sure the document is aligned with the arrows or marks on the scanner glass to ensure it scans properly. If your printer has an automatic document feeder (ADF), you can also use this to scan multiple pages at once. Once your document is in place, navigate to the control panel of your printer and select the scan option. This will open the scanning software on your computer, which may be the printer manufacturer's software or a third-party scanning application. From here, you can choose the scanning settings, such as the resolution, file format, and destination folder, to customize your scan to your needs. With your settings selected, click the scan button to initiate the scanning process. Your printer will then begin to scan your document, and the scanned image will be saved to your computer according to your chosen settings.
Post-Scanning Tasks and Tips
After scanning your documents, you're not quite done yet. There are several post-scanning tasks that you need to complete to ensure that your digital files are organized, easily accessible, and of high quality. In this article, we will discuss the essential steps to take after scanning your documents, including saving and organizing the scanned documents, editing and enhancing the scanned images, and troubleshooting common scanning issues. By following these tips, you can ensure that your scanned documents are preserved for years to come and can be easily retrieved when needed. First, let's start with the most critical step: saving and organizing the scanned documents. This is a crucial step that requires careful consideration to ensure that your digital files are properly stored and easily accessible. Note: The introduction should be 200 words. Here is the rewritten introduction: After scanning your documents, you may think that the process is complete, but there are several crucial post-scanning tasks that require attention to ensure your digital files are organized, easily accessible, and of high quality. The scanning process is just the first step, and neglecting the subsequent tasks can lead to disorganization, data loss, and decreased productivity. To maximize the benefits of scanning, it's essential to focus on three key areas: saving and organizing the scanned documents, editing and enhancing the scanned images, and troubleshooting common scanning issues. Saving and organizing your scanned documents is vital to ensure they are properly stored and easily retrievable. Editing and enhancing the scanned images can improve their quality and readability. Meanwhile, troubleshooting common scanning issues can help you overcome obstacles and optimize your scanning workflow. By mastering these post-scanning tasks, you can unlock the full potential of your scanned documents and enjoy the benefits of a paperless office. In this article, we will delve into these essential steps, starting with the critical task of saving and organizing the scanned documents.
Saving and Organizing the Scanned Documents
Here is the paragraphy: Saving and organizing scanned documents is a crucial step in the document scanning process. Once you have scanned your documents, it's essential to save them in a format that is easily accessible and editable. The most common file formats for scanned documents are PDF, JPEG, and TIFF. PDF is the most popular format as it preserves the layout and formatting of the original document, making it ideal for documents that require editing. JPEG is suitable for images and photos, while TIFF is best for high-quality images and documents that require detailed editing. When saving your scanned documents, consider the file size and resolution. A higher resolution will result in a larger file size, but it will also provide a clearer image. It's also important to consider the naming convention for your files. A clear and descriptive file name will make it easier to locate and identify your documents in the future. Organizing your scanned documents is also crucial. You can organize them by category, date, or alphabetical order. You can also use tags or keywords to make them easily searchable. Consider creating folders and subfolders to store your scanned documents, and make sure to back them up regularly to prevent data loss. Additionally, you can use document management software to help you organize and manage your scanned documents. These software programs can help you to categorize, tag, and search your documents, making it easier to find what you need quickly. By saving and organizing your scanned documents properly, you can ensure that they are easily accessible, editable, and secure, making it easier to manage your documents and increase productivity.
Editing and Enhancing the Scanned Images
Editing and enhancing scanned images is a crucial step in the document scanning process. This involves refining the scanned images to improve their quality, readability, and overall appearance. There are several editing and enhancement techniques that can be applied to scanned images, including adjusting brightness and contrast, removing noise and dust, and straightening and cropping the image. Additionally, image editing software can be used to remove unwanted objects or blemishes, and to enhance the color and texture of the image. Some common editing and enhancement tools used for scanned images include Adobe Photoshop, GIMP, and Microsoft Office Picture Manager. These tools offer a range of features and functions that allow users to customize and refine their scanned images to meet their specific needs. By editing and enhancing scanned images, users can improve the overall quality and usability of their digital documents, making them easier to read, share, and store. Furthermore, edited and enhanced scanned images can be used for a variety of purposes, including archiving, sharing, and publishing, making them an essential part of the document scanning process.
Troubleshooting Common Scanning Issues
Troubleshooting common scanning issues can be a daunting task, but with the right approach, you can resolve most problems efficiently. One of the most common issues is poor image quality, which can be caused by a dirty scanner glass, incorrect scanner settings, or low resolution. To resolve this, clean the scanner glass regularly, adjust the scanner settings to optimize image quality, and increase the resolution to capture more details. Another common issue is scanning errors, such as paper jams, misfeeds, or incomplete scans. To troubleshoot these issues, check the scanner's paper tray and ensure it is aligned properly, remove any blockages or debris, and restart the scanning process. Additionally, ensure that the scanner is properly connected to the computer and that the scanning software is up-to-date. If you encounter issues with scanning multiple pages, check the scanner's settings to ensure that the automatic document feeder (ADF) is enabled, and that the scanner is set to scan multiple pages. You can also try scanning pages individually to identify if the issue is with the ADF or the scanner itself. Furthermore, if you experience issues with scanning documents with complex layouts or graphics, try adjusting the scanner's settings to optimize image quality, or use a scanning software that can handle complex layouts. It's also essential to regularly update the scanner's drivers and software to ensure that you have the latest features and bug fixes. By following these troubleshooting steps, you can quickly resolve common scanning issues and ensure that your scanned documents are of high quality and accurate. Regular maintenance, such as cleaning the scanner glass and updating software, can also help prevent issues from arising in the first place. By being proactive and taking the time to troubleshoot common scanning issues, you can save time and frustration in the long run, and ensure that your scanning process runs smoothly and efficiently.