How To Thread A Singer Sewing Machine
Threading a Singer sewing machine can be a daunting task, especially for beginners. However, with the right guidance, you can master this essential skill and unlock the full potential of your machine. In this article, we will walk you through the step-by-step process of threading a Singer sewing machine, covering the crucial preparation steps, the actual threading process, and troubleshooting common issues that may arise. To ensure a smooth and successful threading experience, it is essential to start with a solid foundation, which is why preparation is key. By understanding the importance of preparation, you can avoid common mistakes and set yourself up for success. In the next section, we will delve into the preparation process, exploring the necessary steps to take before threading your machine.
Preparation is Key
Preparation is key to ensuring a smooth and successful experience when working with any machine or equipment. Whether you're a seasoned professional or a beginner, taking the time to prepare beforehand can make all the difference. To start, it's essential to understand the machine's parts and how they function together. This knowledge will help you identify potential issues and take corrective action before they become major problems. Additionally, gathering essential tools and materials is crucial to completing the task at hand. Having the right tools and materials can save you time and frustration, and ensure that the job is done correctly. Finally, consulting the user manual can provide valuable insights and guidance on how to operate the machine safely and effectively. By taking these steps, you can ensure that you're well-prepared to tackle any task that comes your way. Understanding the machine's parts is the first step in this process, and it's essential to get it right.
Understanding the Machine's Parts
When it comes to threading a Singer sewing machine, understanding the machine's parts is crucial. The machine consists of several key components, including the spool pin, take-up lever, tension discs, and bobbin winder. The spool pin is where the thread is inserted, and it's essential to ensure it's securely seated to prevent the thread from coming loose while sewing. The take-up lever, located on the front of the machine, regulates the thread's tension and helps to maintain a smooth, even stitch. The tension discs, usually found on the machine's top or side, control the thread's tightness and can be adjusted to achieve the perfect balance. The bobbin winder, typically located on the machine's top or side, is used to wind the bobbin thread, which is essential for creating a smooth, even stitch on the underside of the fabric. By familiarizing yourself with these parts and their functions, you'll be able to thread your Singer sewing machine with ease and confidence.
Gathering Essential Tools and Materials
To ensure a smooth and successful threading process, it's crucial to gather all the essential tools and materials beforehand. Start by collecting the Singer sewing machine's user manual, which typically includes a detailed threading diagram and instructions. Next, locate the machine's accessories, such as the spool pin, take-up lever, and tension discs. You'll also need a high-quality thread that matches your fabric type, as well as a pair of scissors, a seam ripper, and a small brush to remove any debris or lint. Additionally, have a well-lit workspace and a comfortable seating arrangement to reduce eye strain and fatigue. If you're new to sewing or threading a machine, it's also a good idea to have some spare thread and a few scraps of fabric on hand to practice and test the machine's tension. By having all these tools and materials within reach, you'll be able to focus on the threading process and avoid any unnecessary interruptions or frustrations.
Consulting the User Manual
When it comes to threading a Singer sewing machine, consulting the user manual is an essential step that should not be overlooked. The user manual provides a wealth of information on how to properly thread the machine, including detailed diagrams and step-by-step instructions. By consulting the manual, you can ensure that you are threading the machine correctly, which is crucial for achieving optimal performance and preventing damage to the machine. The manual will also provide you with troubleshooting tips and solutions to common threading issues, saving you time and frustration. Furthermore, the manual may also include additional information on how to maintain and care for your machine, such as cleaning and oiling instructions, which can help extend the life of your machine. By taking the time to consult the user manual, you can ensure that you are getting the most out of your Singer sewing machine and achieving professional-looking results. Additionally, the manual may also provide information on how to use different types of threads, needles, and other accessories, which can help you to expand your sewing capabilities and take on more complex projects. Overall, consulting the user manual is a crucial step in the threading process, and it is an investment of time that will pay off in the long run.
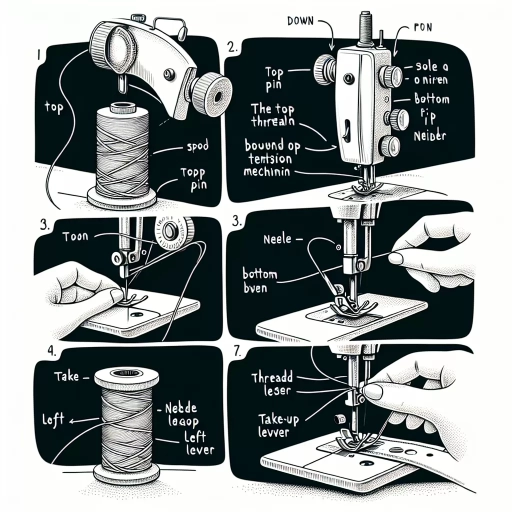
Threading the Machine
Threading a sewing machine can be a daunting task, especially for beginners. However, with a clear understanding of the process, it can be accomplished with ease. To thread a sewing machine, one must first locate the spool pin and take-up lever, which are crucial components in the threading process. Next, the thread must be guided through the machine's path, which involves navigating through various tension discs and guides. Finally, the thread must be secured with the tension discs, ensuring that it is properly aligned and ready for use. By following these steps, individuals can successfully thread their sewing machine and begin their sewing projects. To start, it is essential to locate the spool pin and take-up lever, which are usually located on the top of the machine.
Locating the Spool Pin and Take-Up Lever
When threading a Singer sewing machine, it's essential to locate the spool pin and take-up lever to ensure proper thread alignment and tension. The spool pin is usually located on the top right side of the machine, and it's where you'll place the thread spool. Look for a small metal pin or rod that sticks out from the machine's body, and you'll find the spool pin. The take-up lever, on the other hand, is typically located on the front of the machine, near the presser foot. It's a small metal arm or lever that moves up and down as you turn the handwheel. To locate the take-up lever, look for a small metal piece that protrudes from the machine's front, and you'll see the take-up lever. Once you've located both the spool pin and take-up lever, you can proceed with threading the machine. Make sure to refer to your Singer sewing machine's user manual for specific instructions, as the location of these parts may vary slightly depending on the machine model.
Guiding the Thread Through the Machine's Path
Threading the machine is a crucial step in preparing your Singer sewing machine for use. To guide the thread through the machine's path, start by locating the spool pin, which is usually found on the top right side of the machine. Take the thread and insert the end into the spool pin's small hole, making sure it's seated properly. Next, gently pull the thread to remove any slack, and then guide it through the first guide, which is usually a small metal loop or hook. Continue to guide the thread through the machine's path, following the arrows or diagrams on the machine's body, which indicate the correct threading direction. As you thread, keep the thread taut but not too tight, as this can cause the thread to break or the machine to malfunction. Once you've guided the thread through all the guides and take-up lever, pull it gently to remove any remaining slack, and then insert the thread into the machine's tension discs. Finally, pull the thread gently to set the tension, and your machine is now threaded and ready for use.
Securing the Thread with the Tension Discs
Securing the thread with the tension discs is a crucial step in threading a Singer sewing machine. To do this, locate the tension discs, which are usually found on the front of the machine, near the take-up lever. Gently pull the thread to remove any slack, then pass it through the tension discs from right to left. Make sure the thread is seated properly in the discs, and adjust the tension by turning the tension dial. The tension should be set according to the type of fabric being sewn, with thicker fabrics requiring more tension and thinner fabrics requiring less. Once the tension is set, pull the thread gently to ensure it is secure and evenly tensioned. This step is important to prevent thread breakage and ensure smooth, even stitching. By securing the thread with the tension discs, you can ensure that your Singer sewing machine is properly threaded and ready for use.
Troubleshooting Common Issues
Troubleshooting common issues with your sewing machine can be a daunting task, especially for beginners. However, with the right approach and knowledge, you can quickly identify and resolve problems that hinder your sewing experience. Three common issues that often plague sewists are thread breakage, improper tension, and thread tangles and knots. To address these problems, it's essential to understand the root causes and apply the correct solutions. By identifying and resolving thread breakage, adjusting the tension for smooth operation, and dealing with thread tangles and knots, you can ensure a seamless sewing experience. In this article, we will delve into these common issues and provide practical tips to help you troubleshoot and resolve them. Let's start by exploring the first common issue: Identifying and Resolving Thread Breakage.
Identifying and Resolving Thread Breakage
When it comes to threading a Singer sewing machine, one of the most common issues that can arise is thread breakage. Identifying and resolving thread breakage is crucial to ensure smooth and uninterrupted sewing. To identify thread breakage, look for signs such as a sudden loss of tension, a broken thread, or a tangled mess of thread. If you notice any of these signs, stop the machine immediately and inspect the thread path. Check for any blockages, tangles, or knots that may be causing the breakage. Next, check the thread itself for any signs of wear or damage, such as fraying or splitting. If the thread is damaged, replace it with a new one. If the thread is not damaged, check the machine's tension discs and take-up lever to ensure they are properly adjusted. If the tension is too tight or too loose, it can cause thread breakage. Adjust the tension accordingly to resolve the issue. Additionally, check the machine's needle and hook for any signs of wear or damage. A dull or damaged needle or hook can cause thread breakage, so replace them if necessary. By identifying and resolving thread breakage, you can ensure that your Singer sewing machine runs smoothly and efficiently, allowing you to complete your sewing projects with ease.
Adjusting the Tension for Smooth Operation
Adjusting the tension for smooth operation is a crucial step in ensuring that your Singer sewing machine runs efficiently and effectively. To begin, locate the tension dials on your machine, usually found on the front or top of the machine. The upper thread tension dial is typically marked with numbers or a series of lines, while the bobbin thread tension is usually adjusted by turning a small screw. Start by setting the upper thread tension to the recommended setting, usually around 4-5, and then thread your machine as usual. Next, test the tension by gently pulling on the thread while it's still attached to the machine. If the thread feels too tight, loosen the tension by turning the dial counterclockwise. If it feels too loose, tighten the tension by turning the dial clockwise. Repeat this process until the thread feels smooth and even. Now, move on to the bobbin thread tension. To adjust this, you'll need to remove the bobbin case and locate the small screw that controls the tension. Turn the screw clockwise to tighten the tension or counterclockwise to loosen it. Again, test the tension by gently pulling on the thread. Once you've adjusted both the upper and bobbin thread tensions, re-thread your machine and test it by sewing a few straight lines. If the stitches are even and smooth, you've successfully adjusted the tension for smooth operation. However, if the stitches are still uneven or the thread is breaking, you may need to make further adjustments. Remember to always refer to your Singer sewing machine's user manual for specific instructions on adjusting the tension, as the process may vary slightly depending on the model of your machine. By taking the time to adjust the tension, you'll be able to enjoy smooth and efficient sewing, and extend the life of your machine.
Dealing with Thread Tangles and Knots
Dealing with thread tangles and knots can be frustrating, but there are several steps you can take to resolve the issue. First, stop the machine immediately and carefully remove the tangled thread from the machine. If the thread is knotted, gently tease out the knot with your fingers or a blunt object like a chopstick. If the knot is particularly stubborn, you can try soaking the thread in warm water to loosen it. Once the thread is removed, inspect the machine's tension discs and take-up lever to ensure they are clean and free of debris. If you find any blockages, gently remove them with a soft brush or a cotton swab. Next, rethread the machine, making sure to follow the correct threading path and maintaining a consistent tension. If the problem persists, try adjusting the machine's tension settings or consulting the user manual for troubleshooting tips. Additionally, regular maintenance such as cleaning and oiling the machine can help prevent thread tangles and knots from occurring in the future. By following these steps, you can quickly and easily resolve thread tangles and knots, and get back to sewing with ease.