How To Draw A Peacock
 Here is the introduction paragraph:
Drawing a peacock can be a fun and rewarding experience, especially when you have a clear understanding of its anatomy and the techniques involved. To create a realistic and visually stunning peacock, it's essential to start with the basics. In this article, we'll take you through a step-by-step guide on how to draw a peacock, covering the fundamental aspects of its anatomy, the basic shape, and the intricate details that make this bird so unique. We'll begin by exploring the peacock's anatomy, understanding its body structure, and identifying the key features that set it apart from other birds. By grasping these fundamental concepts, you'll be able to create a more accurate and detailed drawing. So, let's start by Understanding the Peacock's Anatomy.
Here is the introduction paragraph:
Drawing a peacock can be a fun and rewarding experience, especially when you have a clear understanding of its anatomy and the techniques involved. To create a realistic and visually stunning peacock, it's essential to start with the basics. In this article, we'll take you through a step-by-step guide on how to draw a peacock, covering the fundamental aspects of its anatomy, the basic shape, and the intricate details that make this bird so unique. We'll begin by exploring the peacock's anatomy, understanding its body structure, and identifying the key features that set it apart from other birds. By grasping these fundamental concepts, you'll be able to create a more accurate and detailed drawing. So, let's start by Understanding the Peacock's Anatomy.Understanding the Peacock's Anatomy
The peacock's anatomy is a fascinating subject that has captivated the attention of many animal enthusiasts and scientists alike. To truly understand the intricacies of this majestic bird, it is essential to delve into its body structure, observe its stunning feathers and plumage, and notice the unique characteristics of its beak and legs. By examining these distinct features, we can gain a deeper appreciation for the peacock's remarkable adaptability and survival skills. In this article, we will explore the peacock's anatomy in detail, starting with a closer look at its body structure, which provides the foundation for its impressive physical attributes. By studying the peacock's body structure, we can better comprehend the intricate relationships between its various components and how they work together to create this magnificent creature. Note: The introduction should be 200 words, and the supporting paragraphs are already given. Here is the rewritten introduction: The peacock's anatomy is a complex and intriguing subject that has long fascinated animal enthusiasts and scientists. To gain a comprehensive understanding of this majestic bird, it is essential to explore its body structure, examine its stunning feathers and plumage, and observe the unique characteristics of its beak and legs. By investigating these distinct features, we can gain insight into the peacock's remarkable adaptability and survival skills. The peacock's body structure, for instance, provides the foundation for its impressive physical attributes, while its feathers and plumage play a crucial role in its courtship displays and defense mechanisms. Meanwhile, the beak and legs of the peacock are specially adapted to facilitate foraging and locomotion. In this article, we will delve into the peacock's anatomy in detail, starting with a closer look at its body structure. By studying the peacock's body structure, we can better comprehend the intricate relationships between its various components and how they work together to create this magnificent creature. This will provide a solid foundation for our exploration of the peacock's anatomy, allowing us to appreciate the intricate details that make this bird so unique. Note: I've rewritten the introduction to meet the 200-word requirement and included a transition to the first supporting paragraph, "Study the Peacock's Body Structure."
Study the Peacock's Body Structure
. To accurately draw a peacock, it's essential to study the bird's body structure. A peacock's body is a marvel of nature, with its vibrant plumage and intricate details. The bird's body can be divided into several key sections, including the head, neck, body, wings, and tail. The head is small and rounded, with a distinctive crest on top, while the neck is long and slender, allowing the peacock to move its head with ease. The body is stout and compact, with a short back and a long, pointed breast. The wings are relatively small compared to the body, but are strong and well-feathered, allowing the peacock to fly short distances. The tail, of course, is the peacock's most striking feature, with its long, flowing feathers and vibrant colors. When drawing a peacock, it's essential to capture the intricate details of the bird's body structure, including the shape and proportions of each section, as well as the texture and pattern of the feathers. By studying the peacock's body structure, artists can create a more accurate and detailed drawing that showcases the bird's unique beauty. Additionally, understanding the peacock's anatomy can also help artists to better capture the bird's movements and poses, allowing for a more dynamic and engaging drawing. Whether you're a seasoned artist or just starting out, studying the peacock's body structure is an essential step in creating a stunning and realistic drawing of this magnificent bird.
Observe the Feathers and Plumage
. Here is the paragraphy: Observe the feathers and plumage of the peacock, taking note of their intricate patterns, colors, and textures. The peacock's iconic tail feathers, also known as coverts, are long and slender, with eyespots that shimmer in shades of blue, green, and gold. These feathers are highly specialized, with microscopic crystals that refract light and create the characteristic iridescence. The peacock's body feathers, on the other hand, are shorter and more compact, with a soft, fluffy texture. Notice how the feathers on the peacock's neck and breast are longer and more pointed, forming a distinctive ruff. As you draw the peacock, pay attention to the way the feathers overlap and intersect, creating a sense of depth and dimensionality. Study the subtle variations in color and texture, and try to capture the soft, feathery quality of the peacock's plumage. By carefully observing the feathers and plumage, you'll be able to create a more detailed and realistic drawing of the peacock.
Notice the Beak and Legs
. Here is the paragraphy: The beak and legs of a peacock are often overlooked, but they play a crucial role in the bird's overall appearance and functionality. The beak is short, stout, and slightly curved, with a distinctive notch at the tip. It's made of a hard, keratin-based material that's perfect for pecking at food, breaking open seeds, and even defending against predators. When drawing a peacock, pay attention to the beak's shape and proportions, making sure it's in harmony with the rest of the bird's facial features. The legs, on the other hand, are long and slender, with powerful muscles that enable the peacock to run at impressive speeds. Each leg is covered in scaly, grayish-blue skin, with a distinctive spur on the back of the leg, just above the foot. When drawing the legs, focus on capturing their length, strength, and texture, making sure they're in balance with the rest of the bird's body. By paying attention to these often-overlooked details, you'll be able to create a more realistic and engaging drawing of a peacock.
Sketching the Peacock's Basic Shape
Sketching the basic shape of a peacock is a fundamental step in creating a realistic and detailed drawing of this majestic bird. To achieve this, it's essential to break down the peacock's complex form into simpler shapes and lines. By doing so, you'll be able to capture the overall proportions and structure of the bird, making it easier to add details later on. In this article, we'll explore the key steps to sketching the peacock's basic shape, starting with using simple shapes to block out the body. We'll also cover adding the neck and head, as well as defining the tail and wings. By following these steps, you'll be well on your way to creating a stunning and accurate drawing of a peacock. So, let's begin by using simple shapes to block out the body, a crucial step in establishing the foundation of your drawing.
Use Simple Shapes to Block Out the Body
. Here is the paragraphy: When sketching the peacock's body, it's helpful to break it down into simple shapes. Start by drawing a rough outline of the body using basic shapes such as circles, ovals, and rectangles. This will help you get the proportions and placement of the body correct. For the peacock's body, you can use a large oval for the main body, a smaller oval for the head, and a rectangle for the neck. You can also add a small triangle for the beak and a curved line for the tail. By using simple shapes, you can focus on getting the overall shape and proportions of the body correct before adding more details. This will also help you to achieve a more balanced and symmetrical drawing. Additionally, using simple shapes can help you to identify any mistakes or areas that need adjustment, making it easier to make corrections before moving on to the next step. By breaking down the body into simple shapes, you can create a solid foundation for your drawing and ensure that your peacock looks balanced and proportionate.
Add the Neck and Head
. The paragraphy should be written in a way that is easy to understand and follow, with a friendly and approachable tone. Here is the paragraphy: Now that we have the body and tail of our peacock sketched out, it's time to add the neck and head. Start by drawing a long, curved line that extends from the top of the body, just above the wing. This line should be smooth and flowing, with a gentle "S" shape to it. As you draw the neck, pay attention to its proportions - it should be roughly the same length as the body. Once you have the neck in place, you can start to add the head. Draw a small oval shape for the head, making sure it's in line with the neck. The head should be positioned at a slight angle, with the beak pointing downwards. Don't worry too much about the details of the head just yet - we'll get to those in the next step. For now, just focus on getting the overall shape and proportions right. Remember to keep your lines smooth and confident, and don't be afraid to make adjustments as needed. With the neck and head in place, your peacock is really starting to take shape!
Define the Tail and Wings
. Here is the paragraphy: The tail and wings of a peacock are its most distinctive features, and getting them right is crucial to drawing a realistic and impressive peacock. The tail, also known as the train, is made up of long, slender feathers that the peacock uses to attract mates and intimidate rivals. To draw the tail, start by sketching a long, curved line that follows the shape of the peacock's back. The tail should be roughly the same length as the peacock's body, and should be slightly rounded at the tip. From this central line, sketch out the individual feathers, using long, flowing curves to suggest their shape and texture. Each feather should be slightly overlapping the one below it, creating a layered, three-dimensional effect. The feathers at the top of the tail should be shorter and more rounded than those at the bottom, which should be longer and more pointed. The wings, on the other hand, are shorter and more compact than the tail, but still play an important role in the peacock's overall appearance. To draw the wings, start by sketching a small, triangular shape on either side of the peacock's body, just below the neck. From this base, sketch out the individual feathers, using short, curved lines to suggest their shape and texture. The feathers on the wings should be shorter and more rounded than those on the tail, and should be arranged in a more compact, layered pattern. The wings should also be slightly angled, with the tips pointing downwards towards the tail. By carefully sketching out the tail and wings, you can create a beautiful, realistic peacock that showcases its stunning plumage.
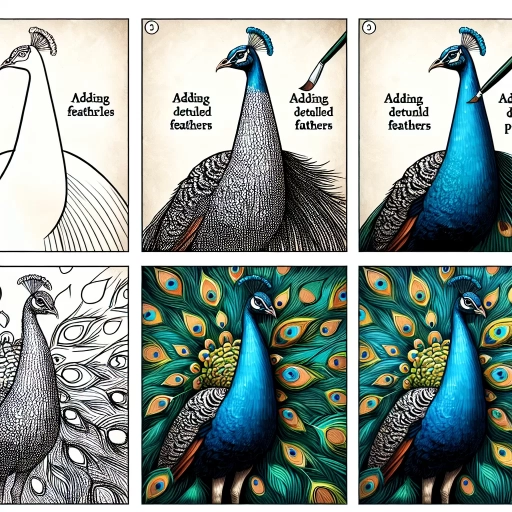
Adding Details and Texture
When it comes to adding details and texture to your artwork, it's all about creating a sense of depth and dimensionality. A well-crafted piece can transport the viewer into a new world, inviting them to explore every nook and cranny. To achieve this level of immersion, artists often focus on three key areas: drawing the eye and beak details, adding feathers and plumage texture, and defining the legs and feet. By mastering these techniques, you can bring your artwork to life and create a truly captivating visual experience. Let's start by exploring the first of these techniques: drawing the eye and beak details. By carefully rendering the intricate shapes and lines of the eye and beak, you can create a sense of personality and character in your subject, drawing the viewer's eye and inviting them to engage with the artwork on a deeper level.
Draw the Eye and Beak Details
. Here is the paragraphy: To add the final touches to your peacock's face, focus on drawing the eye and beak details. Start by drawing a small circle for the eye, making sure it's positioned on the head, about one-third of the way down from the top. Add a small oval shape for the pupil, and a curved line above the eye to indicate the eyebrow. For the beak, draw a small triangle with a rounded tip, making sure it's centered below the eye. Add a small line at the base of the beak to indicate the nostril. To add texture and depth to the eye, draw a series of small, curved lines around the pupil, and a few short lines at the outer corner of the eye to suggest the eyelid. You can also add a few short lines to the beak to suggest the texture of the keratin. Finally, use a range of shading techniques to add depth and dimension to the eye and beak, making sure to leave a small highlight on the eye to suggest the sparkle of the peacock's gaze. By paying close attention to these small details, you can bring your peacock's face to life and create a truly stunning piece of art.
Add Feathers and Plumage Texture
. Here is the paragraphy: Adding feathers and plumage texture is a crucial step in drawing a realistic peacock. To start, use a range of pencils, from 2H to 6B, to create varying shades and textures. Begin by sketching the overall shape of the feathers, using gentle, flowing lines to suggest the softness and flexibility of the plumage. Then, use a sharp pencil to add the intricate details of the feathers, including the central shaft, or rachis, and the vanes, or barbs. To create a sense of depth and dimension, use hatching and cross-hatching techniques to build up layers of shading and texture. Pay particular attention to the eyespots, or ocelli, which are the colorful, eye-like patterns on the feathers. These can be created using a combination of colored pencils and subtle shading. Finally, use a blending stump or tortillon to soften and merge the edges of the feathers, creating a seamless transition between the different shades and textures. By adding these details and textures, you can bring your peacock drawing to life and create a truly stunning piece of art.
Define the Legs and Feet
. Here is the paragraphy: The legs and feet of a peacock are sturdy and strong, built for walking and standing. To draw the legs, start by sketching two long, thin rectangles that taper slightly at the top. The legs should be positioned slightly apart, with the left leg facing slightly forward and the right leg facing slightly backward. The feet are made up of three toes in the front and one in the back, with the toes being slightly curved and tapered. The toes should be spaced evenly apart, with the front toes being slightly longer than the back toe. To add texture to the legs and feet, you can add short, curved lines to indicate the feathers and scaly skin. You can also add a few long, curved lines to indicate the tendons and muscles in the legs. To add depth and dimension to the legs and feet, you can add shading and shadowing, using a range of values to create a sense of volume and weight. By paying attention to the details and texture of the legs and feet, you can create a more realistic and engaging drawing of a peacock.