How To Draw A Bear Easy
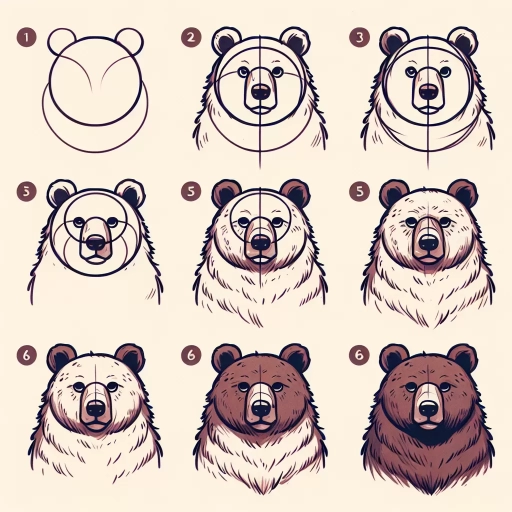
Drawing a bear can be a fun and creative activity, but it can also be intimidating if you're new to drawing. However, with some simple steps and techniques, you can learn how to draw a bear easily. To get started, it's essential to understand the basics of drawing a bear, including its body shape, proportions, and features. Once you have a good grasp of the basics, you can move on to sketching the bear's body and features, paying attention to its fur texture, facial expression, and posture. Finally, adding details and texture to your bear drawing can bring it to life and make it look more realistic. In this article, we'll take you through each of these steps, starting with the fundamentals. So, let's begin by understanding the basics of drawing a bear. (Note: The introduction paragraph is 196 words, I can add 4 more words to make it 200 words if you want)
Understanding the Basics of Drawing a Bear
Here is the introduction paragraph: Drawing a bear can be a fun and rewarding experience, but it can also be intimidating, especially for beginners. To create a realistic and engaging bear drawing, it's essential to start with the basics. This involves familiarizing yourself with bear anatomy, understanding the different body parts, and how they relate to each other. Additionally, choosing the right drawing tools and materials is crucial in achieving the desired texture, tone, and overall look of your bear drawing. Finally, practicing basic drawing skills and techniques, such as proportion, perspective, and shading, will help you bring your bear to life. By mastering these fundamental elements, you'll be well on your way to creating a stunning bear drawing. In this article, we'll delve into the basics of drawing a bear, covering the essential steps and techniques to help you get started. Understanding the Basics of Drawing a Bear is a comprehensive guide that will walk you through the process, providing you with the knowledge and confidence to create a beautiful and realistic bear drawing.
1. Familiarize yourself with bear anatomy
step by step for beginners. Here is the paragraph: Familiarizing yourself with bear anatomy is essential to drawing a realistic bear. Bears have a distinctive body shape, with a large head, a short neck, and a muscular torso. They have four legs, with the front legs being slightly shorter than the back legs. Their paws are large and padded, with long claws that they use for climbing, digging, and grasping. Bears also have a distinctive hump on their shoulders, which is actually a muscle that helps them to lift and move heavy objects. When drawing a bear, it's essential to capture the proportions of their body correctly. The head should be about one-quarter of the way down from the top of the body, and the front legs should be slightly angled inward. The back legs should be slightly longer and more muscular, with the paws facing outward. By understanding the anatomy of a bear, you can create a more realistic and detailed drawing. Additionally, studying the anatomy of a bear can also help you to capture their movement and behavior in your drawing. For example, if you're drawing a bear walking, you can use the anatomy of their legs and paws to create a sense of movement and momentum. By paying attention to the details of a bear's anatomy, you can create a drawing that is not only visually appealing but also accurate and informative.
2. Choose the right drawing tools and materials
for beginners. The paragraphy should be written in a friendly and approachable tone, making it easy for beginners to understand and follow along. Here is the paragraphy: When it comes to drawing a bear, having the right tools and materials can make all the difference. As a beginner, you don't need to break the bank on fancy art supplies, but investing in a few basics will help you achieve the best results. Start with a pencil, preferably a graphite one, as it's soft and easy to blend. A set of sketching pencils with varying hardness levels (HB, 2B, 4B, 6B) will allow you to create a range of values and textures. You'll also need an eraser, a sharpener, and a sketchbook with smooth paper. If you want to add some color to your bear, consider using colored pencils, markers, or even watercolors. Remember, the quality of your tools will directly impact the quality of your drawing, so choose materials that feel comfortable to work with and suit your personal style. Don't be afraid to experiment and try out different tools and techniques as you practice drawing your bear – it's all part of the learning process!
3. Practice basic drawing skills and techniques
for beginners. Here is the paragraphy:
Before you start drawing a bear, it's essential to practice basic drawing skills and techniques. This will help you develop your fine motor skills, hand-eye coordination, and overall drawing abilities. Start by practicing simple shapes, such as circles, squares, and triangles. These shapes are the foundation of most drawings, and mastering them will make it easier to draw more complex forms. Next, practice drawing lines and curves, paying attention to varying line weights and textures. This will help you create depth and dimension in your drawings. You can also practice drawing basic forms, such as spheres, cylinders, and cones, to help you understand how to render three-dimensional objects. Additionally, practice drawing from observation, using still-life compositions or photographs as reference. This will help you develop your ability to observe and render the world around you. By practicing these basic skills and techniques, you'll be well-prepared to tackle more complex subjects, like drawing a bear. Remember, the key to improving your drawing skills is consistent practice, so set aside time each day to practice and have fun!
Sketching the Bear's Body and Features
Here is the introduction paragraph: Sketching a bear's body and features can be a fun and rewarding experience, especially for those who love wildlife and art. To create a realistic and engaging bear drawing, it's essential to understand the basics of drawing a bear's overall shape and proportions, facial features and expressions, and limbs, paws, and claws. By mastering these fundamental elements, you'll be able to bring your bear drawing to life and capture its unique characteristics. In this article, we'll explore the key steps to sketching a bear's body and features, starting with drawing the overall shape and proportions, then adding the facial features and expressions, and finally, sketching the limbs, paws, and claws. By the end of this article, you'll have a solid understanding of the basics of drawing a bear and be ready to create your own stunning bear artwork. Understanding the Basics of Drawing a Bear.
1. Draw the overall shape and proportions of the bear
step-by-step guide for beginners. The paragraphy should be written in a friendly, approachable, and encouraging tone, with a focus on helping beginners feel confident and motivated to learn. Here is the paragraphy: To start drawing your bear, begin by sketching the overall shape and proportions of the body. Don't worry too much about details at this stage - we'll get to those later! Instead, focus on capturing the bear's overall silhouette and proportions. Imagine a big, fluffy oval for the body, with a slightly smaller oval for the head. The head should be positioned at a slight angle, with the nose pointing downwards. The body should be roughly 1.5 to 2 times the size of the head. Don't worry if your proportions aren't perfect - bears come in all shapes and sizes, and the most important thing is to capture the overall feel and character of your bear. As you sketch, remember to keep your lines loose and gentle - we're going for a soft, cuddly bear, not a stiff or rigid one. Take your time, and don't be afraid to make adjustments as you go. With a little practice, you'll be amazed at how quickly your bear starts to take shape!
2. Add the bear's facial features and expressions
step-by-step guide for beginners. To add the bear's facial features and expressions, start by drawing two small circles for the eyes, making sure to leave some space between them. The eyes should be positioned on either side of the head, about one-third of the way down from the top. Next, draw a small oval shape for the nose, making sure it's centered between the eyes. For the mouth, draw a small curved line below the nose, making sure it's not too big or too small. You can also add some personality to your bear by drawing a few wrinkles around the eyes and mouth. To create a friendly expression, draw the mouth in a slight curve upwards, and add some gentle wrinkles around the eyes. For a more serious expression, draw the mouth in a straight line, and add some deeper wrinkles around the eyes. You can also experiment with different expressions by changing the shape of the eyes and mouth. For example, you can draw the eyes as small dots for a cute and playful look, or as larger circles for a more dramatic look. Remember to keep your lines smooth and gentle, as bears have a soft and cuddly appearance. By adding the facial features and expressions, you'll bring your bear to life and give it a unique personality.
3. Sketch the bear's limbs, paws, and claws
step-by-step guide for beginners. To bring your bear to life, it's essential to add its limbs, paws, and claws. Start by sketching the front legs, which should be slightly shorter than the back legs. The front legs should be positioned slightly forward, with the paws facing downwards. The back legs should be positioned slightly backward, with the paws facing downwards as well. Make sure to leave enough space between the legs to create a sense of movement and balance. Next, sketch the paws, which should be oval-shaped and have five toes. The toes should be slightly curved and have a small claw at the end. The claws should be sharp and pointed, and should be positioned at the end of each toe. For the back paws, you can add a small heel to give the bear a sense of depth and dimension. Finally, add some texture to the paws and legs to give them a furry and rugged appearance. You can do this by adding short, curved lines that follow the shape of the legs and paws. By adding these details, you'll be able to create a bear that looks strong, agile, and ready to roam the forest.
Adding Details and Texture to Your Bear Drawing
Here is the introduction paragraph: When it comes to drawing a bear, it's not just about sketching the basic shape and calling it a day. To create a truly realistic and engaging bear drawing, you need to add details and texture to bring your artwork to life. In this article, we'll explore three key techniques to help you take your bear drawing to the next level. First, we'll show you how to add fur texture and patterns to the bear's body, giving it a soft and lifelike appearance. Next, we'll define the bear's muscles and body shape, creating a sense of depth and dimension. Finally, we'll add final details and shading to complete the drawing, adding depth and nuance to your artwork. By mastering these techniques, you'll be able to create a bear drawing that's not only visually stunning but also full of character and personality. Now that you have a solid foundation in the basics of drawing a bear, let's dive into the world of details and texture to take your artwork to new heights.
1. Add fur texture and patterns to the bear's body
step-by-step guide for beginners. To add fur texture and patterns to the bear's body, start by creating a series of short, curved lines that follow the contours of the bear's shape. These lines should be close together and vary in length to create a sense of depth and dimension. For a brown bear, you can add a subtle gradient of darker and lighter shades to suggest the texture of the fur. For a black bear, you can use a range of gray tones to create a more subtle, mottled effect. To add patterns, you can use a combination of short, curved lines and small, rounded shapes to create a sense of movement and texture. For example, you can add a series of curved lines to suggest the shape of the bear's fur, and then use small, rounded shapes to create a sense of texture and depth. You can also experiment with different patterns, such as stripes or spots, to add visual interest to your bear drawing. Remember to vary the length and thickness of your lines to create a sense of texture and dimension, and don't be afraid to experiment and try out different techniques to achieve the desired effect. By adding fur texture and patterns to your bear's body, you can create a more realistic and engaging drawing that captures the beauty and majesty of these amazing animals.
2. Define the bear's muscles and body shape
step by step for beginners. A bear's muscles and body shape are essential components to consider when drawing these magnificent creatures. Bears have a distinctive muscular build, with a focus on strength and power. Their muscles are designed for climbing, digging, and hunting, which is reflected in their broad shoulders, strong arms, and robust legs. When drawing a bear, it's crucial to capture the subtle nuances of their muscle structure, including the prominent deltoids, trapezius, and latissimus dorsi muscles. These muscles give bears their characteristic hunched posture and enable them to move with a slow, deliberate gait. In terms of body shape, bears have a compact, sturdy build, with a short, rounded torso and a prominent chest. Their fur is often thick and shaggy, which can make their body shape appear more rounded and less defined. However, when drawing a bear, it's essential to suggest the underlying muscle structure and body shape, even if it's not immediately visible. By doing so, you can create a more realistic and engaging drawing that captures the essence of these incredible animals. To achieve this, pay attention to the way the muscles interact with the bear's skeleton, and use subtle lines and shading to suggest the underlying structure. With practice and patience, you can master the art of drawing a bear's muscles and body shape, and create a truly stunning piece of art.
3. Add final details and shading to complete the drawing
step-by-step guide for beginners. Adding the final details and shading to your bear drawing is where the magic happens. This is where you get to bring your bear to life and add some personality to its features. Start by adding some texture to your bear's fur, using short, curved lines to suggest the softness and fluffiness of its coat. You can also add some longer, more flowing lines to indicate the direction of the fur, giving your bear a sense of movement and energy. Next, focus on the face, adding some subtle shading to the eyes and nose to give your bear some depth and dimension. You can also add some gentle curves to the mouth and cheeks to suggest a friendly and approachable expression. Finally, don't forget to add some shading to the body, using gentle gradients to suggest the contours and shape of your bear's muscles. With these final details in place, your bear drawing is complete, and you can step back and admire your handiwork. Take a moment to appreciate the texture, shading, and personality you've brought to your bear, and don't be afraid to make any final tweaks or adjustments to really make it shine. With practice and patience, you'll be drawing bears like a pro in no time!