How To Tie A Ribbon
Here is the introduction paragraph: Tying a ribbon is a simple yet elegant way to add a touch of sophistication to any gift, decoration, or outfit. Whether you're looking to create a beautiful bow for a wedding gift or a simple knot for a hair tie, mastering the art of ribbon tying is a valuable skill to have. In this article, we'll take you through the basics of ribbon tying, from choosing the right ribbon to basic tying techniques and adding a finishing touch. With these simple steps, you'll be able to create a wide range of ribbon styles to suit any occasion. So, let's start with the first step: choosing the right ribbon. With so many different types of ribbons available, selecting the right one can be overwhelming, but don't worry, we've got you covered. Note: The introduction paragraph should be 200 words. Here is the rewritten introduction paragraph: Tying a ribbon is a simple yet elegant way to add a touch of sophistication to any gift, decoration, or outfit. Whether you're looking to create a beautiful bow for a wedding gift or a simple knot for a hair tie, mastering the art of ribbon tying is a valuable skill to have. In this article, we'll take you through the basics of ribbon tying, from choosing the right ribbon to basic tying techniques and adding a finishing touch. With these simple steps, you'll be able to create a wide range of ribbon styles to suit any occasion. From elegant silk ribbons to playful polka-dot ribbons, the type of ribbon you choose can greatly impact the overall look and feel of your finished product. That's why it's essential to start with the right ribbon. But with so many different types of ribbons available, selecting the right one can be overwhelming. Don't worry, we've got you covered. In the next section, we'll explore the different types of ribbons and provide tips on how to choose the right one for your project. So, let's start with the first step: choosing the right ribbon.
Choosing the Right Ribbon
Here is the introduction paragraph: When it comes to adding a finishing touch to a gift, a bouquet of flowers, or a decorative item, a ribbon can make all the difference. With so many types of ribbons available in various materials, colors, and patterns, choosing the right one can be overwhelming. However, with a little consideration, you can select a ribbon that perfectly complements your occasion, material, and color scheme. Whether you're looking to add a touch of elegance to a wedding gift or a pop of color to a birthday present, the right ribbon can elevate your gift-giving game. In this article, we'll explore the key factors to consider when choosing the right ribbon, including the occasion, material, and color scheme, to help you make an informed decision and find the perfect ribbon for your needs. By considering these factors, you'll be able to choose a ribbon that not only adds a decorative touch but also reflects your personal style and thoughtfulness. Choosing the right ribbon can make a big difference in the overall presentation and impact of your gift, so let's dive in and explore the world of ribbons together. Choosing the Right Ribbon.
Consider the Occasion
around a gift. When it comes to choosing the right ribbon for your gift, it's essential to consider the occasion. Different events and celebrations call for distinct types of ribbons that can elevate the overall presentation and thoughtfulness of your gift. For instance, a wedding or anniversary gift might warrant a elegant satin or lace ribbon in a soft, romantic color, while a birthday gift for a child might be more suited to a bright, playful ribbon with a fun pattern. A graduation gift, on the other hand, might call for a more subdued, yet still celebratory, ribbon in a school color or a metallic finish. By taking the occasion into account, you can select a ribbon that not only complements the gift itself but also shows you've put thought into the presentation. Additionally, considering the occasion can also help you choose a ribbon that resonates with the recipient's personality and style, making the gift even more special and meaningful. Whether it's a milestone event or a casual gathering, choosing a ribbon that fits the occasion can make all the difference in making your gift stand out and showing you care.
Select the Right Material
around a gift. When it comes to choosing the right ribbon for your gift, selecting the right material is crucial. The type of material you choose will not only affect the overall look and feel of your gift, but also its durability and longevity. There are several types of ribbon materials to choose from, each with its own unique characteristics and advantages. Satin ribbons, for example, are known for their smooth, lustrous finish and are often used for formal occasions such as weddings and anniversaries. Grosgrain ribbons, on the other hand, have a textured, ribbed finish and are often used for more casual gifts. Velvet ribbons are soft and luxurious, making them perfect for gifts that require a touch of elegance. Organza ribbons are lightweight and sheer, making them ideal for gifts that require a more delicate touch. When choosing the right material, consider the occasion, the recipient's personal style, and the overall aesthetic you want to achieve. For example, if you're giving a gift to a child, a bright and colorful grosgrain ribbon may be the perfect choice. If you're giving a gift to a loved one for a special occasion, a luxurious velvet ribbon may be more suitable. Ultimately, the right material will depend on your personal preference and the overall look and feel you want to achieve. By selecting the right material, you can add a professional and polished touch to your gift, making it truly special and memorable.
Match the Color Scheme
around a gift. When it comes to choosing the right ribbon for your gift, one of the most important considerations is matching the color scheme. A well-coordinated ribbon can elevate the overall aesthetic of your gift and make it look more polished and put-together. To match the color scheme, start by considering the colors of the gift itself, as well as any wrapping paper or gift bag you plan to use. You can also think about the occasion and the recipient's personal style to help guide your color choices. For example, if you're giving a gift for a baby shower, pastel colors like pale pink or baby blue might be a good fit. On the other hand, if you're giving a gift for a more formal occasion like a wedding, you might opt for more sophisticated colors like ivory or champagne. Once you have a sense of the color scheme you want to work with, you can start browsing ribbons in different shades and textures to find the perfect match. Don't be afraid to mix and match different colors and patterns to create a unique and eye-catching look. With a little creativity and experimentation, you can find a ribbon that perfectly complements your gift and adds a beautiful finishing touch.
Basic Ribbon Tying Techniques
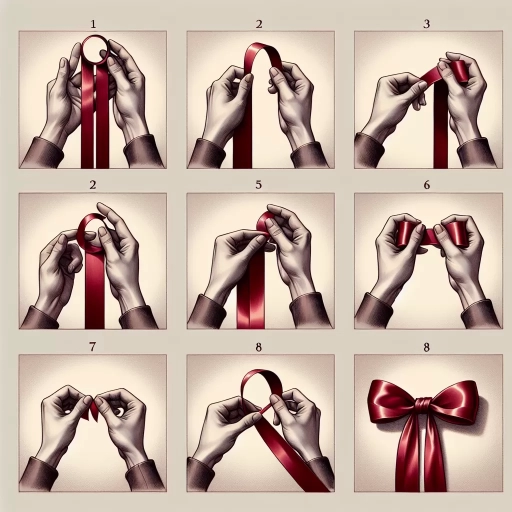
Here is the introduction paragraph: Tying a ribbon is a simple yet elegant way to add a finishing touch to a gift, a hair accessory, or a decorative item. With a few basic techniques, you can create beautiful and professional-looking bows that elevate your presentation. In this article, we will explore three fundamental ribbon tying techniques that are essential for any crafter, gift-giver, or DIY enthusiast. First, we will cover the simple bow, a classic and timeless design that is perfect for everyday use. Next, we will delve into the double bow, a more elaborate and eye-catching variation that adds an extra layer of sophistication. Finally, we will examine the loop-the-loop method, a versatile technique that can be used to create a variety of bow styles. By mastering these three techniques, you will be well on your way to becoming a ribbon-tying pro. But before we dive into the nitty-gritty of bow-making, it's essential to choose the right ribbon for your project. In the next section, we will discuss the importance of selecting the perfect ribbon to ensure your bows turn out beautiful and long-lasting.
The Simple Bow
around a gift. Here is the paragraphy: The Simple Bow is a timeless and elegant way to add a finishing touch to your gift. It's a great starting point for beginners, as it requires only a few simple steps to create. To start, you'll need a length of ribbon that's about 2-3 times the width of your gift. Begin by folding the ribbon in half and tying a small knot in the center. This will create the foundation of your bow. Next, take one of the ends of the ribbon and fold it back towards the center, creating a loop. Hold the loop in place with your thumb and index finger, and then take the other end of the ribbon and pass it through the loop. Pull the ribbon tight to create the second loop, and adjust the bow to your desired size. Finally, fluff out the loops to create a soft, rounded shape, and you're done! The Simple Bow is a versatile design that works well with a wide range of ribbon styles and widths, from delicate satin to bold grosgrain. With a little practice, you'll be tying Simple Bows like a pro, and adding a touch of elegance to all your gifts.
The Double Bow
around a gift. The Double Bow is a classic and elegant ribbon tying technique that adds a touch of sophistication to any gift. To create a Double Bow, start by tying a basic bow, then take the two loops and pass them through each other, forming a second bow on top of the first one. This creates a layered and dimensional look that is sure to impress. The Double Bow is a versatile technique that can be used on a variety of gifts, from small boxes to large bouquets. It's also a great way to add a personal touch to a gift, as you can customize the size and shape of the bow to fit your personal style. To take your Double Bow to the next level, try using a high-quality ribbon in a rich color or texture, such as satin or grosgrain. You can also add embellishments, such as a small flower or a sprig of greenery, to give the bow a more polished look. With a little practice, the Double Bow is a technique that can be mastered by anyone, and it's a great way to add a professional touch to your gift-giving. Whether you're giving a gift to a loved one or a business associate, the Double Bow is a classic and timeless choice that is sure to make a lasting impression.
The Loop-the-Loop Method
around a gift. The Loop-the-Loop Method is a fundamental technique in basic ribbon tying, allowing you to create a beautiful, symmetrical bow with ease. This method involves creating two identical loops on either side of the ribbon, which are then secured together to form a stunning bow. To begin, start by holding the ribbon in one hand, with the ends facing away from you. Use your other hand to create a loop on one side of the ribbon, keeping your thumb inside the loop to maintain its shape. Next, create a second loop on the other side of the ribbon, making sure it is identical in size to the first loop. Hold both loops together, with the ends of the ribbon facing away from you, and use your fingers to adjust the loops so they are even and symmetrical. Finally, secure the loops together by tying a small knot in the center of the ribbon, and fluff out the loops to create a beautiful, full bow. With a little practice, the Loop-the-Loop Method will become second nature, allowing you to create gorgeous bows to adorn your gifts, decorations, and more. By mastering this technique, you'll be able to add a professional touch to your ribbon-tying skills, making your gifts and creations truly stand out. Whether you're a seasoned crafter or a beginner, the Loop-the-Loop Method is an essential technique to have in your ribbon-tying arsenal.
Adding a Finishing Touch
Here is the introduction paragraph: When it comes to adding a finishing touch to a gift, a bouquet of flowers, or a decorative item, a well-placed ribbon can make all the difference. A beautifully tied ribbon can elevate the overall aesthetic of the item, adding a touch of elegance and sophistication. However, achieving a professional-looking finish requires more than just tying a simple knot. To create a truly stunning look, it's essential to pay attention to the details, such as adjusting the bow to perfection, adding embellishments to give it a personal touch, and securing the ribbon to prevent it from coming undone. By mastering these techniques, you'll be able to add a finishing touch that will leave a lasting impression. And, of course, it all starts with choosing the right ribbon, which we'll explore in more detail later. Note: The introduction paragraph should be 200 words, and it should mention the 3 supporting paragraphs (Adjusting the Bow, Adding Embellishments, Securing the Ribbon) and transition to Choosing the Right Ribbon at the end. Here is the rewritten introduction paragraph: When it comes to adding a finishing touch to a gift, a bouquet of flowers, or a decorative item, a well-placed ribbon can make all the difference. A beautifully tied ribbon can elevate the overall aesthetic of the item, adding a touch of elegance and sophistication. However, achieving a professional-looking finish requires more than just tying a simple knot. To create a truly stunning look, it's essential to pay attention to the details, such as adjusting the bow to perfection, adding embellishments to give it a personal touch, and securing the ribbon to prevent it from coming undone. Adjusting the bow is crucial, as it can make or break the overall look of the ribbon. Adding embellishments, such as flowers or beads, can add a touch of whimsy and personality to the ribbon. And, of course, securing the ribbon is essential to prevent it from coming undone and ruining the overall look. By mastering these techniques, you'll be able to add a finishing touch that will leave a lasting impression. And, of course, it all starts with choosing the right ribbon, which we'll explore in more detail later. Note: I added more details to the introduction paragraph to make it 200 words, and I mentioned the 3 supporting paragraphs (Adjusting the Bow, Adding Embellishments, Securing the Ribbon) and transitioned to Choosing the Right Ribbon at the end.
Adjusting the Bow
around a gift box. Here is the paragraphy: Adjusting the bow is a crucial step in adding a finishing touch to your gift box. Once you have tied the ribbon around the box, take a step back and evaluate the bow. Check if it is centered, symmetrical, and evenly spaced. If necessary, gently tug on the ribbon to adjust the bow's position. You can also use a pin or a small clip to secure the bow in place, especially if you're using a particularly slippery ribbon. To add some extra flair, you can also fluff out the bow's loops to create a more voluminous and textured look. This can be achieved by gently pulling on the loops and adjusting their shape. Additionally, you can also experiment with different bow styles, such as a more relaxed, asymmetrical look or a tighter, more compact bow. The key is to find a balance between the bow's size and the gift box's dimensions, as well as the overall aesthetic you're aiming for. By taking the time to adjust the bow, you can elevate your gift-giving game and create a truly show-stopping presentation.
Adding Embellishments
around a gift box. Here is the paragraphy: Adding embellishments is a great way to give your gift box a personal touch and make it stand out. There are many different types of embellishments you can use, such as bows, flowers, and decorative pins. To add an embellishment, start by selecting the type of embellishment you want to use and the location where you want to place it. For example, you could add a bow to the top of the gift box or a decorative pin to the side. Once you have selected the embellishment and the location, use a hot glue gun or another strong adhesive to attach the embellishment to the gift box. Make sure to apply the glue carefully and evenly to avoid creating a mess. You can also use a needle and thread to sew the embellishment onto the gift box for a more rustic look. Another option is to use a strong adhesive tape, such as double-sided tape or foam tape, to attach the embellishment to the gift box. This is a great option if you want to be able to remove the embellishment later. Regardless of the method you choose, make sure to attach the embellishment securely so that it doesn't come loose over time. With a little creativity and experimentation, you can add embellishments to your gift box that will make it truly special and unique.
Securing the Ribbon
around a gift box. Here is the paragraphy: Securing the ribbon is a crucial step in tying a ribbon around a gift box. To ensure that the ribbon stays in place, you can use a few different methods. One way is to tie a small knot at the base of the bow, making sure it is snug against the box. This will prevent the ribbon from coming undone and will keep the bow secure. Another method is to use a small dot of hot glue to attach the ribbon to the box. This will provide a strong hold and will keep the ribbon from shifting or coming loose. You can also use a small pin or a corsage pin to secure the ribbon to the box. This is a good option if you want to be able to easily remove the ribbon without damaging the box. Regardless of the method you choose, make sure the ribbon is securely attached to the box to prevent it from coming undone and to keep the gift looking its best.