How To Remove Sink Stopper
Understanding the Basics of Sink Stopper
Types of Sink Stoppers
Before one can learn how to remove a sink stopper, it's crucial to understand the types of sink stoppers that you can find in the market. The sink stopper varieties usually differ in the way they are operated. Some common types include lift-and-turn, push-and-pull, toe-touch, flip-it, and pop-up stoppers. Choosing the right type is essential, as it can influence the ease of removal and installation processes. The lift-and-turn type, for instance, uses a knob to lift and twist the stopper for water drainage, making it one of the simplest types to remove or install. Each type of sink stopper offers unique advantages and suit individual preferences and sink specifications.
Functioning of a Sink Stopper
A sink stopper functions as a plug that fits into the drain hole of a sink. It's designed to prevent water from draining out of the sink when pulled or pushed into place. This function can be achieved manually or even automatically in some advanced sink stoppers. Understanding the functioning of a sink stopper is crucial when trying to remove it, as the removal process will often involve deactivating its water-blocking feature before removal can be successful.
Main Parts of a Sink Stopper
A typical sink stopper features several parts that work together to ensure the stopper is both secure and functional. Identifying these parts is vital during the removal process, to prevent any damage to the stopper piece or the sink drain. The main components include the stopper itself - usually made of metal or plastic material, the pull rod - which acts as a control for the stopper, and the pivot rod - a piece that connects the pull rod and the base of the stopper, allowing it to move up and down. With an understanding of these parts and how they function, one can easily remove a sink stopper without any professional help.
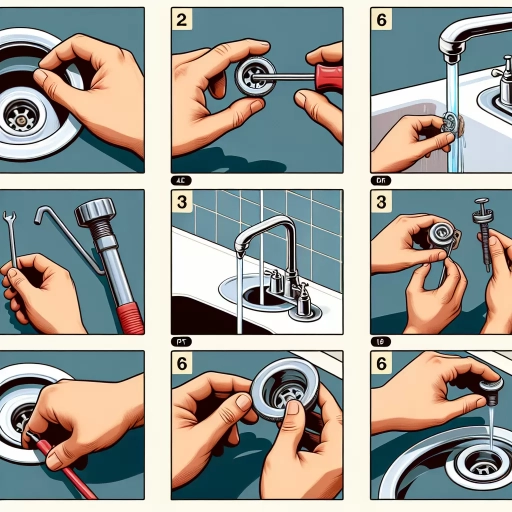
Step-by-Step Guide to Removing a Sink Stopper
Preparing for the Removal Process
Before removing a sink stopper, it's necessary to prepare adequately for the task. This preparation involves gathering all the necessary tools for the job, which may include pliers, a torch, and a cleaning rag. Remember to put on appropriate protective attire, preferably rubber gloves, to protect your hands, as sink stopper surfaces can sometimes be slippery. Once you've gathered your tools and prepared your workspace, you can proceed to disable the stopper's functionality, usually by disconnecting the pull rod from the pivot rod.
Executing the Removal Process
Once you've disconnected the rods, you can then remove the sink stopper. The stopper should easily lift out of the drain at this point. If not, a gentle twist and pull might be necessary to dislodge it. The removal process, while seemingly simple, requires care to avoid damaging the sink or the stopper components. Therefore, it's necessary to be gentle and patient during removal, particularly if the stopper appears to be stuck or is resistant to being lifted out.
Dealing with Challenges During Removal
Difficulties during sink stopper removal can arise due to various reasons such as rusting, corrosion, or even debris stuck in the stopper. In such cases, it may be necessary to apply lubricant around the sink stopper or even use pliers for added leverage during removal. However, remember to make these additions or modifications cautiously to prevent damaging the components of the sink stopper. In severe cases, where removal appears impossible, seeking professional help is advisable rather than risking potential damage.
Post-Removal Tips and Cautions
Cleaning After Removal
Once the sink stopper has been successfully removed, it's crucial to clean the stopper and the sink drain to ensure smooth water flow post-installation. This cleaning can be done using ordinary household products like vinegar and baking soda. These cleaning agents can effectively remove any debris, hair, or soap scum build-up, thus ensuring optimal functioning of the sink after reinserting the stopper.
Reinstalling your Sink Stopper
After cleaning, the sink stopper should be reinstalled with care. Reinstalling the stopper involves reversing the removal process: inserting the stopper into the drain, reattaching the pivot and pull rod, and then checking the functionality of the stopper. It's essential to ensure that the stopper is working correctly, without leaks, and that it's easy to operate.
When to Seek Professional Help
If you've followed the removal steps correctly but still find issues with your sink stopper, or you are unable to successfully reinstall it, seeking professional help might be necessary. Plumbers have the tools and expertise necessary to deal with complicated stopper issues and can efficiently determine if there are deeper plumbing issues. It's better to seek expert assistance rather than risk potential damage to your drainage system.