How To Change The Margins In Google Docs
Here is the introduction paragraph: When working with Google Docs, one of the essential formatting options to master is adjusting the margins. Margins play a crucial role in determining the overall layout and readability of your document. However, many users are unsure about how to change the margins in Google Docs, which can lead to a poorly formatted document. To help you achieve a professional-looking document, this article will guide you through the process of adjusting margins in Google Docs. We will start by understanding the default margins in Google Docs, which will provide a foundation for making informed adjustments. From there, we will explore how to adjust the margins to suit your specific needs. Finally, we will discuss best practices for setting margins in Google Docs to ensure your document looks its best. By the end of this article, you will be equipped with the knowledge to create a well-formatted document that effectively communicates your message. Let's begin by understanding the default margins in Google Docs.
Understanding the Default Margins in Google Docs
When working with Google Docs, understanding the default margins is crucial for creating a well-formatted and visually appealing document. The default margins in Google Docs can significantly impact the layout of your document, and adjusting them can make a big difference in the overall appearance of your work. But what exactly are the default margin settings in Google Docs, and how do they affect the layout of your document? Moreover, why is it important to adjust the margins in Google Docs? In this article, we will delve into these questions and provide you with a comprehensive understanding of the default margins in Google Docs. So, let's start by exploring what the default margin settings are in Google Docs.
What are the default margin settings in Google Docs?
The default margin settings in Google Docs are 1 inch (2.54 cm) on all sides, including top, bottom, left, and right margins. These default settings are applied to all new documents created in Google Docs, and they can be adjusted as needed to suit the specific requirements of your document. The default margin settings are designed to provide a standard and professional layout for your documents, with sufficient space between the text and the edges of the page to make your content easy to read and understand. If you need to change the margin settings, you can do so by going to the "File" menu, selecting "Page setup," and adjusting the margin values as desired.
How do the default margins affect the layout of your document?
The default margins in Google Docs play a significant role in determining the layout of your document. When you create a new document, Google Docs automatically sets the margins to 1 inch on all sides (top, bottom, left, and right). These default margins affect the layout of your document in several ways. Firstly, they define the amount of space between the text and the edge of the page, which can impact the overall appearance and readability of your document. If the margins are too narrow, the text may appear cramped and difficult to read, while wide margins can make the text appear sparse and unbalanced. Additionally, the default margins can also affect the placement of headers, footers, and other page elements, such as page numbers and borders. For example, if you want to add a header or footer to your document, the default margins will determine how much space is available for these elements. Furthermore, the default margins can also impact the layout of tables, images, and other objects that you insert into your document. If the margins are too narrow, these objects may be cut off or overlap with the text, while wide margins can provide ample space for these elements. Overall, understanding how the default margins affect the layout of your document is crucial in creating a well-designed and visually appealing document in Google Docs.
Why is it important to adjust the margins in Google Docs?
Adjusting the margins in Google Docs is crucial for several reasons. Firstly, it allows you to control the amount of white space around your text, which can significantly impact the overall appearance and readability of your document. Properly set margins can make your content look more organized, balanced, and visually appealing. Moreover, adjusting the margins enables you to fit more text on a page, which is particularly useful when working with lengthy documents or trying to meet specific page count requirements. Additionally, adjusting the margins is essential when preparing documents for printing, as it ensures that your content is properly aligned and doesn't get cut off during the printing process. By adjusting the margins, you can also ensure that your document meets specific formatting guidelines, such as those required for academic papers, business reports, or other professional documents. Overall, adjusting the margins in Google Docs is a simple yet effective way to enhance the overall quality and professionalism of your documents.
Adjusting the Margins in Google Docs
Adjusting the margins in Google Docs is a crucial step in creating a well-formatted document. Margins play a significant role in determining the overall appearance of a document, and adjusting them can greatly impact the readability and visual appeal of the content. In this article, we will explore the different margin options available in Google Docs, including how to set custom margins to suit specific needs. We will also discuss how to access the margin settings in Google Docs, which is the first step in making any margin adjustments. By understanding how to access and adjust the margins in Google Docs, users can take control of their document's layout and create a professional-looking final product. To get started, let's first take a look at how to access the margin settings in Google Docs.
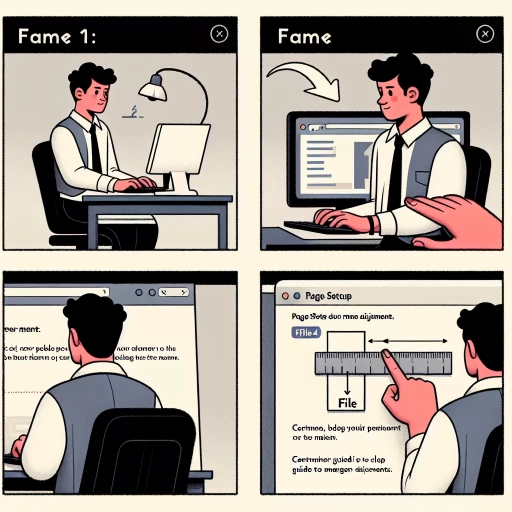
How to access the margin settings in Google Docs?
To access the margin settings in Google Docs, follow these simple steps. First, open your Google Docs document and click on the "File" menu located at the top left corner of the screen. From the drop-down menu, select "Page setup." This will open the "Page setup" dialog box, where you can adjust various settings, including the margins. Alternatively, you can also use the keyboard shortcut Ctrl+Shift+P (Windows) or Command+Shift+P (Mac) to quickly access the "Page setup" dialog box. Once the dialog box is open, click on the "Margins" tab, where you can adjust the top, bottom, left, and right margins to your desired settings. You can enter the margin values in inches or centimeters, and also select the unit of measurement from the drop-down menu. Additionally, you can also set the gutter margin, which is the space between the margin and the edge of the page. After making your changes, click "OK" to apply the new margin settings to your document.
What are the different margin options available in Google Docs?
In Google Docs, you have several margin options to choose from, allowing you to customize the layout of your document. The default margin settings are 1 inch on all sides (top, bottom, left, and right), but you can adjust these to suit your needs. The margin options available in Google Docs include: Normal, Narrow, Wide, and Custom. The Normal margin setting is the default, with 1 inch margins on all sides. The Narrow margin setting reduces the margins to 0.5 inches on all sides, while the Wide margin setting increases the margins to 1.5 inches on all sides. If you need more precise control over your margins, you can select the Custom margin setting, which allows you to specify the exact margin sizes for the top, bottom, left, and right sides of your document. Additionally, you can also set the gutter margin, which is the space between the margin and the edge of the page, and the header and footer margins, which control the space between the header and footer and the edge of the page. By adjusting these margin options, you can create a layout that suits your specific needs and enhances the overall appearance of your document.
How to set custom margins in Google Docs?
To set custom margins in Google Docs, start by clicking on the "File" menu and selecting "Page setup" from the drop-down list. In the Page setup dialog box, click on the "Margins" tab. Here, you can adjust the top, bottom, left, and right margins by entering the desired values in the corresponding fields. You can also use the up and down arrows to increment or decrement the margin values. Additionally, you can check the "Mirror margins" box to set the same margins for both the left and right sides of the page, or the "Different first page" box to set a different margin for the first page. Once you've made your changes, click "OK" to apply them to your document. You can also use the "Ruler" tool to adjust the margins by dragging the margin markers on the ruler. To do this, click on the "View" menu and select "Show ruler" to display the ruler at the top of the page. Then, click and drag the margin markers to the desired position. This method allows you to visually adjust the margins and see the changes in real-time. By setting custom margins in Google Docs, you can control the layout of your document and ensure that your content is properly aligned and spaced.
Best Practices for Setting Margins in Google Docs
When it comes to creating professional-looking documents in Google Docs, setting the right margins is crucial. Margins play a significant role in determining the overall appearance and readability of a document. However, many users struggle to determine the ideal margin settings for their documents. To help you achieve a polished look, it's essential to understand the best practices for setting margins in Google Docs. This includes knowing the standard margin settings for different types of documents, such as academic papers, business reports, and creative projects. Additionally, it's vital to balance margin size with font size and line spacing to ensure optimal readability. By avoiding common mistakes, such as setting margins too narrow or too wide, you can create a visually appealing document that effectively communicates your message. So, let's start by exploring the standard margin settings for different types of documents.
What are the standard margin settings for different types of documents?
The standard margin settings for different types of documents vary depending on the purpose and intended use of the document. For academic papers, such as essays and research papers, the standard margin settings are typically 1 inch on all sides (top, bottom, left, and right). This allows for ample space for comments and annotations from instructors or peers. For business documents, such as reports and proposals, the standard margin settings are usually 0.5-1 inch on all sides. This provides a clean and professional appearance while still allowing for some white space. For creative documents, such as brochures and flyers, the standard margin settings can vary depending on the design, but a common range is 0.25-0.5 inch on all sides. This allows for a more flexible and visually appealing layout. For formal documents, such as resumes and cover letters, the standard margin settings are typically 0.5-1 inch on all sides, with a slightly larger margin at the top to accommodate a header or letterhead. For web documents, such as blog posts and articles, the standard margin settings are often determined by the website's design and layout, but a common range is 0.25-0.5 inch on all sides. Ultimately, the standard margin settings will depend on the specific needs and goals of the document, as well as the preferences of the author or designer.
How to balance margin size with font size and line spacing?
When it comes to balancing margin size with font size and line spacing in Google Docs, there are a few key considerations to keep in mind. First, it's essential to choose a font size that is clear and readable, but not so large that it overwhelms the page. A good rule of thumb is to use a font size between 10 and 12 points for body text. Next, consider the line spacing, which should be set to at least 1.5 times the font size to ensure that the text is easy to read. For example, if you're using a 12-point font, set the line spacing to 18 points. Now, when it comes to margin size, a good starting point is to set the top and bottom margins to 1 inch, and the left and right margins to 0.5 inches. However, you may need to adjust these settings depending on the specific needs of your document. For instance, if you're creating a document with a lot of images or tables, you may want to increase the margin size to ensure that the content has enough breathing room. On the other hand, if you're working with a lot of text, you may be able to get away with smaller margins. Ultimately, the key is to find a balance between margin size, font size, and line spacing that creates a clear and visually appealing document. By experimenting with different settings and paying attention to how they impact the overall look and feel of your document, you can create a well-designed and effective document that communicates your message clearly.
What are the common mistakes to avoid when setting margins in Google Docs?
Here is the paragraphy: When setting margins in Google Docs, there are several common mistakes to avoid. One of the most common mistakes is not setting the margins correctly for the intended print format. For example, if you're printing a document on A4 paper, you'll want to set the margins to accommodate the paper size. Another mistake is not leaving enough space between the text and the edge of the page, which can make the document look cluttered and unprofessional. Additionally, not setting the margins consistently throughout the document can lead to formatting issues and make the document look sloppy. It's also important to avoid setting the margins too small, as this can cause the text to be cut off when printing. Furthermore, not using the "Mirror margins" feature when printing a document that will be bound, such as a booklet or a report, can result in uneven margins and a poor layout. Finally, not checking the margins before printing can lead to costly mistakes and reprints. By avoiding these common mistakes, you can ensure that your Google Doc looks professional and is formatted correctly for printing.