How To Draw Hand
Here is the introduction paragraph: Drawing hands can be a daunting task, even for experienced artists. The intricate details, complex anatomy, and expressive nature of hands make them a challenging subject to master. However, with practice and patience, anyone can learn to draw hands that are both realistic and captivating. To get started, it's essential to understand the basics of hand anatomy, including the structure of the bones, muscles, and tendons. From there, you can build on your knowledge by learning basic drawing techniques for hands, such as capturing the overall shape and proportions. Finally, you can add details and refine your hand drawing to bring it to life. In this article, we'll take a closer look at each of these steps, starting with the foundation of hand drawing: understanding hand anatomy.
Understanding Hand Anatomy
Here is the introduction paragraph: The human hand is a complex and intricate structure that plays a vital role in our daily lives. From grasping and manipulating objects to communicating through gestures and expressions, our hands are essential for interacting with the world around us. However, many of us take our hands for granted, rarely stopping to think about the intricate mechanisms that allow them to function. To truly appreciate the hand's remarkable abilities, it's essential to understand its anatomy. This involves familiarizing yourself with the bones and joints that provide the hand's framework, learning about the different types of hand shapes and proportions that can affect its function, and studying the muscles and tendons that control its movement. By gaining a deeper understanding of these components, you'll be well on your way to Understanding Hand Anatomy.
1. Familiarize yourself with the bones and joints of the hand
from different angles. To accurately draw hands from various angles, it's essential to familiarize yourself with the bones and joints that make up this intricate structure. The human hand is composed of 27 bones, which are divided into three main groups: the carpal bones (wrist), metacarpal bones (hand), and phalanges (fingers). The carpal bones are further divided into two rows: proximal and distal. The proximal row consists of the scaphoid, lunate, triquetrum, and pisiform bones, while the distal row comprises the trapezium, trapezoid, capitate, and hamate bones. The metacarpal bones connect the wrist to the fingers, and each finger has three phalanges, except for the thumb, which only has two. Understanding the relationships between these bones and how they articulate with each other is crucial for drawing hands in different positions and angles. For instance, knowing how the metacarpal bones rotate and flex can help you accurately depict the hand in a variety of gestures, from a relaxed pose to a tightly clenched fist. By studying the bones and joints of the hand, you'll be able to create more realistic and dynamic drawings that capture the subtleties of human anatomy.
2. Learn about the different types of hand shapes and proportions
from different angles. When it comes to drawing hands, understanding the different types of hand shapes and proportions is crucial for creating realistic and varied depictions. There are generally considered to be four main types of hand shapes: square, rectangular, triangular, and oval. Square hands are characterized by a broad palm and short fingers, often with a prominent knuckle joint. Rectangular hands have a longer palm and fingers, with a more even distribution of width and length. Triangular hands are narrow and tapered, with a pointed tip and a more delicate appearance. Oval hands are curved and smooth, with a rounded tip and a balanced proportion of width and length. In addition to these general shapes, hands can also be classified by their proportions, including the length and width of the fingers, the size of the palm, and the shape of the wrist. For example, some hands may have long, slender fingers, while others may have shorter, more stubby fingers. Understanding these variations in hand shape and proportion can help artists create more nuanced and realistic drawings of hands, and can also be used to convey character and personality traits. By studying the different types of hand shapes and proportions, artists can develop a deeper understanding of the anatomy of the hand and improve their ability to draw hands from different angles and perspectives.
3. Study the muscles and tendons that control hand movement
. The intricate dance of hand movement is made possible by a complex interplay of muscles and tendons. To truly understand hand anatomy, it's essential to study the muscles and tendons that control hand movement. The hand is comprised of 29 bones, 123 ligaments, 34 muscles, and 48 nerves, all working in harmony to facilitate a wide range of motions. The muscles of the hand can be broadly categorized into two groups: intrinsic and extrinsic. Intrinsic muscles, such as the thenar and hypothenar muscles, are located within the hand itself and control fine motor movements like finger flexion and extension. Extrinsic muscles, on the other hand, are located in the forearm and control gross motor movements like wrist flexion and extension. Tendons, which are fibrous cords that connect muscles to bones, play a crucial role in transmitting the forces generated by muscle contractions to the bones, allowing for precise and coordinated movement. By studying the muscles and tendons that control hand movement, artists can gain a deeper understanding of the hand's structure and function, enabling them to create more accurate and nuanced drawings. For example, understanding the way the flexor digitorum profundus muscle controls finger flexion can help artists capture the subtle curves and contours of the hand in various poses. By mastering the intricacies of hand anatomy, artists can unlock the secrets of drawing the hand with confidence and precision.
Basic Drawing Techniques for Hands
Here is the introduction paragraph: Drawing the human hand can be a daunting task, but with practice and patience, anyone can master the basic techniques required to create realistic and detailed hand drawings. To get started, it's essential to understand the fundamental building blocks of the hand, including basic shapes and forms that can be used to construct its overall structure. Additionally, practicing different line weights and textures can help capture the intricate details of the hand, from the delicate wrinkles on the palm to the rugged contours of the fingers. By combining these techniques with gesture drawing, which involves quickly sketching the overall pose and movement of the hand, artists can create dynamic and expressive hand drawings that seem to come alive on the page. By mastering these basic drawing techniques, artists can gain a deeper understanding of hand anatomy and unlock the secrets to creating realistic and captivating hand drawings.
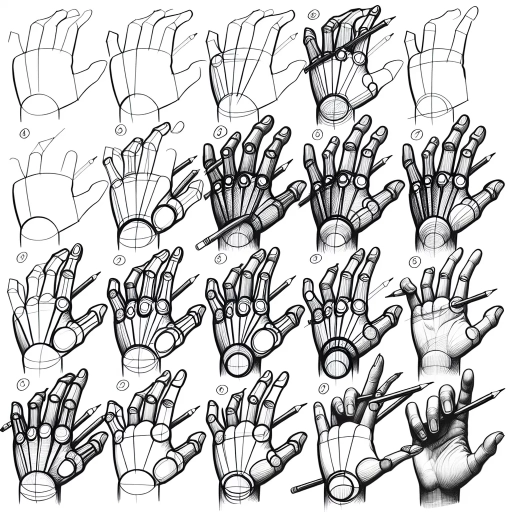
1. Mastering basic shapes and forms to construct the hand
. Mastering basic shapes and forms is the foundation of drawing realistic hands. To construct the hand, start by breaking it down into its fundamental components. The palm can be represented by a slightly flattened oval, while the fingers are essentially cylindrical in shape. The thumb, however, is more complex, consisting of two interconnected ovals that form its unique shape. By combining these basic forms, you can create a simplified representation of the hand. Pay attention to the proportions and relationships between these shapes, as they will serve as the building blocks for more detailed and nuanced drawings. For example, the fingers should be roughly the same length, with the middle finger being the longest, and the thumb should be positioned in opposition to the other fingers. By mastering these basic shapes and forms, you'll be able to create a solid foundation for your hand drawings and set yourself up for success in capturing the subtleties and complexities of the human hand.
2. Practicing different line weights and textures to capture hand details
. When it comes to drawing hands, one of the most important aspects to capture is the varying line weights and textures that give the hand its unique character. Practicing different line weights and textures can help you achieve a more realistic and detailed representation of the hand. Start by experimenting with different tools, such as pencils, pens, and markers, to create a range of line weights. Thicker lines can be used to define the overall shape of the hand, while thinner lines can be used to suggest the delicate details of the fingers and palm. You can also use hatching and cross-hatching techniques to create texture and depth on the hand. For example, you can use short, curved lines to suggest the softness of the palm, while longer, more angular lines can be used to define the knuckles and joints. Additionally, you can use stippling or pointillism to create a more detailed and realistic texture on the hand. By practicing different line weights and textures, you can add depth, dimension, and character to your drawings of hands, making them more engaging and lifelike. Furthermore, paying attention to the varying textures and line weights of the hand can also help you capture the subtleties of hand gestures and emotions, allowing you to convey a sense of movement and expression in your drawings. With practice and patience, you can master the art of capturing the intricate details of the hand, and create drawings that are both realistic and expressive.
3. Using gesture drawing to capture the overall pose and movement of the hand
. Here is the paragraphy:
Gesture drawing is a technique used to capture the overall pose and movement of the hand. This method involves quickly sketching the hand's gesture, focusing on its overall shape, movement, and energy. To practice gesture drawing, start by observing the hand's pose and movement. Look for the overall shape of the hand, including the fingers, wrist, and forearm. Notice how the hand is positioned in space and how it relates to the surrounding environment. Next, quickly sketch the hand's gesture using simple lines and shapes. Focus on capturing the movement and energy of the hand, rather than trying to draw every detail. Use a range of lines, from smooth and flowing to quick and gestural, to convey the hand's movement and energy. As you practice gesture drawing, pay attention to the hand's proportions, making sure to capture the relationships between the fingers, wrist, and forearm. You can also practice gesture drawing with different hand poses and movements, such as grasping, pointing, or waving. By practicing gesture drawing, you can develop your ability to capture the overall pose and movement of the hand, which is essential for creating realistic and dynamic drawings. Additionally, gesture drawing can help you loosen up your drawing style and capture the essence of the hand's movement and energy. By combining gesture drawing with other techniques, such as contour drawing and shading, you can create detailed and realistic drawings of the hand.
Adding Details and Refining Your Hand Drawing
Here is the introduction paragraph: When it comes to hand drawing, adding details and refining your technique can make all the difference in creating a realistic and engaging piece of art. A well-drawn hand can convey emotion, tell a story, and add depth to a composition. To take your hand drawing to the next level, it's essential to focus on the subtleties that make a hand look truly lifelike. This includes adding fingernails, wrinkles, and other subtle details that enhance realism, refining the shape and proportions of the hand to achieve accuracy, and experimenting with different mediums and techniques to add depth and dimension. By mastering these techniques, you'll be able to create hand drawings that are not only visually stunning but also anatomically correct. Understanding the intricacies of hand anatomy is crucial to achieving this level of realism, and by combining technical skill with artistic expression, you'll be well on your way to creating truly remarkable hand drawings.
1. Adding fingernails, wrinkles, and other subtle details to enhance realism
. When it comes to adding the finishing touches to your hand drawing, it's all about the subtle details that can make or break the realism of your artwork. One of the most effective ways to enhance the realism of your hand drawing is to add fingernails, wrinkles, and other subtle details that give your hand a sense of depth and dimension. Fingernails, for example, can be added using a small brush or a fine-tip pen, and can be shaped to match the natural curve of the finger. Wrinkles, on the other hand, can be added using a series of gentle, curved lines that follow the natural contours of the hand. These subtle details can help to create a sense of texture and depth, and can make your hand drawing look more lifelike and realistic. Additionally, you can also add other details such as veins, tendons, and creases to further enhance the realism of your hand drawing. By paying attention to these subtle details, you can take your hand drawing to the next level and create a truly realistic and engaging piece of art.
2. Refining the shape and proportions of the hand to achieve accuracy
. Refining the shape and proportions of the hand is a crucial step in achieving accuracy in your hand drawing. To start, take a closer look at the overall shape of the hand, paying attention to the proportions of the fingers, palm, and wrist. The fingers should be roughly the same length, with the middle finger being the longest and the pinky finger being the shortest. The palm should be slightly curved, with the wrist being slightly narrower than the palm. Next, focus on the individual fingers, making sure to capture their unique shapes and proportions. The fingers should be tapered, with the tips being narrower than the bases. The fingernails should be small and oval-shaped, with a slight curve to follow the natural shape of the finger. As you refine the shape and proportions of the hand, pay attention to the subtle curves and contours that give the hand its natural, organic shape. Use gentle, flowing lines to capture the softness and flexibility of the hand, and avoid using harsh or angular lines that can make the hand look stiff or unnatural. By taking the time to carefully refine the shape and proportions of the hand, you can create a drawing that is not only accurate, but also visually appealing and engaging.
3. Experimenting with different mediums and techniques to add depth and dimension
. Experimenting with different mediums and techniques is a great way to add depth and dimension to your hand drawings. By incorporating various materials and methods, you can create a more dynamic and visually appealing piece of art. For example, you can use a range of pencils, from graphite to colored, to achieve different shades and textures. Adding charcoal or pastels can also introduce new dimensions and add a sense of expressiveness to your drawing. Additionally, experimenting with different paper types, such as rough or smooth, can affect the overall look and feel of your artwork. You can also try combining traditional drawing techniques with digital tools, such as layering or blending, to create a unique and captivating piece. By pushing the boundaries of traditional drawing and exploring new mediums and techniques, you can add a level of sophistication and complexity to your hand drawings, making them truly stand out. Furthermore, experimenting with different mediums and techniques can also help you develop your own personal style and voice as an artist, allowing you to express yourself in a more authentic and meaningful way. As you continue to explore and experiment, you may find that your hand drawings become more nuanced, detailed, and emotionally resonant, ultimately leading to a more satisfying and fulfilling creative experience.