How To Remove Skin From Salmon
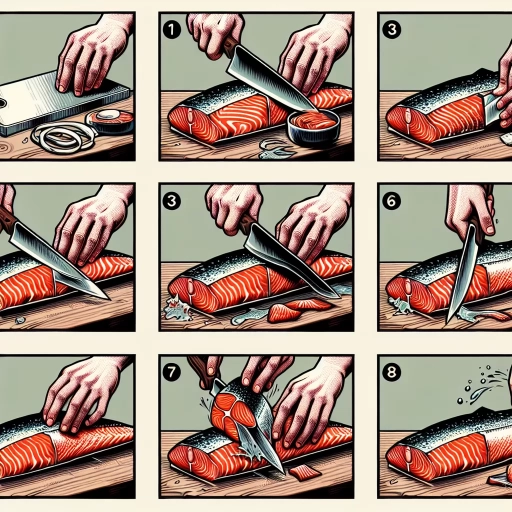
Here is the introduction paragraph: Removing the skin from salmon can be a daunting task, especially for those who are new to cooking this popular fish. However, with the right techniques and a little practice, it can be done easily and efficiently. In this article, we will explore the steps involved in removing the skin from salmon, from preparation to execution. To start, preparation is key to ensuring a smooth and successful skin removal process. By understanding the importance of preparation, you'll be able to remove the skin with ease, and then explore various tips and variations to enhance your cooking experience. In the following sections, we'll dive into the specifics of preparation, the actual skin removal process, and provide some valuable tips and variations to help you become a pro at removing salmon skin. Let's start with the foundation of it all: preparation is key.
Preparation is Key
Preparation is key when it comes to cooking salmon. To achieve a delicious and moist dish, it's essential to start with the right tools, techniques, and ingredients. Choosing the right tools, such as a sharp knife and a cutting board, is crucial for preparing the salmon. Additionally, freezing the salmon to the right temperature is vital to prevent bacterial growth and ensure food safety. Furthermore, pat drying the salmon is necessary to remove excess moisture and promote even cooking. By following these steps, home cooks can ensure a successful and flavorful salmon dish. With the right tools in hand, the preparation process can begin, starting with the selection of the perfect knife and cutting board.
Choosing the Right Tools
Choosing the right tools is essential for removing skin from salmon efficiently and effectively. A dull knife or the wrong utensils can lead to a frustrating and messy experience. To start, you'll need a sharp fillet knife with a flexible blade, preferably between 6-12 inches long. This type of knife is designed specifically for filleting fish and will make it easier to navigate the delicate flesh and skin. Additionally, a pair of kitchen shears or scissors can come in handy for trimming any bloodlines or dark meat. A cutting board with a non-slip surface is also crucial for preventing the fish from slipping around while you work. Some people also swear by using a fish skin remover tool, which is a small, handheld device specifically designed for removing skin from fish. This tool can be especially helpful if you're new to filleting fish or struggle with removing the skin in one piece. By investing in the right tools, you'll be able to remove the skin from your salmon with ease and confidence, making the entire process much more enjoyable.
Freezing the Salmon
Freezing the salmon is a crucial step in removing the skin, as it helps to loosen the bond between the skin and the flesh. When salmon is frozen, the water molecules inside the fish form ice crystals, which expand and contract, causing the skin to separate from the flesh. This process makes it easier to remove the skin in one piece, without tearing the flesh. To freeze the salmon, place it in a freezer-safe bag or wrap it tightly in plastic wrap, making sure to remove as much air as possible to prevent freezer burn. Then, place the salmon in the freezer and let it freeze for at least 30 minutes to an hour. Once frozen, remove the salmon from the freezer and let it sit at room temperature for about 10-15 minutes to allow it to thaw slightly. This will make it easier to handle and remove the skin. It's essential to note that freezing the salmon will not affect its quality or flavor, as long as it is stored properly and thawed correctly. In fact, freezing can help to preserve the fish's texture and flavor, making it a great way to store salmon for future use. By freezing the salmon, you'll be able to remove the skin easily and efficiently, making the process of preparing your salmon fillets a breeze.
Pat Dry the Salmon
Pat dry the salmon with a paper towel to remove excess moisture. This step is crucial in helping the skin come off easily and preventing it from tearing. Gently pat the salmon fillet, making sure not to press too hard, which can cause the skin to tear. You can also use a clean kitchen towel to pat dry the salmon, but paper towels are more effective at absorbing moisture. By removing excess moisture, you create a better surface for the skin to release from the flesh, making the skin removal process smoother and more efficient. Additionally, pat drying the salmon helps to reduce the risk of the skin sticking to the cutting board or your knife, making the entire process less messy and more manageable.
Removing the Skin with Ease
Removing the skin from a fish can be a daunting task, but with the right techniques, it can be done with ease. One of the most effective methods is to start at the tail end of the fish, where the skin is thinnest. This allows for a clean and easy removal of the skin, without tearing or ripping the flesh. Another approach is to use a gentle sawing motion, working from the tail end towards the head. This helps to loosen the skin and prevent it from tearing. Alternatively, peeling the skin backwards, from the head towards the tail, can also be an effective method. By using one of these techniques, you can remove the skin from your fish with ease and prepare it for cooking. Starting at the tail end is often the most effective approach, and it's where we'll begin.
Starting at the Tail End
Starting at the tail end of the salmon fillet, gently grasp the skin with your fingers or a pair of tweezers, making sure to get a good grip. Hold the skin firmly in place with one hand, while using your other hand to slowly and carefully peel the skin away from the flesh. As you work your way up the fillet, you may encounter some resistance, but be patient and gentle, as you don't want to tear the delicate flesh. If the skin does start to tear, don't worry, simply adjust your grip and continue peeling. The key is to work slowly and steadily, using a gentle prying motion to loosen the skin from the flesh. By starting at the tail end, you'll be able to get a good grip on the skin and work your way up the fillet with ease, removing the skin in one smooth motion.
Using a Gentle Sawing Motion
When removing the skin from salmon, using a gentle sawing motion is crucial to avoid tearing the flesh. To do this, hold the skin firmly in one hand and the fillet in the other, with the skin side facing down. Place the blade of your knife or fillet knife at a 45-degree angle, with the sharp edge facing the skin. Gently start sawing back and forth, applying gentle pressure, and working your way through the skin. Be careful not to apply too much pressure, as this can cause the skin to tear and the flesh to become damaged. Instead, focus on using a smooth, gentle motion to separate the skin from the flesh. As you continue to saw, the skin should start to release from the flesh, allowing you to remove it in one piece. By using a gentle sawing motion, you can ensure that the skin is removed cleanly and easily, without damaging the delicate flesh of the salmon.
Peeling the Skin Backwards
Peeling the skin back from the salmon fillet can be a delicate process, but with the right technique, it can be done with ease. To start, hold the fillet firmly in place with one hand, and with the other hand, gently grasp the skin at the tail end of the fillet. Slowly begin to peel the skin back, working your way up the fillet towards the head. It's essential to be gentle, as the skin can tear easily, especially if it's not removed correctly. As you peel the skin back, you may encounter some resistance, but don't force it, instead, use a gentle prying motion to coax the skin away from the flesh. If the skin does tear, don't worry, it's not the end of the world, simply continue to peel the skin back, working around the torn area. Once you've removed the skin, you can discard it or save it for another use, such as making salmon skin crisps. With the skin removed, your salmon fillet is now ready to be cooked, and you can proceed with your desired recipe.
Tips and Variations
Here is the introduction paragraph: When it comes to cooking salmon, there are several tips and variations that can elevate the dish from ordinary to extraordinary. One of the most important aspects of cooking salmon is achieving a crispy skin, which can be done using a blowtorch. Additionally, removing the bloodline can greatly improve the flavor of the fish, while leaving the skin on can add texture and flavor when grilling or pan-sealing. By incorporating these techniques into your cooking routine, you can take your salmon dishes to the next level. In this article, we will explore these tips and variations in more detail, starting with the art of using a blowtorch for crispy skin.
Using a Blowtorch for Crispy Skin
Using a blowtorch for crispy skin is a game-changer for those who want to achieve a perfectly cooked salmon with a satisfying crunch. This technique is especially useful when cooking salmon fillets with the skin on, as it allows for a crispy exterior while keeping the inside tender and juicy. To use a blowtorch for crispy skin, start by patting the skin dry with a paper towel to remove excess moisture. This step is crucial, as it helps the skin brown more evenly and prevents it from steaming instead of crisping. Next, season the skin with your desired spices and place the salmon under the broiler for a few minutes to get the skin started. Then, remove the salmon from the oven and use a blowtorch to carefully caramelize the skin, moving the flame slowly back and forth to achieve an even crispiness. Be careful not to burn the skin, as this can happen quickly. The result is a beautifully cooked salmon with a crispy, golden-brown skin that adds texture and flavor to the dish. This technique can be used for other types of fish as well, and is especially useful for those who want to add a professional touch to their cooking. By using a blowtorch for crispy skin, home cooks can achieve restaurant-quality results in the comfort of their own kitchen.
Removing the Bloodline for Better Flavor
Removing the bloodline from salmon can significantly enhance its flavor and texture. The bloodline, a darker meat that runs along the spine, contains a higher concentration of myoglobin, a protein that stores oxygen and gives the meat its characteristic red color. While some people may not mind the slightly stronger flavor and softer texture of the bloodline, others may find it unappealing. By removing the bloodline, you can enjoy a milder flavor and a firmer texture, making it a great option for those who prefer a more delicate taste. To remove the bloodline, simply cut along both sides of the spine, being careful not to cut too deeply and damage the surrounding meat. Then, use a spoon or your fingers to gently pry the bloodline away from the bone and discard it. This simple step can make a big difference in the overall flavor and texture of your salmon, and is definitely worth the extra effort.
Leaving the Skin On for Grilling or Pan-Sealing
When it comes to grilling or pan-sealing salmon, leaving the skin on can be a game-changer. Not only does it provide a crispy, caramelized texture that's hard to resist, but it also helps to retain moisture and flavor within the fish. The skin acts as a natural barrier, protecting the delicate flesh from the high heat and preventing it from drying out. This is especially important when cooking salmon, as it can quickly become overcooked and tough. By leaving the skin on, you can achieve a perfectly cooked piece of fish with a tender, flaky interior and a crunchy, golden-brown exterior. Additionally, the skin can be easily removed after cooking, leaving you with a beautiful, skinless piece of salmon that's ready to be served. So, the next time you're grilling or pan-sealing salmon, consider leaving the skin on – your taste buds will thank you!